admin1
Mint Chocolate Chip Cheesecake Dessert Cups: A Very Long and Detailed Recipe
Introduction
Mint Chocolate Chip Cheesecake Dessert Cups are a beautiful, creamy, and indulgent dessert inspired by the delicious combination of refreshing mint, rich dark chocolate, and smooth cheesecake mousse. These layered dessert cups feature a crunchy chocolate cookie base, a fluffy mint chocolate chip cheesecake filling, a delicate peppermint drizzle, and a generous topping of chocolate curls and mint-flavored chips.
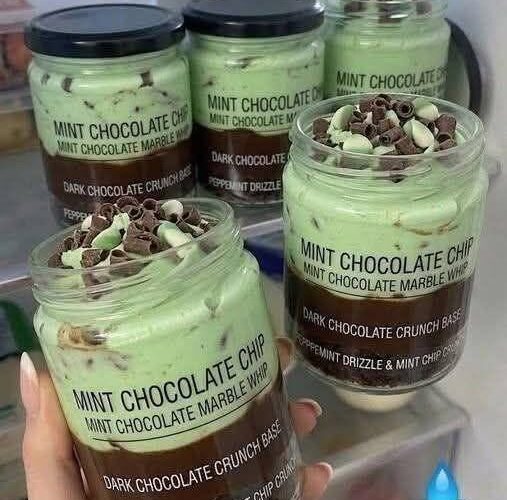
Inspired by the dessert jars shown in the picture, this recipe recreates the same attractive appearance with distinct layers of dark chocolate crunch and pale mint-green cheesecake mousse. Each spoonful offers a wonderful combination of textures: a slightly crunchy chocolate base, a soft and airy cheesecake filling, tiny chocolate pieces throughout, and a rich chocolate topping that melts beautifully in the mouth.
The best part about this dessert is that it requires no oven. The cheesecake mousse is prepared without baking, making it an excellent choice for warm days, celebrations, family gatherings, dinner parties, birthdays, and special occasions. You can prepare the cups ahead of time and store them in the refrigerator until you are ready to serve them.
The refreshing flavor of mint balances the richness of the chocolate and cream cheese, while the cookie crumbs provide a satisfying contrast to the silky filling. The result is a dessert that looks elegant enough for a bakery display but is simple enough to prepare in your own kitchen.
This recipe includes detailed instructions for creating the chocolate crunch base, preparing the mint chocolate chip cheesecake mousse, making a chocolate-peppermint drizzle, assembling the layers, decorating the cups, and storing the finished desserts.
Recipe Overview
Preparation time: 35–45 minutes
Chilling time: 3–4 hours, preferably overnight
Total time: Approximately 4 hours and 30 minutes
Servings: 8 medium dessert cups
Difficulty level: Easy to moderate
Cooking method: No-bake
Texture: Creamy, fluffy, smooth, and crunchy
Flavor profile: Refreshing mint, tangy cheesecake, dark chocolate, and sweet cream
Best serving temperature: Thoroughly chilled
Ingredients for the Dark Chocolate Crunch Base
The foundation of these dessert cups is a rich chocolate cookie layer. It provides structure, balances the sweetness of the mousse, and creates the dark bottom layer visible in the photograph.
Ingredients
- 250 grams chocolate sandwich cookies or chocolate biscuits
- 3 tablespoons unsalted butter, melted
- 2 tablespoons finely grated dark chocolate
- 1 tablespoon unsweetened cocoa powder
- 1 tablespoon brown sugar, optional
- A small pinch of salt
Chocolate sandwich cookies provide a convenient base because their chocolate flavor pairs beautifully with the mint filling. You can use chocolate wafer biscuits, plain chocolate cookies, or chocolate graham crackers if those are more readily available.
The melted butter binds the crumbs together, helping them form a compact layer at the bottom of each cup. Dark chocolate adds a deeper cocoa flavor, while cocoa powder intensifies the chocolate taste without introducing too much sweetness.
The brown sugar is optional because many chocolate cookies already contain enough sugar. If your biscuits are particularly sweet, you can leave it out.
How to Prepare the Chocolate Crunch Base
Begin by placing the chocolate cookies in a food processor. Pulse them until they become fine crumbs. A few slightly larger pieces are perfectly acceptable because they add texture to the finished dessert.
If you do not have a food processor, place the cookies in a sturdy food-storage bag, remove most of the air, seal the bag, and crush the cookies with a rolling pin. Continue until the crumbs are relatively uniform.
Transfer the crumbs to a medium-sized mixing bowl. Add the cocoa powder, finely grated dark chocolate, brown sugar if using, and the small pinch of salt. Stir everything together until the dry ingredients are evenly distributed.
Pour in the melted butter gradually while mixing with a fork. Continue stirring until the crumbs resemble damp sand. When you squeeze a small amount between your fingers, it should hold together briefly without feeling excessively greasy.
If the mixture appears too dry, add another teaspoon of melted butter. If it seems oily, add a small amount of additional cookie crumbs.
Divide the mixture among eight clean dessert cups or small glass jars. Add approximately two to three tablespoons to each container, depending on its size.
Use the back of a small spoon to press the crumbs gently into an even layer. You do not need to compress them extremely firmly. A lightly compacted base will remain pleasantly crumbly while still supporting the mousse.
Place the cups in the refrigerator while preparing the cheesecake filling. Chilling helps the butter firm up and gives the dessert a more defined bottom layer.
For an especially chocolatey variation, reserve one tablespoon of the crumb mixture to sprinkle between the layers during assembly.
Ingredients for the Mint Chocolate Chip Cheesecake Mousse
The mint cheesecake mousse is the star of this dessert. It should be creamy, light, smooth, and delicately flavored with peppermint. Small pieces of chocolate throughout the filling create the familiar mint chocolate chip experience.
Ingredients
- 450 grams full-fat cream cheese, softened
- 300 milliliters cold heavy whipping cream
- 100–130 grams powdered sugar, adjusted to taste
- 2 teaspoons vanilla extract
- 1–1½ teaspoons peppermint extract, adjusted to taste
- 3–5 drops green food coloring, optional
- 100 grams finely chopped dark chocolate or mini chocolate chips
- 50 grams mini semisweet chocolate chips, optional
- 2 tablespoons sour cream, optional
- A small pinch of salt
Full-fat cream cheese gives the mousse its rich cheesecake flavor and smooth consistency. Allow it to soften at room temperature before mixing. Softened cream cheese blends more easily and is less likely to produce lumps.
Heavy whipping cream creates the light, airy texture. For the best results, use cream that is suitable for whipping and chill it thoroughly before use.
Powdered sugar dissolves easily and helps the filling remain smooth. You can begin with 100 grams and add more if you prefer a sweeter dessert.
Vanilla extract rounds out the flavor and complements both the cream cheese and chocolate. Peppermint extract provides the refreshing mint flavor, but it should be added carefully because it is concentrated.
Green food coloring is optional. The filling in the photograph has a pale mint-green appearance, so a small amount is sufficient. Add the coloring gradually until you achieve the shade you like.
Finely chopped dark chocolate creates delicate chocolate flecks throughout the mousse. Mini chocolate chips are another convenient option, especially if you prefer more noticeable pieces of chocolate in each spoonful.
The sour cream is optional, but it adds a gentle tang that makes the filling taste more like traditional cheesecake.
Preparing the Cream Cheese Mixture
Remove the cream cheese from the refrigerator approximately 30–45 minutes before beginning, depending on the temperature of your kitchen. It should feel soft enough to press gently with a spoon.
Place the softened cream cheese in a large mixing bowl. Beat it with an electric hand mixer on medium speed until it becomes smooth and creamy.
Stop occasionally to scrape down the sides and bottom of the bowl. Cream cheese can cling to the edges, and incorporating it properly prevents small lumps from remaining in the filling.
Once the cream cheese is smooth, add the powdered sugar. Beat again at low speed until the sugar is incorporated, then increase the speed slightly and continue mixing until the mixture looks creamy.
Add the vanilla extract, peppermint extract, and pinch of salt. If you are using sour cream, add it at this stage as well.
Mix until everything is evenly combined.
Taste a small amount of the mixture before adding the whipped cream. The mint flavor should be refreshing rather than overpowering. If it seems too mild, add peppermint extract a few drops at a time.
Remember that peppermint extract can vary considerably in strength between brands. It is much easier to add more than to correct a filling that tastes excessively minty.
If you want a pale green filling similar to the dessert jars in the picture, add one or two drops of green food coloring and mix thoroughly. Continue adding tiny amounts until the color becomes a soft mint shade.
Avoid adding too much coloring at once. A delicate pastel green usually looks more attractive and natural than an intensely bright green.
Set the cream cheese mixture aside while preparing the whipped cream.
Whipping the Cream
Pour the cold heavy whipping cream into a separate, clean mixing bowl.
For the best results, chill the bowl and beaters for approximately 10–15 minutes before whipping. This is particularly helpful in a warm kitchen because cold equipment helps the cream whip more efficiently.
Begin beating the cream at medium speed. Once it starts to thicken and leave visible trails, increase the speed slightly.
Continue whipping until medium-stiff peaks form. When you lift the beaters, the cream should hold its shape, with the tips bending only slightly.
Be careful not to overwhip the cream. If it becomes grainy or begins separating, it may have been beaten too far.
The goal is a thick, fluffy whipped cream that can be folded into the cream cheese mixture without losing too much air.
Do not add the whipped cream directly to the cream cheese while it is still runny. Properly whipped cream gives the dessert its light mousse-like texture and helps it hold its shape in the jars.
Combining the Cheesecake Mousse
Add approximately one-third of the whipped cream to the prepared cream cheese mixture.
Use a rubber spatula to fold the cream into the mixture. Move the spatula down through the center of the bowl, sweep it along the bottom, and lift the mixture over the top. Rotate the bowl as you work.
This gentle folding method incorporates the cream while preserving as much air as possible.
Once the first portion is incorporated, add the remaining whipped cream in two additions. Continue folding gently until no large streaks of white cream remain.
The finished mousse should look pale, fluffy, and creamy. It should be thick enough to hold soft peaks but light enough to spoon or pipe easily into the dessert cups.
Avoid vigorous stirring after adding the whipped cream. Excessive mixing can deflate the filling, making it denser and less airy.
If the mixture seems slightly soft, refrigerate it for 15–20 minutes before assembling the cups.
Adding the Chocolate Chips
Finely chop the dark chocolate into small pieces if you are not using mini chocolate chips.
Very large chocolate pieces can be difficult to scoop with a spoon and may interrupt the smooth texture of the mousse. Small pieces distribute more evenly and create a pleasant chocolate crunch.
Add the chopped chocolate to the prepared mint cheesecake mousse.
Fold gently until the chocolate is evenly distributed throughout the filling.
If you want a stronger chocolate flavor, use a mixture of dark chocolate and semisweet chocolate chips. Dark chocolate provides a slightly bitter contrast to the sweet filling, while semisweet chocolate adds a familiar chocolate chip flavor.
For a more delicate texture, reserve some of the chocolate for decoration rather than adding all of it to the mousse.
At this point, the filling should have a lovely pale green color with tiny dark chocolate flecks throughout.
Cover the bowl and refrigerate it for approximately 15–20 minutes if necessary. This brief chilling period makes the mousse easier to pipe neatly into the jars.
Ingredients for the Peppermint Chocolate Drizzle
The chocolate drizzle adds another layer of flavor and gives the dessert its attractive chocolate-mint appearance.
Ingredients
- 100 grams dark chocolate, finely chopped
- 60 milliliters heavy cream
- 1 teaspoon unsalted butter, optional
- ¼ teaspoon peppermint extract, optional
- 1–2 teaspoons milk, only if needed to adjust consistency
Place the chopped dark chocolate in a heatproof bowl.
Pour the heavy cream into a small saucepan and warm it over low heat until it is hot but not boiling. Remove it from the heat and pour it over the chopped chocolate.
Allow the mixture to stand for two minutes. This gives the warm cream time to soften the chocolate.
Stir slowly from the center outward until the chocolate melts and the mixture becomes glossy.
If small pieces remain unmelted, place the bowl over a saucepan containing gently simmering water. Make sure the bottom of the bowl does not touch the water, and stir until the chocolate becomes smooth.
Add the butter if you want a slightly silkier finish. Stir until it melts completely.
If you want a mint-flavored chocolate drizzle, allow the mixture to cool slightly before adding a small amount of peppermint extract. Peppermint is potent, so use only a little.
If the ganache seems too thick for drizzling, add milk one teaspoon at a time until it reaches a pourable consistency.
Allow the chocolate drizzle to cool until it is no longer hot. It should remain fluid but should not be warm enough to melt the cheesecake mousse.
For the best appearance, prepare the drizzle before assembling the final decorations, then let it cool while you arrange the cups.
How to Assemble the Mint Chocolate Chip Dessert Cups
Assembling the dessert is one of the most enjoyable parts of the recipe. Clear glass jars or dessert cups are ideal because they show off the dark chocolate base and pale green filling.
Step 1: Prepare the Cups
Arrange eight clean, dry dessert cups on a tray.
Remove the chocolate crumb bases from the refrigerator and check that the crumbs have settled into an even layer.
If the cups are particularly tall, you can make two layers of mousse separated by a thin sprinkling of chocolate crumbs. For smaller cups, a single generous layer of mousse is often sufficient.
Step 2: Add the First Layer of Mousse
Transfer the mint chocolate chip cheesecake filling to a piping bag fitted with a large round tip.
If you do not have a piping bag, use a large resealable food bag and cut a small opening in one corner. You can also spoon the mousse directly into the cups.
Pipe or spoon the filling over the chocolate cookie base.
Begin around the edges and work toward the center to reduce large air pockets. Fill each cup to approximately two-thirds or three-quarters of its height, leaving space for the chocolate drizzle and toppings.
Try to keep the mousse layer level. A flat surface gives the finished dessert a clean, professional appearance.
Step 3: Add a Chocolate Accent
Drizzle a small amount of cooled chocolate ganache around the inside wall of each cup, allowing some of it to run gently down into the mousse.
Alternatively, spoon a thin layer of ganache over the mousse and spread it carefully.
Do not use hot ganache, as it can soften the filling and blur the distinction between the layers.
For a stronger dark chocolate flavor, add a very thin chocolate layer in the middle of the mousse. Allow it to cool slightly before covering it with another small portion of mint filling.
Step 4: Add More Mint Mousse
If you are making a two-layer dessert, pipe another portion of mint chocolate chip mousse over the chocolate accent.
Smooth the top gently with a spoon or small offset spatula.
Leave enough room for the final decorations. The cups should look generous without being so full that the toppings spill over the sides.
Step 5: Add the Chocolate Topping
Sprinkle the top with a mixture of dark chocolate curls, mini chocolate chips, and small pieces of white chocolate.
The combination of dark and white chocolate creates an attractive contrast against the pale green filling.
For the closest appearance to the photograph, use a generous mound of chocolate shavings in the center of each cup.
You can also add a few mint chocolate pieces or finely chopped chocolate wafers.
Keep the toppings light enough that they do not overwhelm the mousse.
Step 6: Finish with Peppermint Drizzle
Using a small spoon, drizzle thin lines of the cooled chocolate ganache over the topping.
For a more decorative finish, use a piping bag with a very small opening to create delicate lines across the surface.
You can also drizzle a little ganache around the inner rim of the glass before adding the final chocolate curls.
The finished cups should have distinct dark and green layers, visible chocolate flecks, and a generous chocolate topping.
Chilling the Dessert Cups
Place the assembled cups on a tray and cover them carefully with lids or food-safe covering.
Refrigerate for at least three to four hours.
This chilling period allows the filling to firm up and the flavors to blend. The chocolate base also becomes more cohesive, making the cups easier to serve.
For the best texture and flavor, prepare the desserts the evening before serving and refrigerate them overnight.
Keep the cups level in the refrigerator so that the mousse remains evenly distributed and the toppings stay in place.
Avoid placing the cups in the freezer for a quick chill unless you specifically want a frozen dessert. Freezing and rapidly thawing them can change the texture of the cream cheese filling.
Once thoroughly chilled, the mousse should be creamy and stable enough to hold its shape when scooped with a spoon.
How to Serve Mint Chocolate Chip Cheesecake Cups
Serve the dessert directly from the refrigerator while the mousse is cool and creamy.
For a special occasion, place each jar on a small dessert plate and add a teaspoon alongside it. A simple presentation allows the contrasting layers to remain the focus.
You can garnish each serving with a few additional chocolate curls immediately before serving.
For a more elaborate presentation, add a small mint leaf, a thin chocolate shard, or a delicate swirl of whipped cream. These decorations are optional; the chocolate topping alone makes the dessert look attractive.
If you are serving the cups at a party, arrange them on a tray in alternating rows. Their pale green color and dark chocolate layers create a striking display.
These dessert cups pair particularly well with coffee, hot chocolate, or a glass of cold milk. Their creamy texture also makes them a pleasant finish to a meal featuring savory dishes.
Because the filling contains cream cheese and whipped cream, keep the dessert refrigerated until serving time. Avoid leaving it at room temperature for extended periods.
Important Tips for Perfect Results
Use Room-Temperature Cream Cheese
Cold cream cheese is more difficult to blend smoothly and can create small lumps in the filling.
Allow it to soften before mixing, but do not leave it out for an excessive period. If you forget to take it out of the refrigerator, cut it into small cubes so it softens more quickly.
Keep the Whipping Cream Cold
Cold whipping cream generally whips more easily and holds its structure better.
If your kitchen is warm, place the bowl over another bowl containing ice while whipping. This helps keep the cream cool.
Measure Peppermint Extract Carefully
Peppermint extract is concentrated. Adding too much can make the dessert taste overly sharp and medicinal.
Begin with a small quantity, taste the cream cheese mixture, and increase gradually.
If you are using peppermint oil rather than a food-grade peppermint extract, check the product label carefully. Not every peppermint oil is intended for culinary use.
Chop the Chocolate Finely
Smaller chocolate pieces are easier to distribute through the mousse and create a more balanced texture.
Finely chopped chocolate also looks attractive when scattered across the pale green filling.
Do Not Overmix the Mousse
Once the whipped cream has been added, use gentle folding movements rather than vigorous beating.
Preserving the air in the cream is important for creating a fluffy, mousse-like consistency.
Let the Ganache Cool
Hot chocolate ganache can melt the filling and cause the layers to lose their definition.
Allow the ganache to cool until it is fluid but no longer warm before adding it to the cups.
Use Clear Glass Jars
Transparent jars show off the contrast between the dark crumb base and green filling.
Small mason jars, dessert tumblers, and clear plastic dessert cups all work well.
Chill Before Decorating
If the mousse is soft, refrigerate the cups before adding heavy toppings. A firmer surface makes decorating easier and helps the toppings remain in place.
Recipe Variations
White Chocolate Mint Cheesecake Cups
For a sweeter, creamier variation, replace some of the dark chocolate chips with finely chopped white chocolate.
You can also melt 75 grams of white chocolate, allow it to cool until barely warm, and fold it into the cream cheese mixture before adding the whipped cream.
White chocolate makes the filling sweeter and richer, so reduce the powdered sugar if desired.
Double Chocolate Mint Dessert Cups
Chocolate lovers can create a more intense version by adding a thin chocolate ganache layer between two layers of mint mousse.
Use dark chocolate for the base and topping, then add extra chocolate curls before serving.
The result is a dessert with pronounced chocolate flavor in every layer.
Oreo Mint Cheesecake Cups
Replace the chocolate biscuits with chocolate sandwich cookies and retain some of the filling from the cookies if desired.
Crush the cookies finely for the base, then reserve a few larger crumbs for decoration.
You can also fold a small handful of coarsely crushed cookies into the mousse for an extra crunchy texture.
Sugar-Reduced Mint Chocolate Cups
If you prefer a less sweet dessert, use unsweetened cocoa biscuits, reduce the powdered sugar gradually, and choose dark chocolate with a higher cocoa percentage.
The filling will taste more like a traditional dark chocolate cheesecake, with a refreshing mint finish.
Keep in mind that reducing sugar can affect the overall flavor and texture, so make small adjustments rather than eliminating it entirely.
Mint Brownie Cheesecake Cups
Replace the chocolate cookie base with small pieces of cooled chocolate brownie.
Press a thin layer of brownie pieces into the bottom of each jar and spoon the mint mousse on top.
For a softer texture, drizzle a small amount of chocolate ganache over the brownie layer before adding the filling.
This version is particularly rich and works well for celebrations.
Peppermint Bark Cheesecake Cups
Fold finely chopped dark and white chocolate into the mousse, then finish each cup with additional chocolate shards.
A very small amount of crushed peppermint candy can be added as a topping if you enjoy a crisp peppermint flavor.
Add the candy shortly before serving because moisture in the refrigerator can make it sticky.
Mint Chocolate Cheesecake Parfaits
Instead of using a single base and mousse layer, alternate chocolate cookie crumbs with mint cheesecake filling in several thin layers.
Finish with a generous spoonful of mousse and chocolate curls.
This version is ideal for taller glasses because it creates a visually appealing striped appearance.
Mini Party Dessert Cups
For parties, prepare the recipe in small shot-style dessert cups.
Use approximately one teaspoon of cookie crumbs per cup, followed by a smaller portion of mousse and a few chocolate shavings.
The smaller servings are convenient for dessert tables and allow guests to sample several different treats.
Extra-Minty Chocolate Cups
If you prefer a stronger mint flavor, add a small additional amount of peppermint extract to the cream cheese mixture.
Increase it gradually and taste as you go. The goal is a refreshing mint flavor that complements the chocolate without overwhelming the cheesecake.
Chocolate Wafer Crunch Cups
For a crunchier base, combine crushed chocolate wafers with a small amount of chopped toasted nuts, provided everyone being served can safely eat them.
The nuts add a roasted flavor and a more varied texture.
You can also scatter a thin layer of the crumb mixture between the mousse layers.
Make-Ahead Instructions
These dessert cups are excellent for preparing ahead of time.
You can make the chocolate cookie base a day in advance and keep the prepared cups covered in the refrigerator.
The cheesecake mousse can also be prepared in advance, but it is best to assemble the complete desserts soon after making the filling so that the texture remains light and the layers stay neat.
For the most convenient approach, prepare the entire dessert the day before your event. Assemble the cups, cover them, and refrigerate overnight.
If you want the chocolate topping to remain especially crisp, add the final chocolate curls and delicate decorations shortly before serving.
For gatherings, label the cups if you are making several dessert flavors. This is particularly helpful when some guests have dietary restrictions or when different versions contain different ingredients.
Storage Instructions
Store the finished dessert cups in the refrigerator at or below 4°C in covered, food-safe containers.
For the best quality, enjoy them within two to three days. The mousse may remain edible longer under consistently safe refrigeration, but the texture of the cookie base and toppings can gradually change.
The chocolate crumb base may soften slightly as it absorbs moisture from the filling. This is normal and often creates a texture similar to a chilled cheesecake crust.
Keep the cups away from uncovered foods with strong odors because cream-based desserts can absorb refrigerator smells.
Do not leave the cups unrefrigerated for more than two hours in total, or more than one hour when the surrounding temperature exceeds 32°C. If they have been left out beyond these limits, discard them.
Can You Freeze These Dessert Cups?
Freezing is possible, although it may slightly alter the texture of the cream cheese mousse after thawing.
If you decide to freeze them, use freezer-safe containers and leave a little room at the top for expansion. Cover the cups tightly and freeze without delicate decorations whenever possible.
For better results, add the chocolate curls after thawing.
Thaw the desserts in the refrigerator rather than on the kitchen counter. Allow enough time for the centers to soften completely before serving.
The mousse may become a little less airy after freezing, and the cookie base may soften, but the chocolate and mint flavors should remain enjoyable.
Troubleshooting Common Problems
Why Is My Mousse Too Runny?
A runny filling may result from cream that was not whipped sufficiently, cream cheese that was too warm, or overmixing after the whipped cream was added.
Place the mixture in the refrigerator for 30–45 minutes to see whether it firms up.
If the mousse remains very soft, it may be necessary to use it as a spoonable dessert rather than expecting sharply defined layers.
For future batches, use cold whipping cream, properly softened cream cheese, and gentle folding techniques.
Why Does My Filling Have Lumps?
Lumps usually develop when the cream cheese is too cold or has not been beaten until smooth before the other ingredients are added.
Always beat the cream cheese by itself first, scraping the bowl regularly.
If small lumps remain, continue mixing the cream cheese and sugar before adding the whipped cream. Once the whipped cream has been incorporated, avoid excessive beating.
Why Does My Dessert Taste Too Minty?
Peppermint extract can quickly overpower the other flavors.
For a milder result, begin with a small amount and increase only after tasting the cream cheese mixture.
If the filling already tastes too strong, adding a little more cream cheese mixture without peppermint may help dilute the flavor, although this will increase the overall quantity of dessert.
Why Is My Chocolate Base Too Hard?
A very hard base may contain too much butter or may have been compressed too firmly.
Use only enough butter to moisten the crumbs and press the mixture gently into the cups.
Allow the desserts to sit in the refrigerator until chilled, but avoid packing the crumb layer as tightly as you would a baked cheesecake crust.
Why Did My Chocolate Drizzle Become Thick?
Ganache thickens as it cools, and dark chocolate can set relatively quickly.
Warm it gently over a bowl of warm water and stir until it becomes pourable again.
If necessary, add a small amount of warm cream to adjust the consistency.
Avoid overheating the mixture, especially after adding peppermint extract.
Why Did My Green Color Become Too Bright?
Food coloring is concentrated, and even a few drops can create a strong color.
Add it one drop at a time and mix thoroughly before adding more.
If the filling is already too green, adding more uncolored cream cheese mixture can soften the color, although the quantity and flavor balance will change.
Frequently Asked Questions
Do These Dessert Cups Need Baking?
No. The chocolate cookie base and mint cheesecake mousse are both prepared without baking.
The butter helps bind the cookie crumbs, while the cream cheese and whipped cream create the filling.
Refrigeration is essential because it allows the mousse to firm up and makes the cups easier to serve.
Can I Make the Recipe Without Food Coloring?
Yes. Food coloring is completely optional.
Without coloring, the mousse will be naturally off-white or pale cream, depending on the ingredients you use.
The peppermint flavor will still be present, and the dark chocolate pieces will provide an attractive contrast.
Can I Use Cool Whip or Another Whipped Topping?
Yes, you can use a prepared whipped topping as a convenient alternative to heavy cream.
Use an amount sufficient to create a light, creamy filling, and follow the product’s storage instructions.
Prepared whipped topping varies in sweetness and stability, so you may need to reduce the powdered sugar and adjust the chilling time.
Can I Use Low-Fat Cream Cheese?
Full-fat cream cheese generally provides the richest flavor and most dependable texture.
Low-fat cream cheese can produce a softer filling and a slightly different mouthfeel. If you use it, ensure the whipped cream is properly whipped and allow additional chilling time if necessary.
What Type of Chocolate Works Best?
Dark chocolate, semisweet chocolate, and mini chocolate chips all work well.
Dark chocolate creates a more pronounced contrast with the sweet mint mousse, while semisweet chocolate offers a milder flavor.
For decoration, use chocolate curls, grated chocolate, or a combination of dark and white chocolate shavings.
Can I Make the Cups Without a Mixer?
Yes, although an electric mixer makes the process easier.
You can soften the cream cheese thoroughly and beat it with a sturdy whisk until smooth. However, whipping cream by hand requires more effort, and you must still whip it until it forms firm peaks.
A ready-made whipped topping can simplify the process if you do not have a mixer.
Are These Cups Suitable for a Party?
Absolutely. Their individual portions make them convenient for birthday parties, family dinners, celebrations, potlucks, and holiday dessert tables.
They can be prepared ahead of time and displayed in clear jars to show off the contrasting layers.
Keep them refrigerated until serving, particularly in warm weather.
How Can I Make the Dessert Look Like the Photograph?
Use clear, straight-sided glass jars and create a distinct dark chocolate cookie base.
Pipe the pale green mousse neatly into the jars, add thin chocolate accents, and finish with dark chocolate curls and small white chocolate pieces.
A slightly uneven mound of chocolate shavings gives the topping a generous, bakery-style appearance.
Approximate Nutritional Information
The following estimates are for one serving when the recipe makes eight medium cups. Actual values vary according to the type of cookies, cream cheese, chocolate, and cream used, as well as the amount of topping added.
- Calories: approximately 450–600
- Protein: approximately 5–8 grams
- Carbohydrates: approximately 35–50 grams
- Fat: approximately 30–45 grams
- Sugar: approximately 25–40 grams
These figures are estimates rather than laboratory-tested nutritional values. If you need precise information for dietary or medical reasons, calculate the values using the specific ingredients and quantities you use.
Final Recipe Notes
Mint Chocolate Chip Cheesecake Dessert Cups combine everything that makes a layered dessert memorable: a crunchy chocolate foundation, a fluffy cheesecake mousse, refreshing peppermint flavor, and rich chocolate decorations.
The contrast between the pale green filling and dark cookie base makes these cups particularly attractive, while the individual servings eliminate the need to slice a traditional cheesecake.
For the most successful results, use softened cream cheese, cold whipping cream, finely chopped chocolate, and a light hand when folding the mousse. Allow the ganache to cool before adding it to the cups, and give the assembled desserts enough time to chill.
You can keep the recipe simple with only the chocolate base and mint mousse, or add multiple layers of ganache, extra chocolate chips, and decorative curls for a more elaborate presentation.
Whether you prepare them for a family dessert, a festive gathering, or a special occasion, these no-bake mint chocolate chip cheesecake cups offer a delicious combination of creamy cheesecake, refreshing mint, and rich chocolate in every spoonful.