admin1
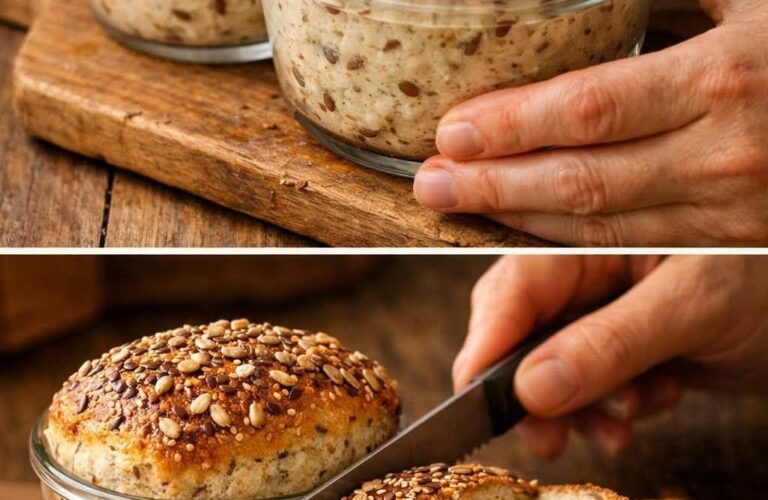
Seeded No Knead Jar Bread
Introduction
Seeded No Knead Jar Bread is a wonderfully simple homemade bread recipe that produces bakery-style results with very little effort. Unlike traditional bread recipes that require extensive kneading, multiple rising stages, and advanced baking skills, this no knead version relies on time rather than labor to develop its texture and flavor. The result is a rustic artisan loaf with a beautifully crisp crust, a soft and airy interior, and the added nutritional benefits of wholesome mixed seeds.
This bread is perfect for beginner bakers, busy households, and anyone who loves the aroma of freshly baked bread without spending hours in the kitchen. The long resting period allows the dough to slowly ferment, creating complex flavors and a light texture that rivals breads found in artisan bakeries. Because the dough is baked in a heat-safe jar or small baking vessel, it naturally holds its shape and develops a wonderfully moist crumb.
The addition of seeds not only enhances the appearance of the bread but also contributes a pleasant crunch and valuable nutrients. Flax seeds, sunflower seeds, sesame seeds, and pumpkin seeds add fiber, healthy fats, vitamins, and minerals that make this bread both delicious and nourishing. Whether enjoyed warm with butter, used for sandwiches, served alongside soups, or toasted for breakfast, Seeded No Knead Jar Bread is a versatile recipe that can easily become a staple in your kitchen.
About This Bread
No knead bread became popular because it simplified traditional bread making while still producing excellent results. The concept is based on allowing a wet dough to ferment slowly over many hours. During this time, gluten develops naturally without the need for extensive kneading. This process creates an artisan-style loaf with large air pockets, a chewy texture, and rich flavor.
Adding seeds elevates the bread even further by introducing texture, nutrition, and a nutty taste. Baking the dough in a jar or compact baking vessel helps maintain its structure and creates an attractive shape that is ideal for slicing.
Because of its simplicity and reliability, this bread is often recommended for beginners who want to experience homemade baking without complicated techniques.
Yield
This recipe yields:
- 1 small artisan loaf
- 6 to 8 slices
- 4 to 6 servings
Preparation Time
Preparation Time: 10 minutes
Resting Time: 8 to 12 hours
Baking Time: 30 to 40 minutes
Total Time: Approximately 9 to 13 hours
Ingredients
- 2 cups all-purpose flour
- 1 teaspoon salt
- ½ teaspoon instant yeast
- ¾ cup warm water
- 1 tablespoon mixed seeds (flax seeds, sunflower seeds, sesame seeds, or pumpkin seeds)
- 1 teaspoon honey or olive oil (optional)
- Extra seeds for topping
Optional Ingredients
- Whole wheat flour
- Rye flour
- Chia seeds
- Rolled oats
- Dried rosemary
- Fresh thyme
- Garlic powder
- Shredded cheddar cheese
- Mozzarella cheese
- Dried cranberries
- Raisins
- Chopped walnuts
- Chopped pecans
Equipment Required
- Large mixing bowl
- Wooden spoon
- Measuring cups
- Measuring spoons
- Heat-safe glass jar or small baking dish
- Kitchen towel or plastic wrap
- Oven
Choosing Quality Ingredients
The quality of your ingredients greatly influences the final loaf. Fresh flour produces a better texture, while active yeast ensures a strong rise and airy crumb. Seeds should be fresh and free from bitterness, as older seeds may develop off-flavors due to natural oils becoming rancid.
Using filtered water can also improve flavor, especially if your tap water contains strong mineral or chlorine tastes.
Preparing the Dough
Begin by placing the flour, salt, yeast, and mixed seeds into a large mixing bowl. Stir thoroughly to distribute all ingredients evenly throughout the flour.
Add the warm water and optional honey or olive oil. Stir using a wooden spoon until a rough, sticky dough forms. The dough should appear wet and shaggy rather than smooth. Avoid the temptation to add extra flour because a wetter dough helps create the airy structure that makes no knead bread so special.
Once mixed, ensure no dry flour remains at the bottom of the bowl.
First Rise and Fermentation
Cover the bowl tightly with plastic wrap, a lid, or a clean kitchen towel.
Allow the dough to rest at room temperature for 8 to 12 hours.
During this time, the yeast slowly ferments the dough. Tiny bubbles form throughout the mixture, creating the structure that will later produce a light and fluffy loaf.
The dough is ready when it has doubled in size and displays visible bubbles across the surface.
This slow fermentation process is the secret behind the bread’s rich flavor and artisan texture.
Preparing the Baking Jar
Lightly grease a heat-safe glass jar or small baking dish.
Carefully transfer the risen dough into the prepared container.
Handle the dough gently to preserve as much trapped air as possible.
Sprinkle additional seeds over the top. These seeds create an attractive appearance and add extra crunch to the finished loaf.
Baking Instructions
Preheat the oven to 375°F (190°C).
Place the jar or baking dish in the center of the oven.
Bake for 30 to 40 minutes, or until the top becomes golden brown and the crust feels firm.
The bread should sound hollow when gently tapped.
If the top begins browning too quickly, loosely cover it with aluminum foil during the final portion of baking.
Cooling the Bread
Remove the bread from the oven and allow it to cool for at least 20 minutes before slicing.
Although it may be tempting to cut into it immediately, cooling allows the internal structure to set properly.
Slicing too soon can result in a gummy texture and uneven crumb.
Once cooled, the bread will slice cleanly and reveal its soft interior.
How to Make the Perfect No Knead Bread
The secret to exceptional no knead bread lies in patience rather than effort. The dough may initially appear too sticky, but this moisture is essential for developing an airy crumb. Long fermentation allows gluten to form naturally and creates a texture that would otherwise require extensive kneading. Using fresh yeast and allowing sufficient rising time are among the most important factors for success.
Maintaining the proper balance between flour and water is equally important. A wetter dough creates larger air pockets and a lighter texture. Rushing the process often results in a denser loaf, while allowing the dough to fully ferment rewards you with bakery-quality bread.
Variations
One of the best features of Seeded No Knead Jar Bread is how easily it can be customized. For a healthier version, replace half of the all-purpose flour with whole wheat flour to create a more wholesome loaf with a richer flavor and increased fiber content. Herbs such as rosemary, thyme, oregano, or basil can be added to create a fragrant artisan bread that pairs beautifully with soups and pasta dishes. Cheese lovers can mix shredded cheddar, mozzarella, or parmesan directly into the dough for a savory variation with pockets of melted cheese throughout the loaf. Those who enjoy sweeter breads can incorporate dried cranberries, raisins, chopped dates, or figs along with walnuts or pecans for a breakfast-style bread. Chia seeds, oats, and additional seed blends can also be added to boost nutritional value and texture. Every variation maintains the simplicity of the original recipe while creating entirely new flavor experiences
Nutritional Information
Approximate values per serving:
- Calories: 150–180
- Carbohydrates: 28g
- Protein: 5g
- Fat: 3–5g
- Fiber: 3–4g
Nutritional values may vary depending on the seeds and additional ingredients used.
Health Benefits
This bread offers numerous nutritional advantages compared to many commercially produced breads. Mixed seeds contribute healthy fats, plant-based protein, fiber, and essential minerals. Flax seeds provide omega-3 fatty acids that support heart health, while sunflower and pumpkin seeds supply vitamin E, magnesium, and antioxidants. The fiber content helps support digestion and promotes satiety, helping you feel full for longer periods. Because the bread is homemade, you maintain complete control over ingredients and can avoid unnecessary preservatives, additives, and excessive sodium often found in packaged breads.
The slow fermentation process may also improve digestibility and enhance nutrient availability, making this bread a wholesome addition to a balanced diet.
Common Mistakes
One of the most common mistakes when making no knead bread is adding too much flour because the dough appears overly sticky. A sticky dough is actually necessary for creating a light, airy texture. Another frequent mistake is shortening the fermentation time, which prevents the dough from developing proper flavor and structure. Using expired yeast can result in poor rising and a dense loaf. Some bakers also make the mistake of slicing the bread immediately after baking, causing the interior to become gummy. Failing to grease the baking jar properly may lead to sticking, while baking at an incorrect temperature can produce uneven results. Patience throughout the process is often the difference between an average loaf and an exceptional artisan bread.
Storage Guidelines
- Store the bread in an airtight container or bread bag at room temperature for up to three days.
- For longer storage, refrigerate for up to one week.
- Always allow the bread to cool completely before storing to prevent excess moisture buildup.
Freezing Instructions
- Seeded No Knead Jar Bread freezes exceptionally well.
- Wrap the cooled loaf tightly in plastic wrap followed by aluminum foil.
- Freeze for up to three months.
- To serve, thaw at room temperature and warm briefly in the oven.
Serving Suggestions
This bread pairs beautifully with soups, stews, salads, pasta dishes, and roasted vegetables. It can also be toasted and served with butter, jam, honey, cream cheese, or avocado. For breakfast, enjoy it alongside eggs and fresh fruit. For lunch, use it to make hearty sandwiches filled with vegetables, cheese, or lean proteins.