admin1
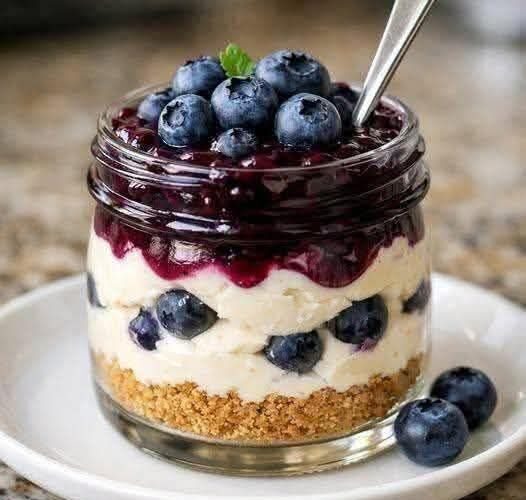
Blueberry Cheesecake Jars are the perfect no-bake dessert for parties, family gatherings, picnics, or simple weeknight treats. These creamy layered desserts combine buttery graham cracker crumbs, rich cheesecake filling, and sweet blueberry topping in adorable individual jars. They are easy to prepare, beautifully presented, and packed with classic cheesecake flavor in every spoonful.
One of the best things about cheesecake jars is their convenience. Since they are served in small containers, there is no slicing, messy serving, or baking required. The layers create a lovely presentation while also making the dessert portable and easy to store. Whether you are making desserts for guests or preparing sweet treats ahead of time, these blueberry cheesecake jars are always a crowd favorite.
Why You’ll Love These Blueberry Cheesecake Jars
These mini desserts are simple yet elegant. The creamy cheesecake filling pairs perfectly with juicy blueberries and crunchy graham cracker crust.
Here are a few reasons to love this recipe:
- No baking required
- Easy to prepare ahead of time
- Perfect individual servings
- Rich and creamy texture
- Fresh blueberry flavor
- Beautiful presentation
- Great for parties and holidays
Ingredients
This recipe makes about 6 dessert jars.
For the Graham Cracker Crust
- 1 ½ cups graham cracker crumbs
- 5 tablespoons melted butter
- 2 tablespoons sugar
For the Cheesecake Filling
- 16 ounces cream cheese, softened
- ½ cup powdered sugar
- 1 teaspoon vanilla extract
- 1 cup heavy whipping cream
For the Blueberry Topping
- 2 cups fresh or frozen blueberries
- ¼ cup sugar
- 1 tablespoon lemon juice
- 1 tablespoon cornstarch
- 2 tablespoons water
Kitchen Tools Needed
- Mixing bowls
- Electric mixer
- Medium saucepan
- Spoon or spatula
- Small jars or dessert cups
- Measuring cups and spoons
Step-By-Step Instructions
Step 1: Prepare the Blueberry Topping
Start by making the blueberry sauce so it has time to cool before assembling the jars.
In a medium saucepan, combine the blueberries, sugar, and lemon juice. Place the pan over medium heat and stir gently. As the berries heat, they will begin releasing their juices.
In a small bowl, mix the cornstarch and water until smooth. Pour this mixture into the blueberries and stir continuously. Let the sauce simmer for about 4 to 5 minutes until it thickens slightly.
Remove the saucepan from the heat and allow the blueberry topping to cool completely.
Step 2: Make the Graham Cracker Crust
In a mixing bowl, combine the graham cracker crumbs, melted butter, and sugar. Stir until the crumbs are evenly coated and resemble wet sand.
Spoon about 2 tablespoons of the crumb mixture into the bottom of each jar. Press lightly using the back of a spoon to form a crust layer.
Set the jars aside while preparing the cheesecake filling.
Step 3: Prepare the Cheesecake Filling
In a large bowl, beat the softened cream cheese until smooth and creamy. Add the powdered sugar and vanilla extract, then continue mixing until fully combined.
In a separate bowl, whip the heavy cream until stiff peaks form. Carefully fold the whipped cream into the cream cheese mixture using a spatula. This creates a light, fluffy cheesecake filling.
The filling should be smooth, airy, and rich.
Step 4: Assemble the Cheesecake Jars
Spoon or pipe a generous layer of cheesecake filling over the graham cracker crust in each jar.
Add a spoonful of blueberry topping on top of the cheesecake layer.
Repeat the layers if your jars are tall enough, finishing with blueberry topping on the very top.
For extra decoration, sprinkle additional graham cracker crumbs or add fresh blueberries before serving.
Step 5: Chill Before Serving
Place the jars in the refrigerator for at least 2 hours before serving. Chilling allows the layers to firm up and the flavors to blend beautifully.
Serve cold for the best texture and flavor.
Tips for the Best Cheesecake Jars
Use Softened Cream Cheese
Soft cream cheese blends more smoothly and prevents lumps in the filling.
Cool the Blueberry Sauce Completely
Warm topping can melt the cheesecake layer, so let it cool fully before assembling.
Pipe the Filling for Neat Layers
Using a piping bag or zip-top bag creates cleaner, prettier dessert layers.
Chill Thoroughly
The jars taste best when chilled long enough for the filling to set properly.
Delicious Variations
Strawberry Cheesecake Jars
Replace the blueberries with fresh strawberries and strawberry sauce.
Lemon Blueberry Cheesecake Jars
Add lemon zest to the cheesecake filling for bright citrus flavor.
Chocolate Blueberry Cheesecake
Mix mini chocolate chips into the cheesecake layer for a rich twist.
Vanilla Wafer Crust
Swap graham crackers for crushed vanilla wafers or digestive biscuits.
Mixed Berry Cheesecake Jars
Use raspberries, blackberries, and strawberries together for a colorful dessert.
Storage Instructions
Store the cheesecake jars covered in the refrigerator for up to 4 days.
If making ahead for parties, wait to add fresh garnishes until just before serving for the best appearance.
These jars are not ideal for freezing because the creamy filling may change texture after thawing.
Serving Suggestions
Blueberry Cheesecake Jars are wonderful for many occasions:
- Birthday parties
- Summer picnics
- Holiday dessert tables
- Baby showers
- Family dinners
- Romantic date-night desserts
Serve them with coffee, iced tea, or hot chocolate for an extra special treat.
Frequently Asked Questions
Can I use store-bought blueberry pie filling?
Yes, store-bought filling works well if you want a quicker version.
Can I make these in one large dish?
Absolutely. Layer the ingredients in a trifle bowl or baking dish instead of jars.
Can I use frozen blueberries?
Yes. Frozen blueberries work perfectly and do not need to be thawed first.
What jars work best?
Small mason jars, glass dessert cups, or mini trifle containers are all excellent choices.
Can I make these a day ahead?
Yes. These desserts are actually even better after chilling overnight.