admin1
Decadent Black Forest Cake
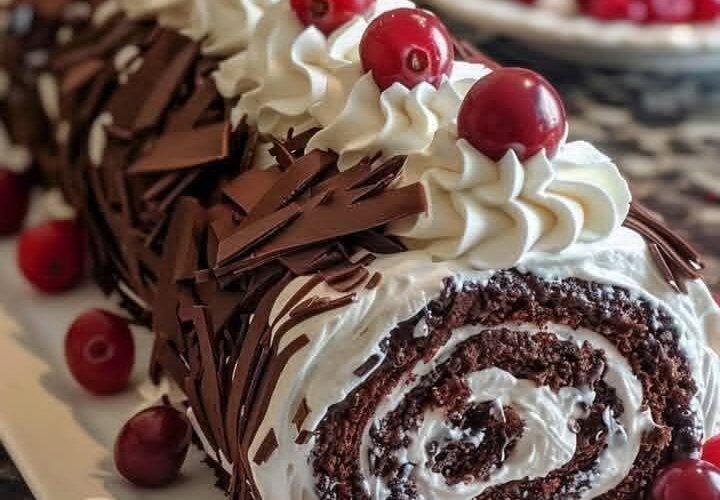
Decadent black forest cake is one of the most luxurious chocolate desserts enjoyed across many parts of the world. Its popularity comes from its rich, moist chocolate layers, billowy whipped cream, juicy cherries, and the way it combines deep cocoa flavor with bright fruitiness for a truly indulgent experience. A slice of freshly made black forest cake can be enjoyed during birthday celebrations, holiday gatherings, anniversary dinners, special weekend baking projects, or simply whenever a show-stopping chocolate dessert is desired.
Unlike a simple chocolate cake, black forest cake layers deep, moist chocolate sponge with billowy whipped cream and sweet-tart cherries, creating a dessert that feels both rich and refreshingly balanced. This comprehensive recipe explains every stage of preparation in detail, from selecting the right chocolate and cherries to baking, assembling, and serving the final cake.
Introduction
Black forest cake, traditionally known by its German name, has long been celebrated as one of the most iconic chocolate and cherry desserts, originating from the Black Forest region and beloved for its dramatic combination of dark chocolate sponge, fluffy whipped cream, and tart cherries. This style of cake has remained a timeless favorite because of its striking presentation and its perfect balance between rich chocolate and bright, juicy fruit.
The cake relies on deeply chocolatey sponge layers, brushed with a cherry-flavored syrup, then layered generously with whipped cream and cherries before being finished with chocolate shavings on top. This characteristic makes decadent black forest cake especially rewarding to bake at home because, while it involves several components, each one is approachable and the final presentation is truly impressive. The resulting cake is naturally rich, fruity, and indulgent.
Homemade decadent black forest cake requires a handful of pantry ingredients, basic kitchen equipment, and a bit of patience while baking and assembling. Even beginners can successfully prepare it with attention to a few key details.
Yield
This recipe produces one 9-inch three-layer round cake, yielding approximately twelve to fourteen slices.
Preparation Time
- Preparation: 35 minutes
- Baking: 30 minutes
- Cooling: 45 minutes
- Assembly: 25 minutes
- Total Time: Approximately 2 hours 15 minutes
Main Ingredients
For the Chocolate Cake:
- 2 cups all-purpose flour
- 2 cups granulated sugar
- ¾ cup unsweetened cocoa powder
- 1 ¾ teaspoons baking soda
- 1 teaspoon salt
- 2 large eggs
- 1 cup buttermilk
- ½ cup vegetable oil
- 1 cup hot water
- 1 teaspoon vanilla extract
For the Filling and Topping:
- 2 ½ cups heavy whipping cream
- ¼ cup powdered sugar
- 1 teaspoon vanilla extract
- 2 cans (14.5 ounces each) pitted cherries in syrup, drained, syrup reserved
- ¼ cup cherry juice or syrup, for brushing
- Chocolate shavings, for garnish
- A few whole cherries, for garnish
Additional Optional Ingredients
- 2 tablespoons cherry-flavored syrup, for extra moisture
- A pinch of espresso powder, to deepen the chocolate flavor
- Fresh cherries, in place of canned, when in season
- A drizzle of chocolate ganache
- A few mint leaves, for garnish
- A splash of almond extract
- A small amount of dark chocolate, melted, for drizzling
- A pinch of cinnamon, added to the cake batter
- A sprinkle of cocoa powder, for dusting
Equipment Required
- Three 9-inch round cake pans
- Parchment paper
- Large mixing bowl
- Medium mixing bowl
- Hand mixer or stand mixer
- Rubber spatula
- Whisk
- Measuring cups
- Measuring spoons
- Wire cooling rack
- Offset spatula, for frosting
- Pastry brush
- Sharp serrated knife, for leveling and slicing
- Vegetable peeler, for chocolate shavings
Choosing the Perfect Cocoa and Cherries
The quality of the cocoa powder and cherries directly affects the final flavor of the cake. Selecting the right ingredients is therefore extremely important.
Choose a good-quality unsweetened cocoa powder with a deep, rich color and a strong chocolate aroma when the container is opened.
Select pitted cherries packed in syrup with a deep red color and a firm texture, or use fresh, ripe cherries when in season for the brightest flavor.
Avoid cocoa powder that smells faint or stale, and avoid cherries that appear overly mushy or have a dull, faded color.
Preparing the Cake Pans and Dry Ingredients
- Preheat the oven to 350°F (175°C).
- Grease three 9-inch round cake pans and line the bottoms with parchment paper.
- In a large mixing bowl, whisk together the flour, sugar, cocoa powder, baking soda, and salt until well combined.
Bringing Ingredients to Room Temperature
Cold eggs and buttermilk can cause the batter to mix unevenly.
- Remove the eggs and buttermilk from the refrigerator at least twenty minutes before baking.
- Allow them to sit covered on the counter until they reach room temperature.
- Room-temperature ingredients blend more evenly, resulting in a smoother batter.
Primary Baking Process
- Add the eggs, buttermilk, vegetable oil, and vanilla extract to the dry ingredients.
- Beat on medium speed for two minutes until well combined.
- Slowly pour in the hot water while mixing on low speed, stirring until the batter is smooth and thin.
- Divide the batter evenly among the three prepared cake pans.
- Bake for 28 to 32 minutes, or until a toothpick inserted into the center comes out clean.
- Remove the cakes from the oven and let them cool in the pans for ten minutes before transferring to a wire rack.
Understanding Sweetness and Richness Levels
Every batch of cocoa powder and cherries can vary slightly in flavor intensity.
- A darker, more intense cocoa powder creates a richer, more pronounced chocolate flavor.
- Sweeter canned cherries may require slightly less added sugar in the whipped cream.
- Always taste the reserved cherry syrup before brushing it onto the cake layers, adjusting with a touch of extra sugar if very tart.
- Adding too much sugar to the whipped cream can overshadow the cake’s deep chocolate flavor.
Preparing the Whipped Cream
- In a large, chilled mixing bowl, combine the heavy whipping cream, powdered sugar, and vanilla extract.
- Beat on medium-high speed until soft peaks form, taking care not to overwhip.
- Keep the whipped cream chilled until ready to use for assembly.
Optional Soaking and Flavor Boosting Techniques
Some people enjoy a lightly moistened cake while others prefer a deeply soaked, extra flavorful version.
For a light finish:
- Brush each cake layer lightly with the reserved cherry syrup.
For a medium finish:
- Brush generously with cherry syrup and add a touch of cherry-flavored syrup for extra fruitiness.
For a deeply flavorful finish:
- Add a pinch of espresso powder to the cake batter to deepen the chocolate flavor, then brush generously with cherry syrup between layers.
Assembling the Cake Layers
- Place one cooled cake layer on a serving plate or cake stand.
- Brush the top generously with the reserved cherry syrup.
- Spread a layer of whipped cream evenly over the top.
- Scatter a portion of the drained cherries over the whipped cream.
- Repeat with the second cake layer, syrup, whipped cream, and cherries.
- Top with the final cake layer.
Simple Two-Layer Version
Many people enjoy a simpler, two-layer version of this cake.
The combination of moist chocolate cake, whipped cream, and cherries already creates a satisfying dessert even with fewer layers.
Simply divide the batter between two cake pans instead of three, adjusting the baking time slightly longer, and assemble with just one layer of filling in between.
Frosting and Decorating the Cake
- Spread the remaining whipped cream over the top and sides of the assembled cake using an offset spatula.
- Smooth the surface as evenly as possible, or create decorative swirls if preferred.
- Press chocolate shavings gently onto the sides of the cake.
- Garnish the top with whole cherries and a sprinkle of chocolate shavings.
Chilling the Finished Cake
- Refrigerate the assembled and decorated cake for at least one hour before slicing.
- Chilling helps the whipped cream firm up and makes the cake easier to slice cleanly.
Traditional Serving Method
- Slice the chilled cake into even wedges using a sharp serrated knife, wiping the blade clean between cuts.
- Plate each slice individually.
- Serve chilled, directly from the refrigerator.
Elegant Presentation Method
- Place a slice at the center of a decorative plate.
- Add a small dollop of extra whipped cream and a whole cherry beside the slice.
- Drizzle a touch of chocolate ganache artistically across the plate.
- Garnish with a small mint leaf for a fresh, polished look.
This presentation works well for special celebrations and elegant dinner parties.
Fresh Cherry Black Forest Cake
Ingredients: Cake base, fresh pitted cherries
Method:
- Use fresh, pitted cherries in place of canned cherries when they are in season for a brighter, more vibrant flavor.
Espresso Black Forest Cake
Ingredients: Cake base, espresso powder
Method:
- Add a pinch of espresso powder to the cake batter to deepen and intensify the chocolate flavor.
Chocolate Ganache Black Forest Cake
Ingredients: Cake base, chocolate ganache
Method:
- Drizzle a layer of chocolate ganache over the top of the finished cake before adding the cherry and chocolate shaving garnish.
Almond Black Forest Cake
Ingredients: Cake base, almond extract
Method:
- Add a splash of almond extract to the whipped cream for a subtly nutty depth.
Mini Black Forest Cake Jars
Ingredients: Cake base, small individual jars
Method:
- Layer crumbled cake, whipped cream, and cherries in small individual jars instead of assembling one large cake.
This version is perfect for individual servings at parties.
Black Forest Cupcakes
Ingredients: Cake base, cupcake liners
Method:
- Divide the batter among a lined muffin tin instead of cake pans.
- Reduce baking time to eighteen to twenty minutes, then fill and top each cupcake with whipped cream and cherries.
Cinnamon Spiced Black Forest Cake
Ingredients: Cake base, ground cinnamon
Method:
- Add a pinch of ground cinnamon to the cake batter for a warm, subtly spiced variation.
Naked Black Forest Cake
Ingredients: Cake base, minimal outer frosting
Method:
- Frost only between the layers, leaving the outside of the cake mostly bare for a rustic, naked cake look, with cherries and cream peeking through.
Black Forest Trifle
Ingredients: Cake base, large trifle dish
Method:
- Layer cubed cake, whipped cream, and cherries in a large trifle dish instead of assembling a traditional layered cake.
Dark Chocolate Black Forest Cake
Ingredients: Cake base, dark chocolate shavings
Method:
- Use dark chocolate exclusively for the shaved garnish for a more intense, slightly bitter contrast to the sweet cherries and cream.
Nutritional Information
Decadent black forest cake naturally contains:
- Carbohydrates
- Protein
- Calcium
- Dietary fats
- Iron
- Vitamin A
The exact nutritional content varies depending on the specific ingredients and quantities used.
Common Mistakes
- Overmixing the batter, leading to a denser texture.
- Skipping the parchment paper lining, causing the cake layers to stick.
- Not allowing the cake layers to cool completely before assembling.
- Overwhipping the cream, causing it to become grainy or buttery.
- Using cherries that have not been well drained, leading to a soggy cake.
- Removing the cakes from the oven too early.
- Assembling the cake while the layers are still warm, causing the cream to melt.
- Skipping the chilling step before slicing, making it harder to achieve clean cuts.
- Adding too much cherry syrup, making the cake overly wet.
- Forgetting to wipe the knife between slices, leading to a messy presentation.
Storage Guidelines
- Store the cake in an airtight container or tightly covered in the refrigerator.
- Keep chilled at all times due to the whipped cream filling.
- Consume within three to four days for best quality.
- Bring to room temperature for about ten minutes before serving for the best flavor and texture.
Freezing Instructions
Decadent black forest cake can be frozen for future enjoyment, though it is best frozen before the whipped cream is added.
- Allow the baked cake layers to cool completely before freezing, without any filling or frosting.
- Wrap each layer tightly in plastic wrap, then in foil.
- Place in a freezer-safe bag or container.
- Freeze for up to two months.
- Thaw the cake layers at room temperature before assembling with fresh whipped cream and cherries.
Creative Uses for Leftover Cake
- Crumble leftover cake into a parfait with extra whipped cream and cherries.
- Use as a base for a quick trifle.
- Serve alongside a scoop of vanilla ice cream.
- Layer crumbled cake with chocolate pudding for a quick dessert cup.
- Use as a topping for a milkshake.
Party Serving Suggestions
- Prepare the cake a day in advance to allow the flavors to fully develop.
- Slice into smaller pieces for easy sharing at larger gatherings.
- Offer a side of extra whipped cream or cherries for guests who prefer more topping.
- Use a decorative cake stand for an elegant table presentation.
- Garnish the serving platter with extra cherries and chocolate shavings for a festive, polished look.