admin1
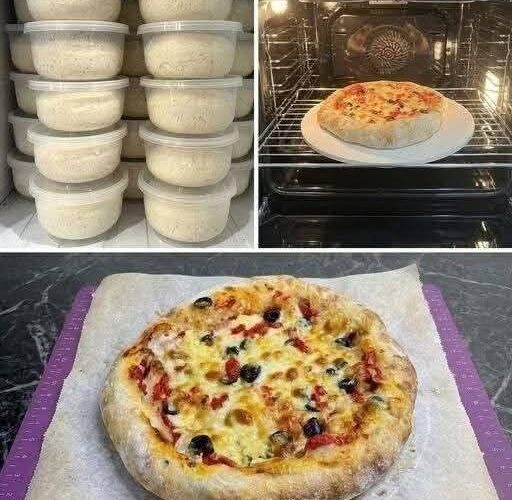
Homemade Sourdough Pizza: The Ultimate Guide to Crispy, Chewy, Flavorful Pizza from Scratch
Homemade sourdough pizza is one of the most delicious ways to enjoy authentic, bakery-style pizza in your own kitchen. With its beautifully blistered crust, chewy interior, crisp bottom, rich tomato sauce, melted cheese, and endless topping possibilities, sourdough pizza transforms simple ingredients into something truly special. The natural fermentation process gives the dough a distinctive flavor, an appealing texture, and a wonderfully airy structure that makes every bite satisfying.
Making sourdough pizza at home takes patience, but the process is easier than many people expect. Once you understand how to prepare the starter, mix the dough, develop gluten, allow fermentation, shape the crust, and bake the pizza at a high temperature, you can create excellent results with ordinary kitchen equipment.
This detailed recipe explains every step, from feeding your sourdough starter to serving a freshly baked pizza with a golden, bubbly crust. It also includes helpful variations, topping combinations, troubleshooting advice, storage instructions, and practical techniques for achieving consistent results.
What Is Homemade Sourdough Pizza?
Sourdough pizza is made using a naturally fermented dough prepared with sourdough starter instead of relying entirely on commercial baker’s yeast. The starter contains naturally occurring yeasts and lactic acid bacteria that ferment the flour and water, helping the dough rise while developing its characteristic flavor.
Unlike quick pizza dough, which may be prepared and baked within a few hours, sourdough pizza often benefits from a longer fermentation period. This allows the dough to develop a more complex taste and a pleasantly chewy texture.
The finished pizza can have a crisp underside, a soft and airy interior, and a beautifully browned outer crust. Depending on your fermentation time, flour, hydration, shaping technique, and oven temperature, the flavor may range from mild and creamy to distinctly tangy.
One of the best things about homemade sourdough pizza is its versatility. You can make a classic Margherita, a cheese-loaded pizza, a vegetable pizza, a pepperoni-style pizza, or a creative combination using your favorite ingredients.
Why You Will Love This Recipe
This homemade sourdough pizza recipe is designed to help you achieve flavorful dough without making the process unnecessarily complicated.
The dough uses simple pantry ingredients: flour, water, sourdough starter, salt, and olive oil if desired. There is no need for complicated equipment, expensive specialty ingredients, or a professional pizza oven.
The long fermentation gives the dough time to develop flavor naturally. You can prepare the dough ahead of time, refrigerate it, and bake your pizza when convenient.
The recipe also gives you control over the thickness and texture of your crust. Shape it thin for a crisp, traditional-style pizza or leave a slightly thicker border for a softer, airier crust.
Because you make everything yourself, you can adjust the sauce, cheese, toppings, and seasoning to suit your preferences.
Recipe Overview
Preparation time: Approximately 30 minutes of active preparation.
Initial fermentation: Approximately 4–6 hours at a moderate room temperature, depending on starter strength and dough temperature.
Cold fermentation: Approximately 12–48 hours, optional but recommended for deeper flavor and easier scheduling.
Final resting time: Approximately 1–2 hours after refrigeration, depending on dough temperature and activity.
Baking time: Approximately 7–15 minutes in a very hot home oven, depending on the oven, baking surface, and pizza thickness.
Total elapsed time: Usually 1–3 days when using a cold-fermentation method, although the actual hands-on work is relatively short.
Yield: Two medium pizzas, approximately 10–12 inches each.
Difficulty: Moderate for beginners, becoming easier with practice.
Ingredients for the Sourdough Pizza Dough
The following quantities make enough dough for two medium pizzas.
Main Dough Ingredients
- 500 grams bread flour or strong white flour
- 325 grams water at room temperature
- 100 grams active sourdough starter at 100% hydration
- 10 grams fine sea salt
- 10 grams olive oil, optional
Bread flour is an excellent choice because its higher protein content helps create a strong gluten network. This structure traps fermentation gases, allowing the dough to rise and develop an airy texture.
All-purpose flour can also work, although the dough may be somewhat less elastic and the crust may have a slightly different texture.
The water quantity produces a dough with moderate hydration, making it manageable for beginners while still capable of creating a tender interior and crisp crust.
The sourdough starter should be active and recently fed. A starter maintained with equal weights of flour and water is particularly convenient for this recipe.
Salt strengthens the flavor and helps regulate fermentation. Olive oil is optional; it can add tenderness and help the dough feel easier to handle, although a traditional lean pizza dough can be made without it.
Ingredients for the Pizza Sauce
- 400 grams canned whole peeled tomatoes or crushed tomatoes
- 1 tablespoon olive oil
- 1–2 garlic cloves, finely minced, optional
- 1 teaspoon dried oregano
- ½ teaspoon fine salt, adjusted to taste
- ¼ teaspoon freshly ground black pepper
- ½ teaspoon sugar, optional if the tomatoes taste especially acidic
- A few fresh basil leaves, optional
A good pizza sauce should taste fresh, balanced, and tomato-forward. It should not be excessively watery, because too much liquid can make the center of the pizza soggy.
For a simple traditional-style sauce, crush good-quality canned tomatoes by hand and season them lightly with salt. You do not necessarily need to cook the sauce before using it.
If you prefer a richer, cooked sauce, gently sauté the garlic in olive oil, add the tomatoes and seasonings, and simmer for approximately 15–20 minutes. Allow the sauce to cool completely before spreading it over the dough.
Ingredients for the Cheese Topping
- 250–300 grams low-moisture mozzarella, grated or torn into small pieces
- 30–50 grams Parmesan cheese, finely grated, optional
- Fresh basil leaves, optional
- A small drizzle of olive oil, optional
Low-moisture mozzarella is particularly useful for homemade pizza because it melts beautifully without releasing as much water as fresh mozzarella.
Fresh mozzarella is also delicious, but it should be drained well and patted dry before use. If it is very wet, tear it into small pieces and allow excess moisture to drain before placing it on the pizza.
Parmesan adds a salty, savory flavor that complements mozzarella. Use it sparingly so that it enhances the pizza without overpowering the other ingredients.
Optional Pizza Toppings
You can keep the pizza simple or create your own combinations using ingredients such as:
- Thinly sliced bell peppers
- Sliced mushrooms
- Red onion
- Black or green olives
- Sweetcorn
- Fresh spinach
- Cooked chicken
- Cooked beef
- Pepperoni
- Thinly sliced tomatoes
- Fresh basil
- Chili flakes
- Dried oregano
- Roasted vegetables
For the best results, avoid piling too many toppings onto the dough. Excess toppings add weight and moisture, which can prevent the crust from becoming properly crisp.
Meat toppings should be cooked beforehand when necessary. Raw chicken, for example, should not be placed on a pizza for a short bake and assumed to be safely cooked through.
Equipment You Will Need
You can make excellent sourdough pizza with basic kitchen equipment.
A digital kitchen scale is highly recommended because sourdough dough behaves more consistently when ingredients are measured by weight.
You will also need a large mixing bowl, a spoon or dough scraper, a clean work surface, and a covered container for fermentation.
For baking, use a heavy baking sheet, pizza stone, or pizza steel if available. A pizza peel is useful for transferring the shaped dough, but an inverted baking sheet can serve as an alternative.
Parchment paper can make transferring pizza easier, provided the paper is suitable for the baking temperature. Follow its manufacturer’s maximum-temperature guidance, and do not leave paper exposed to heating elements or open flames.
A conventional home oven can produce very good results when fully preheated.
Step 1: Prepare an Active Sourdough Starter
The sourdough starter is the foundation of the entire recipe. It provides the microorganisms that ferment the dough, create gas, and develop the distinctive sourdough flavor.
If you already maintain an active starter, feed it according to your usual schedule and use it when it is lively and well risen.
A typical feeding uses equal weights of starter, flour, and water. For example, combine 25 grams of existing starter with 50 grams of flour and 50 grams of water. This produces enough starter for the pizza recipe while leaving some extra for maintenance.
Mix thoroughly until no dry flour remains. Transfer the mixture to a clean jar, cover it loosely, and allow it to ferment at a comfortable room temperature.
The time required depends on the starter, feeding ratio, room temperature, and flour. It may take approximately 4–8 hours or longer to reach its peak.
Look for a starter that has risen noticeably, contains bubbles throughout, and smells pleasantly fermented. Many starters develop a rounded or slightly domed surface near their peak before eventually flattening.
A starter that has recently been fed and is actively rising will generally produce more predictable pizza dough than a weak or neglected starter.
If your starter has been refrigerated, it may need one or more feedings before it becomes sufficiently active.
Step 2: Combine the Flour and Water
Place 500 grams of flour in a large mixing bowl.
Add 300 grams of the water initially, reserving the remaining 25 grams for adjusting the dough and dissolving the salt.
Mix the flour and water until there are no large pockets of dry flour. The dough will look rough and uneven at this stage, which is completely normal.
Cover the bowl and let the mixture rest for 20–30 minutes.
This resting period allows the flour to absorb water more thoroughly and begins gluten development. It can make the dough easier to knead and stretch later.
This step is sometimes called an autolyse when it consists of flour and water alone. Keeping the starter and salt out during this initial rest follows that approach.
Do not worry about achieving a smooth dough yet. The objective is simply to hydrate the flour evenly.
Step 3: Add the Sourdough Starter
Add 100 grams of active sourdough starter to the hydrated flour mixture.
Use your fingers, a spoon, or a dough scraper to work the starter into the dough.
At first, the starter may appear as separate streaks or small pieces. Continue mixing until it is distributed throughout the dough as evenly as possible.
Add the reserved water gradually if needed. The dough should feel moist and slightly tacky, but it should not resemble a liquid batter.
Mix for several minutes until the ingredients form a cohesive mass.
Cover the bowl and let the dough rest for another 15–20 minutes before adding the salt.
This short rest helps the dough relax and makes the next stage easier.
Step 4: Add the Salt and Olive Oil
Sprinkle the 10 grams of salt over the dough.
If you reserved water, use a small amount to help dissolve and distribute the salt. Pinch and fold the dough repeatedly until the salt is incorporated.
If using olive oil, add it after the starter and salt have been mixed into the dough.
Continue folding and squeezing gently until the oil is absorbed.
The dough may feel slippery or uneven for a short time, but it should become more uniform as you work it.
Avoid adding large amounts of extra flour simply because the dough feels sticky. Sourdough dough often becomes less sticky as gluten develops and fermentation progresses.
If the dough is genuinely too wet to handle, allow it to rest before making adjustments. Small amounts of additional flour can be used if necessary, but excessive flour may produce a dense crust.
Step 5: Develop the Gluten
Gluten gives pizza dough its elasticity and helps it hold the gases produced during fermentation.
You can develop gluten by kneading, folding, or combining both methods.
For a beginner-friendly method, use stretch-and-fold movements.
Wet your hand lightly, lift one edge of the dough, stretch it upward without tearing it, and fold it toward the center. Rotate the bowl and repeat from another side.
Continue until you have folded the dough from all four sides.
Cover the bowl and allow the dough to rest for 20–30 minutes.
Repeat the folding process three or four times over approximately 1½–2 hours, depending on how the dough develops.
Each round should gradually make the dough smoother, stronger, and more elastic.
Do not force the dough to stretch beyond its limits. If it resists strongly or begins tearing, cover it and allow it to rest longer.
By the end of this stage, the dough should hold together well and feel more organized than it did immediately after mixing.
Step 6: Begin Bulk Fermentation
After the initial mixing and folding, cover the dough and allow it to ferment.
Bulk fermentation is the period when the entire dough rises before being divided into individual pizza portions.
At a moderate room temperature, this may take approximately 4–6 hours from the time the dough was mixed, but the exact timing varies considerably.
A cool kitchen may require substantially longer. A warm kitchen may shorten the process.
Instead of relying only on the clock, observe the dough.
Look for a noticeable increase in volume, bubbles around the sides of the container, a smoother surface, and a lighter, more aerated feel.
The dough does not always need to double in size. For a dough that will undergo additional cold fermentation, an increase of approximately 30–60% can be a useful starting point, depending on temperature and starter activity.
Avoid allowing the dough to become extremely inflated and fragile before refrigeration. Overfermentation can weaken the gluten structure and make the dough difficult to shape.
If your kitchen is warm, check the dough frequently.
Step 7: Divide the Dough into Pizza Portions
Lightly flour your work surface and transfer the fermented dough onto it.
Use a dough scraper to divide it into two equal portions, each weighing approximately 470 grams, depending on the final dough weight.
Each portion will make a medium pizza with a moderately generous crust.
If you prefer thinner pizzas, divide the dough into three smaller portions instead.
Handle the dough gently to preserve some of the gas created during fermentation.
To form a dough ball, pull the outer edges toward the center, turn the dough seam-side down, and gently rotate it against the work surface to create surface tension.
The goal is to create a rounded ball without tearing the outer skin.
Place each dough ball into a lightly oiled container or individual covered bowl.
Leave enough room for the dough to expand.
Step 8: Refrigerate for Flavor Development
Cover the dough balls securely and place them in the refrigerator for approximately 12–48 hours.
This cold-fermentation period is optional, but it is one of the most useful techniques for improving the flavor and scheduling of sourdough pizza.
As the dough slowly ferments in the refrigerator, it develops more complex aromas and a pleasant depth of flavor.
The dough may also become easier to stretch after sufficient resting time.
For a first attempt, try a 24-hour cold fermentation. Once you understand how your starter behaves, you can experiment with longer or shorter periods.
The refrigerator slows fermentation rather than stopping it completely, so the dough may continue to rise gradually.
If the dough becomes excessively puffy, weak, or strongly acidic, it may have fermented too far. The next batch may benefit from a shorter room-temperature fermentation, a colder refrigerator, or a shorter cold rest.
Step 9: Bring the Dough to Room Temperature
Remove the dough balls from the refrigerator approximately 1–2 hours before baking.
Keep them covered while they warm up.
Cold dough is usually harder to stretch because the gluten is tighter and the dough is less relaxed.
As the dough warms, it generally becomes softer and easier to shape.
The exact time depends on the size of the dough balls and the room temperature. In a warm kitchen, the dough may need less time.
Do not leave it uncovered, as a dry skin can form on the surface and interfere with stretching.
The dough should feel relaxed and pliable. It does not need to become extremely puffy before you begin shaping it.
Step 10: Preheat the Oven Thoroughly
Preheat your oven to its highest suitable temperature, commonly around 250–290°C in home ovens that support this range.
If using a pizza stone or pizza steel, place it in the oven before preheating.
Allow the baking surface to heat thoroughly, often for 45–60 minutes, following the equipment manufacturer’s instructions.
A fully heated baking surface transfers heat rapidly to the bottom of the dough, helping create a crisp base before the toppings release too much moisture.
If you do not have a pizza stone or steel, place a heavy baking sheet upside down on an oven rack and preheat it.
Use an oven temperature that is safe for your cookware and baking surface.
Do not place a cold stone into a hot oven or expose a hot stone to cold water, as sudden temperature changes can cause thermal shock.
Step 11: Prepare the Pizza Sauce
While the oven heats, prepare your sauce.
Place the tomatoes in a bowl and crush them by hand or with a fork until they reach the desired consistency.
Add the olive oil, oregano, salt, pepper, and minced garlic if desired.
Stir thoroughly and taste the mixture.
The sauce should be flavorful without being excessively salty, sweet, or heavily seasoned.
If the tomatoes are naturally sweet and balanced, you may not need any sugar.
If the mixture seems watery, drain off some excess liquid or simmer it gently until slightly thickened. Allow cooked sauce to cool before using.
You generally need only a few tablespoons of sauce per medium pizza. Applying too much sauce can make the middle wet and prevent the crust from baking evenly.
Step 12: Prepare the Toppings
Grate the mozzarella if you are using a block of cheese.
If using fresh mozzarella, drain it well and pat it dry with clean kitchen paper.
Slice vegetables thinly so they cook quickly.
Cook mushrooms briefly if they release a large amount of moisture. Drain cooked vegetables well before placing them on the pizza.
Bell peppers, onions, and olives can generally be used in small quantities without pre-cooking.
For meat toppings, make sure they are appropriately cooked before assembly when the baking time would not be sufficient to cook them safely.
Arrange all your toppings before shaping the dough. Having everything ready makes assembly easier and reduces the time the shaped dough sits on the counter.
Step 13: Shape the Sourdough Pizza Dough
Lightly flour your work surface.
Place one dough ball on the surface and sprinkle a little flour over the top if necessary.
Using your fingertips, gently press the dough from the center outward, gradually pushing the air toward the edges.
Leave a border of approximately 1–2 centimeters around the outside. This border will become the raised crust.
Turn the dough occasionally and continue pressing outward until it begins to widen.
Lift the dough carefully and stretch it with your hands, allowing gravity to assist while supporting the thicker edges.
Rotate the dough as you stretch so it expands evenly.
Aim for a circle approximately 10–12 inches across.
Do not use a rolling pin if you want a more open, airy border, because rolling can press out many of the fermentation bubbles. However, a rolling pin is acceptable if you prefer a uniformly thin crust and find hand stretching difficult.
If the dough repeatedly shrinks back, cover it and let it rest for 10–15 minutes before continuing.
If a small hole develops, pinch the dough together gently or fold a little dough over the opening.
Handle the dough carefully, but do not worry about achieving a perfectly round shape. A slightly irregular homemade pizza can be just as delicious.
Step 14: Transfer the Dough for Topping
If using a pizza peel, dust it lightly with flour or a suitable fine-grained flour such as semolina.
Transfer the shaped dough onto the peel and shake it gently to make sure it moves freely.
If the dough sticks, lift the edge and add a little flour underneath. Avoid using excessive flour, which can burn and create a bitter taste.
If using a baking sheet, you can shape the dough directly on parchment paper, provided the paper is suitable for your baking temperature.
Work relatively quickly once the dough has been shaped, as moisture from the dough and toppings can cause sticking.
Do not add the toppings until the dough can be transferred safely to the oven.
Step 15: Add the Sauce and Cheese
Spread approximately 2–4 tablespoons of tomato sauce over the dough, leaving the outer border uncovered.
Use the back of a spoon to distribute the sauce evenly.
Do not create a thick layer in the center.
Add the mozzarella in an even layer, leaving small spaces between pieces so the sauce and crust can cook properly.
Sprinkle Parmesan over the cheese if desired.
Add your selected toppings, keeping the quantity moderate.
Finish with a small drizzle of olive oil if you enjoy a richer flavor.
The best homemade sourdough pizzas are often simpler than expected. A good crust, a balanced sauce, quality cheese, and a few carefully selected toppings can produce a better result than an overloaded pizza.
Step 16: Bake the Pizza
Carefully transfer the pizza to the preheated stone, steel, or inverted baking sheet.
Bake at the highest suitable oven temperature until the crust is puffed and browned, the cheese is melted, and the underside is crisp.
In a very hot oven, this may take approximately 7–10 minutes. In a less powerful oven, it may take 10–15 minutes or longer.
These times are estimates, not guarantees. Watch the pizza closely during the final minutes.
The outer crust should develop golden-brown areas, and the cheese should be melted with light browning in places.
If the top is cooking too quickly while the bottom remains pale, adjust the rack position or baking method for the next pizza.
If the bottom browns before the toppings are ready, the baking surface may be excessively hot for your oven setup, or the pizza may need a slightly different rack position.
For a second pizza, allow the baking surface to recover its heat between bakes.
Use appropriate heat-resistant tools and protect your hands from the oven and hot baking surface.
Step 17: Finish and Serve
Remove the pizza carefully and place it on a cutting board.
Allow it to rest for approximately 1–2 minutes before cutting.
Add fresh basil leaves, a light drizzle of olive oil, freshly grated Parmesan, or a small pinch of chili flakes if desired.
Slice the pizza using a sharp knife or pizza cutter.
Serve while the crust is warm and the cheese is soft.
The bottom should have a satisfying crispness, while the inside of the crust remains tender and chewy.
Homemade sourdough pizza is best eaten shortly after baking, when the contrast between the crisp crust, melted cheese, and flavorful toppings is at its peak.
Understanding the Perfect Sourdough Pizza Crust
A good sourdough crust combines several different textures.
The bottom should be sufficiently crisp to support the toppings without becoming hard or dry.
The inner crumb should be soft, with a network of small and medium air pockets.
The outer border should be lightly browned and slightly chewy, with occasional larger bubbles.
The flavor should be balanced. A mild tang is desirable, but excessive acidity can overpower the tomato sauce and cheese.
These qualities depend on several factors, including flour strength, dough hydration, fermentation, shaping, oven temperature, and the quantity of toppings.
No single technique guarantees a perfect crust every time. The key is to observe the dough and make small adjustments as you learn how your kitchen behaves.
The Importance of Hydration
Hydration describes the amount of water in the dough relative to the flour.
In this recipe, the 100 grams of starter contains approximately 50 grams of flour and 50 grams of water, assuming it is maintained at 100% hydration.
The total flour is therefore 550 grams, and the total water is 375 grams.
The overall hydration is approximately 68%.
This level provides a useful balance between manageability and a soft, airy texture.
A lower-hydration dough is usually firmer and easier to handle, but it may produce a tighter crumb.
A higher-hydration dough can create a more open interior, but it may be stickier and harder for beginners to shape.
If this is your first sourdough pizza, follow the listed quantities rather than adding extra water immediately.
Once you become familiar with the dough, you can experiment with small changes in hydration.
How to Make a Thin and Crispy Sourdough Pizza
For a thinner crust, divide the dough into three portions instead of two.
Stretch each portion more widely while maintaining a relatively thin center.
Use a moderate quantity of sauce and avoid wet toppings.
Bake on a thoroughly preheated stone, steel, or heavy baking sheet.
A thinner pizza generally needs less baking time, so begin checking it early.
If you prefer a very crisp crust, allow the pizza to bake until the underside is well browned without letting the toppings burn.
Thin sourdough pizza is particularly suitable for simple combinations such as tomato sauce, mozzarella, olives, mushrooms, and fresh basil.
How to Make a Soft and Airy Sourdough Pizza
For a softer, airier crust, handle the dough gently after fermentation.
Avoid pressing all the gas out of the outer border.
Allow the dough to relax before stretching if it feels tight.
Use sufficiently strong flour and ensure the starter is active.
Do not overload the center with sauce and toppings, because excess moisture and weight can prevent the crust from expanding properly.
A well-fermented dough and a hot baking surface help create the contrast between a crisp exterior and a tender interior.
Remember that large bubbles are not the only sign of a successful pizza. A moderately open, evenly baked crust can be excellent even without dramatic air pockets.
Homemade Sourdough Margherita Pizza
Margherita pizza is one of the simplest and most rewarding variations.
Use one portion of sourdough pizza dough, a few tablespoons of tomato sauce, approximately 100–125 grams of mozzarella, fresh basil, and a little olive oil.
Spread the sauce over the shaped dough, add the cheese, and bake until the crust is browned and the cheese has melted.
Add fresh basil after baking or during the final moments, depending on your preferred flavor.
Finish with a light drizzle of olive oil.
The simplicity of this pizza makes the quality of the dough particularly noticeable. A well-fermented sourdough crust adds depth without requiring a large number of toppings.
Homemade Sourdough Pepperoni-Style Pizza
For a meat-topped variation, prepare the dough and sauce as directed.
Spread the sauce evenly, add mozzarella, and arrange thin slices of pepperoni or another suitable cooked or ready-to-eat pizza topping over the cheese.
Bake until the crust is browned and the cheese is melted.
Add a small pinch of dried oregano or chili flakes if desired.
Because cured meat and cheese can both contribute substantial salt, taste your sauce before adding extra seasoning.
For a less greasy pizza, use a moderate amount of meat and avoid covering the entire surface with thick layers.
Homemade Sourdough Vegetable Pizza
Vegetable pizza is a colorful way to use seasonal produce.
Prepare the dough and tomato sauce as directed.
Top with mozzarella, thinly sliced bell peppers, red onion, mushrooms, olives, and a little spinach.
Pre-cook vegetables that release considerable moisture, especially mushrooms, and drain them well.
Bake until the vegetables are tender and the crust is golden.
Finish with fresh basil or a little Parmesan.
The combination of sourdough’s mild tang, sweet peppers, savory mushrooms, and melted cheese creates a satisfying flavor without requiring meat.
Homemade Sourdough Chicken Pizza
Cooked chicken pairs beautifully with sourdough pizza.
Use small pieces of fully cooked chicken seasoned with black pepper, garlic, paprika, or oregano.
Spread tomato sauce over the dough, add mozzarella, and distribute the chicken evenly.
You can include bell peppers, red onion, or olives for additional flavor.
Bake until the crust is golden and the cheese has melted.
If the chicken is refrigerated, make sure it has been stored safely and is suitable for reheating. Do not rely on a short pizza-baking time to cook raw chicken completely.
For a creamy variation, use a small quantity of thick white sauce instead of tomato sauce, but keep the amount moderate to prevent the center from becoming soggy.
Homemade Sourdough Cheese Pizza
A cheese pizza allows the dough to take center stage.
Spread a thin layer of tomato sauce over the crust and top with mozzarella.
Add a modest amount of Parmesan for a more savory flavor.
You can also experiment with small quantities of other melting cheeses, provided they do not release excessive oil.
Bake until the cheese bubbles and the crust is well browned.
Avoid using too much cheese, as a thick layer can trap moisture and make the center difficult to bake properly.
A simple cheese pizza is an excellent way to evaluate the flavor and texture of your sourdough dough before experimenting with more complicated toppings.
Common Mistakes to Avoid
Using an Inactive Starter
A weak starter may produce dough that rises very slowly or barely expands.
Feed the starter and allow it to become active before mixing the dough.
If it consistently struggles to rise after feeding, it may need several regular feedings before it is ready for pizza.
Adding Too Much Flour
Sticky dough can tempt beginners to add large quantities of flour.
However, excessive flour changes the hydration and may produce a dense crust.
Instead, allow the dough to rest, wet your hands lightly, and use a dough scraper when necessary.
Fermenting for Too Long
Long fermentation can improve flavor, but excessive fermentation may weaken the dough.
If the dough becomes extremely slack, tears easily, or has difficulty holding its shape, it may have fermented too far.
Reduce the fermentation time or adjust the temperature in your next batch.
Using Too Much Sauce
Excess sauce can make the center soggy.
Spread a thin, even layer and leave the outer border uncovered.
If your sauce is watery, drain or reduce it before use.
Adding Too Many Toppings
A heavily loaded pizza takes longer to cook and may remain wet in the middle.
Use moderate quantities and distribute ingredients evenly.
Baking in an Insufficiently Heated Oven
A pizza placed in a cold or poorly preheated oven may become dry before the crust develops a good structure.
Preheat the oven thoroughly, especially when using a stone or steel.
Stretching Cold Dough
Cold dough is often tight and difficult to stretch.
Allow it to warm up while covered, and give it extra resting time if it repeatedly contracts.
Using Wet Fresh Mozzarella
Fresh mozzarella contains more moisture than low-moisture mozzarella.
Drain and dry it before using, and avoid adding large pieces to the center of the pizza.
How to Tell When the Dough Is Ready
The appearance and feel of the dough provide valuable information.
During early mixing, the dough may look rough and feel sticky.
After several folds, it should become smoother and more elastic.
During fermentation, it should increase in volume and develop visible bubbles.
After refrigeration and warming, the dough should feel relaxed and stretch without immediately tearing.
When shaping, the dough should expand gradually under gentle pressure.
If it snaps back strongly, give it more time to rest.
If it tears easily and feels unusually weak, it may need gentler handling, or it may have fermented excessively.
Learning these signs is more useful than memorizing a single fermentation schedule, because temperature and starter strength can vary from day to day.
Can You Make Sourdough Pizza Without a Pizza Stone?
Yes. A pizza stone or steel can improve heat transfer, but it is not essential.
A heavy baking sheet is a practical alternative.
Place the baking sheet upside down in the oven and preheat it thoroughly. Prepare the pizza on a suitable peel or parchment paper and transfer it carefully to the hot sheet.
The result may differ slightly from pizza baked on steel or stone, but a properly heated baking sheet can still produce a crisp, flavorful crust.
If your oven has a convection setting, you can experiment with it, although the best setting depends on your oven and how evenly it distributes heat.
Avoid placing a regular glass baking dish directly onto a very hot baking surface unless the manufacturer explicitly confirms that it is safe for that use.
Can You Make Sourdough Pizza Without Olive Oil?
Yes. Olive oil is optional in this recipe.
A dough made without oil can produce a more traditional-style pizza texture, depending on the flour, hydration, fermentation, and baking method.
If you omit the oil, simply mix the remaining ingredients as directed.
You do not need to replace the oil with additional water.
Oil can make the dough feel a little softer and may contribute to tenderness, but the flour, water, starter, and salt are sufficient to make excellent sourdough pizza.
Can You Use All-Purpose Flour?
Yes. All-purpose flour is suitable for homemade sourdough pizza, particularly if it has a reasonably good protein content.
The dough may be slightly less elastic than dough made with strong bread flour.
Begin with the same quantities, but pay attention to the dough’s feel. Different flours absorb water differently, so you may need to reserve a small portion of the water and add it gradually.
Avoid changing several variables at once. Make the first batch with a consistent method, then adjust the water or fermentation time if necessary.
Can You Make the Dough the Same Day?
Yes, provided your starter is active and your kitchen conditions allow the dough to ferment in time.
Mix the dough in the morning, complete the folds during the first part of fermentation, and allow the dough to rise until it shows the expected signs of activity.
Divide and shape the dough balls, then allow them to rest until relaxed and ready to stretch.
Bake later that day.
A same-day dough may have a milder flavor than a dough fermented in the refrigerator for 24 hours, but it can still produce a delicious pizza.
The main consideration is to judge fermentation by the dough’s condition rather than assuming it will be ready after a fixed number of hours.
Can You Prepare the Dough in Advance?
Yes. Preparing sourdough pizza dough in advance is one of the most convenient aspects of the recipe.
You can mix the dough, allow it to begin fermenting, divide it into portions, and refrigerate the dough balls until you are ready to bake.
A cold fermentation of approximately 24–48 hours is a useful starting point.
Keep the dough covered so it does not dry out or absorb unwanted odors from the refrigerator.
Before baking, remove the dough and allow it to warm until it becomes pliable.
If you want to prepare pizza for a gathering, you can make the sauce and prepare the toppings in advance as well. Store each component separately and assemble the pizzas shortly before baking.
How to Store Leftover Pizza
Allow leftover pizza to cool slightly, then place it in a covered container and refrigerate it promptly.
For food safety, refrigerate perishable leftovers within two hours, or within one hour when the surrounding temperature is above 32°C.
Stored at 4°C or colder, cooked pizza is generally best used within 3–4 days.
For reheating, use an oven or skillet to restore some crispness to the crust.
A skillet works particularly well for individual slices. Place a slice in a covered skillet over medium-low heat until the base becomes crisp and the cheese is hot.
You can also reheat pizza in an oven at approximately 180–200°C until thoroughly heated.
Avoid leaving cooked pizza at room temperature for extended periods.
Can You Freeze Homemade Sourdough Pizza?
Yes. Both baked pizza and portions of prepared dough can be frozen, although their handling differs.
To freeze baked pizza, allow the slices to cool, wrap them securely, and place them in a freezer-safe container or bag.
For best quality, use frozen pizza within approximately two months.
Reheat the slices from refrigerated or frozen according to their size and your oven’s performance, ensuring they are heated thoroughly.
To freeze dough balls, place them in suitable freezer-safe containers with room for slight expansion.
Thaw the dough in the refrigerator, then allow it to warm until relaxed enough to stretch.
Freezing can change the dough’s texture and fermentation activity, so results may vary. For the most predictable pizza, fresh or refrigerated dough is generally preferable.
Tips for Better Homemade Sourdough Pizza
Use a kitchen scale to measure the ingredients accurately.
Maintain a healthy, active starter.
Use flour with sufficient strength to support fermentation.
Allow the dough to develop gluten through resting and folding.
Avoid judging fermentation by time alone.
Use a covered container to prevent the dough from drying out.
Give refrigerated dough enough time to relax before shaping.
Stretch the dough gently instead of pressing all the air out of the border.
Use a thin layer of sauce and moderate quantities of toppings.
Preheat your baking surface thoroughly.
Bake at the highest suitable temperature supported by your oven and equipment.
Let the finished pizza rest briefly before slicing.
Most importantly, keep notes about your results. Recording the room temperature, fermentation time, refrigerator time, and baking temperature makes it much easier to reproduce your favorite crust.
Frequently Asked Questions
Why Is My Sourdough Pizza Crust Too Dense?
A dense crust can result from an inactive starter, insufficient fermentation, weak gluten development, or excessive handling during shaping.
Make sure the starter is active, complete several rounds of folding, and allow the dough to develop visible signs of fermentation before shaping.
Also avoid pressing all the air out of the dough when forming the crust.
Why Is My Pizza Dough Too Sticky?
Some stickiness is normal, especially with moderately high-hydration dough.
Use lightly wet hands during folding and a dough scraper when transferring the dough.
Allow the dough to rest before deciding whether it needs more flour.
If the dough is unusually wet and cannot hold its shape, your flour may absorb less water than expected, or the dough may need a slight adjustment in hydration.
Why Does My Sourdough Pizza Taste Too Sour?
An excessively sour flavor can result from a long fermentation, a very acidic starter, or fermentation conditions that encourage a stronger tang.
Try using the starter when it is active and near its peak, shorten the fermentation time, or reduce the length of cold fermentation.
A milder sourdough flavor is perfectly achievable without sacrificing the benefits of natural fermentation.
Why Does My Pizza Stick to the Peel?
The dough may have been left on the peel too long, the peel may have insufficient flour, or moisture from the dough and toppings may have caused sticking.
Make sure the shaped dough moves freely before adding toppings.
Once the pizza is assembled, transfer it to the oven promptly.
If sticking is a persistent problem, a properly sized sheet of oven-safe parchment paper can simplify the process, subject to the paper’s temperature limits.
Why Is the Bottom Burnt but the Top Pale?
Your baking surface may be too hot relative to the heat reaching the top of the pizza.
Try adjusting the rack position, reducing the oven temperature slightly, or changing the baking surface.
The ideal balance depends on your oven and the material used to bake the pizza.
Why Did My Dough Tear While Stretching?
The dough may be too cold, insufficiently relaxed, or inadequately developed.
Cover it and let it rest for 10–15 minutes before trying again.
If the dough tears because it is very weak and slack, it may have fermented too long.
Is Sourdough Pizza Automatically Healthier Than Regular Pizza?
Not necessarily. Sourdough fermentation changes the dough’s flavor and structure, but the nutritional value of the finished pizza also depends on the flour, portion size, cheese, oil, sauce, and toppings.
Sourdough pizza can be part of a balanced diet, but it is not automatically lower in calories or suitable for every dietary need.
Traditional sourdough pizza made with wheat flour is not gluten-free.
Can I Make This Recipe Without Dairy?
Yes. Use a dairy-free cheese alternative or omit the cheese and increase the vegetables.
Check the ingredient labels of any cheese substitute, sauce, and prepared toppings to make sure they meet your requirements.
The dough itself can be made without olive oil and does not require dairy ingredients.
Can I Make Sourdough Pizza with Whole-Wheat Flour?
Yes. You can replace some of the white flour with whole-wheat flour.
For your first attempt, try replacing approximately 10–20% of the total flour with whole-wheat flour.
Whole-wheat flour absorbs water differently and can produce a denser texture, so you may need to adjust the water gradually.
Using a mixture of white bread flour and whole-wheat flour is often easier than using entirely whole-wheat flour.
Serving Suggestions
Homemade sourdough pizza pairs well with a simple green salad, roasted vegetables, or a bowl of soup.
A tomato-and-cucumber salad with lemon dressing provides a refreshing contrast to the warm, cheesy crust.
Roasted vegetables add color and flavor, while a light soup can make the meal more substantial.
For a family pizza night, prepare several bowls of toppings and allow everyone to choose their own combinations.
You can make one classic Margherita, one vegetable pizza, and one chicken pizza from the same batch of dough.
Serve the pizza immediately after baking for the best texture.
Final Thoughts
Homemade sourdough pizza is a rewarding recipe that combines simple ingredients, patient fermentation, and a little practice to create a wonderfully flavorful meal.
The secret is not complicated equipment or an elaborate list of ingredients. It is learning to recognize active starter, developing the dough gradually, allowing fermentation to proceed at the right pace, handling the dough gently, and baking it on a thoroughly heated surface.
The first batch may not look exactly like a restaurant pizza, and that is perfectly fine. Every batch teaches you something about your starter, your flour, your kitchen temperature, and your oven.
Start with the quantities and instructions in this recipe. Once you have achieved a crust you enjoy, experiment with different fermentation times, flour blends, sauce styles, and toppings.
With practice, homemade sourdough pizza can become a reliable favorite for family dinners, weekend cooking, and special occasions.
The finished pizza should have a crisp, golden base, a tender and chewy interior, a flavorful crust, rich tomato sauce, and melted cheese. Served fresh from the oven, it is a delicious reminder that a few simple ingredients can create something truly exceptional.