admin1
Milk Brioche Recipe: Soft, Fluffy, Buttery, and Delicious Homemade Bread
Milk brioche is a beautifully soft, rich, and tender bread made with milk, eggs, butter, flour, sugar, and yeast. It has a delicate golden crust, a light and fluffy interior, and a slightly sweet flavor that makes every slice delicious. Unlike ordinary bread, brioche contains a generous amount of butter and eggs, which give it its signature richness and a soft, almost cloud-like texture.
This homemade milk brioche recipe is perfect for breakfast, afternoon tea, sandwiches, French toast, or a simple snack with butter and jam. Although brioche is often associated with French bakeries, you can make a wonderful loaf at home using basic ingredients and a little patience.
The secret to excellent brioche is allowing the dough enough time to develop gluten, adding the butter gradually, and giving the dough enough time to rise. These steps help create the fine, delicate crumb that makes brioche so special.
Recipe Overview
Preparation time: 35–45 minutes
First rise: 1½–2 hours
Second rise: 45–90 minutes
Baking time: 30–40 minutes
Cooling time: 1 hour
Total time: Approximately 4–5½ hours, depending on room temperature and rising conditions
Yield: 1 large loaf or 2 smaller loaves
Difficulty: Moderate
Texture: Soft, fluffy, tender, and buttery
Flavor: Mildly sweet, rich, and milky
Best for: Breakfast, toast, sandwiches, French toast, and homemade bread gifts
Ingredients for Milk Brioche
The ingredients in this recipe are carefully balanced to create a soft dough that rises well and produces a rich, tender loaf.
Dry Ingredients
All-purpose flour or bread flour: 500 grams
Bread flour is ideal because its higher protein content helps develop a strong gluten structure. This structure allows the dough to hold the butter and eggs while trapping the air produced by the yeast. All-purpose flour also works well and usually creates a slightly softer, more delicate loaf.
Granulated sugar: 60 grams
Sugar gives the brioche its gentle sweetness, helps with browning, and contributes to the overall flavor. You can increase the quantity slightly if you prefer sweeter breakfast bread, but too much sugar can slow yeast activity.
Instant yeast: 7 grams
Instant yeast helps the dough rise and develop a light texture. If you are using active dry yeast, dissolve it in the warm milk first and allow it to become foamy before combining it with the other ingredients.
Fine salt: 8 grams
Salt enhances the buttery flavor, balances the sweetness, and helps regulate fermentation. Do not omit it, because the bread may taste flat without it.
Wet Ingredients
Whole milk: 180 milliliters
Milk adds moisture, tenderness, and a mild dairy flavor. Whole milk is recommended for the richest result, although reduced-fat milk can also be used. The milk should be lukewarm rather than hot.
Large eggs: 3, approximately 150 grams without shells
Eggs provide structure, richness, color, and moisture. They are essential to the characteristic brioche texture. For more consistent results, weigh the eggs without their shells when possible.
Unsalted butter: 150 grams
Butter is one of the most important ingredients in brioche. It creates a rich flavor, tender crumb, and soft texture. Use good-quality unsalted butter, softened until pliable but not melted.
Vanilla extract: 1 teaspoon, optional
Vanilla gives the bread a subtle, pleasant aroma, particularly when the brioche is served as a breakfast treat or dessert.
For the Egg Wash
1 egg
1 tablespoon milk
The egg wash gives the finished loaf an attractive golden-brown surface and a gentle shine.
Optional Finishing Ingredients
You can add pearl sugar, sesame seeds, or a light sprinkle of coarse sugar before baking. For a traditional plain milk brioche, however, the egg wash alone is sufficient.
Equipment Needed
You will need a large mixing bowl or stand mixer, a kitchen scale or measuring cups, a dough scraper, a clean work surface, a loaf pan measuring approximately 9 by 5 inches, a pastry brush, and an oven.
A stand mixer makes brioche easier because the dough requires extended kneading. However, it is entirely possible to prepare it by hand if you are comfortable working with a soft, sticky dough.
A digital kitchen scale is particularly useful for this recipe. Accurate measurements help produce consistent results, especially when working with enriched dough.
Step 1: Prepare the Ingredients
Before beginning, measure all the ingredients and place them within easy reach.
Remove the butter from the refrigerator approximately 30–60 minutes before mixing, depending on the temperature of your kitchen. It should be soft enough to bend and press with a finger but should not look oily or melted.
The eggs should ideally be at room temperature. Cold eggs can make the butter firm up during mixing, slowing the process and making the dough harder to combine smoothly.
Warm the milk gently until it feels lukewarm to the touch, ideally around 30–35°C when using instant yeast. Avoid hot milk because excessive heat can damage the yeast.
Prepare your loaf pan by lightly greasing it with butter or lining it with baking parchment.
Having everything ready before mixing makes the recipe easier to follow and reduces the likelihood of mistakes.
Step 2: Combine the Dry Ingredients
Place the flour, sugar, instant yeast, and salt in a large mixing bowl.
Mix these ingredients thoroughly with a wooden spoon or dough whisk. Distributing the yeast and salt throughout the flour helps create a more even dough.
If you are using active dry yeast, dissolve it in the lukewarm milk with a small portion of the sugar first. Allow it to stand for approximately 5–10 minutes, then proceed with the recipe.
The dry ingredients should be evenly mixed before you add the wet ingredients.
Step 3: Add the Milk and Eggs
Pour the lukewarm milk into the flour mixture.
Add the eggs and vanilla extract, if using.
Mix everything until the flour is moistened and a rough dough begins to form. At first, the dough may appear uneven, sticky, and slightly messy. This is normal.
Do not add large amounts of extra flour just because the dough feels sticky. Brioche is naturally softer than many ordinary bread doughs because it contains eggs, milk, sugar, and butter.
Continue mixing until no large patches of dry flour remain.
Cover the bowl and allow the dough to rest for approximately 10 minutes. This brief rest gives the flour time to absorb moisture and can make kneading easier.
Step 4: Knead the Dough Before Adding Butter
Begin kneading the dough until it becomes smoother and more elastic.
With a stand mixer, use the dough hook on low to medium-low speed for approximately 5–8 minutes. The exact time will depend on the mixer and flour.
For hand kneading, push the dough away from you with the heel of your hand, fold it back toward the center, turn it, and repeat. The dough will initially stick to the surface, but it should gradually become more cohesive.
At this stage, the dough should begin developing elasticity. It may still feel tacky, but it should not resemble a loose batter.
Developing gluten before adding the butter is important because the butter coats some of the flour particles and can slow gluten development. Kneading the dough first gives it a better foundation for holding the rich ingredients.
If the dough becomes warm and greasy, stop mixing and let it cool briefly before continuing.
Step 5: Add the Butter Gradually
Cut the softened butter into small pieces.
With the mixer running at low speed, add one or two pieces of butter at a time. Wait until each addition is mostly incorporated before adding more.
This process may take 8–15 minutes, depending on your equipment and the temperature of the dough.
At first, the dough may look as though it is breaking apart. It may become slippery, sticky, or separated. Do not worry. Continue mixing gently, giving the dough time to absorb the butter.
Avoid adding all the butter at once because doing so can make it more difficult for the dough to develop a uniform structure.
Once all the butter has been incorporated, increase the mixer speed slightly if necessary and continue kneading until the dough looks smooth, elastic, and glossy.
If mixing by hand, press and fold the dough repeatedly, using a dough scraper to collect any butter or dough sticking to the work surface. This stage takes patience, but it is worth the effort.
The finished dough should be soft and supple rather than dry or firm.
Step 6: Check the Dough for Gluten Development
A useful way to assess the dough is the windowpane test.
Take a small piece of dough and gently stretch it between your fingers. If it is sufficiently developed, it should stretch into a thin membrane before tearing.
You do not need to make the membrane perfectly transparent, but the dough should stretch considerably without immediately breaking.
If it tears quickly and looks rough around the edges, continue kneading for another few minutes and test again.
Because brioche contains a substantial amount of butter, it may take longer to reach this stage than lean bread dough.
Do not keep kneading indefinitely. If the dough becomes unusually warm, sticky, and greasy, allow it to cool before continuing.
Step 7: Allow the Dough to Rise
Transfer the dough to a lightly greased bowl.
Turn it once so the surface receives a thin coating of grease. Cover the bowl with a lid, plastic wrap, or a clean damp kitchen towel.
Leave the dough in a comfortably warm place for approximately 1½–2 hours, or until it has increased noticeably in size.
The exact rising time depends on the room temperature, yeast activity, and dough temperature. In a cool kitchen, the first rise may take longer.
Rather than relying only on the clock, observe the dough. It should look puffier and feel lighter than when it was first mixed.
Avoid placing the bowl directly on a hot surface or beside excessive heat. High temperatures can melt the butter and affect the dough’s structure.
Step 8: Consider an Overnight Refrigerated Rise
For a deeper flavor and easier handling, you can refrigerate the dough after its initial rise or allow it to develop slowly in the refrigerator.
Cover the bowl securely and refrigerate the dough for approximately 8–12 hours.
The cold temperature slows yeast activity and firms the butter, making the dough less sticky and easier to shape.
An overnight rise is particularly useful if you want freshly baked brioche in the morning. Prepare the dough the evening before, refrigerate it, and continue shaping it the following day.
Cold dough may rise slowly once removed from the refrigerator, so allow additional time for shaping and proofing.
This step is optional. The recipe works well with a conventional room-temperature rise.
Step 9: Prepare the Dough for Shaping
Once the dough has risen, transfer it to a lightly floured work surface.
Press it gently to release some of the larger air pockets. Do not crush it aggressively, because you want to preserve as much of its light structure as possible.
If the dough was refrigerated, it should feel firmer and easier to handle.
Use a kitchen scale to divide the dough into equal portions if you want a braided loaf or individual rolls.
For one standard loaf, you can shape the entire dough into a single smooth log. For a more decorative brioche, divide it into three equal portions and prepare a braid.
Try to use only a small amount of flour on the work surface. Excess flour can change the dough’s texture and make the finished bread less tender.
Step 10: Shape the Brioche Loaf
For a simple loaf, gently flatten the dough into a rectangle.
Fold the upper third toward the center, then fold the lower third over it, similar to folding a letter. Press gently to seal the folds.
Turn the dough over so the seam is underneath, then roll it into a smooth log that fits comfortably inside your prepared loaf pan.
Pinch the seam closed and tuck the ends underneath.
For a braided loaf, divide the dough into three equal pieces. Roll each piece into a rope of similar length and thickness. Pinch the ends together, braid the ropes gently, and pinch the opposite ends together.
Transfer the shaped dough to the greased loaf pan.
Leave enough room for the dough to expand. Avoid stretching the dough excessively or braiding it too tightly, because the loaf needs space to rise.
Step 11: Complete the Second Rise
Cover the shaped dough loosely and leave it in a warm place for approximately 45–90 minutes.
During this stage, the dough should become noticeably puffy and rise toward or slightly above the edge of the pan, depending on the shape and size of the loaf.
The second rise is important because shaping removes some of the gas developed during the first rise.
If the dough is underproofed, the loaf may split dramatically in the oven and have a dense interior. If it is overproofed, it may collapse or develop a weak structure.
To check readiness, gently press the dough with a lightly floured fingertip. The indentation should slowly begin to spring back. If it springs back immediately, it may need more time. If it remains deeply indented and the dough feels fragile, it may be overproofed.
Use this test gently, as very soft brioche dough can be delicate.
Step 12: Prepare the Egg Wash
When the dough is nearly ready, preheat the oven to 175°C using conventional top-and-bottom heat.
In a small bowl, whisk one egg with one tablespoon of milk until the mixture is smooth.
Using a pastry brush, gently apply a thin layer of egg wash over the surface of the risen loaf.
Try not to press down on the dough. A gentle application helps preserve the air inside the loaf.
For a deeper golden color, you can apply a second thin coat after the first has dried slightly. However, one even coat is generally sufficient.
If you want a plain, classic appearance, do not add any toppings. The egg wash alone will give the loaf a beautiful bakery-style finish.
Step 13: Bake the Milk Brioche
Place the loaf pan on the middle rack of the preheated oven.
Bake for approximately 30–40 minutes, depending on the loaf’s size, shape, and your oven.
The surface should become a rich golden brown, and the loaf should look well risen.
If the top browns too quickly before the center is cooked, cover it loosely with aluminum foil for the remaining baking time.
Avoid opening the oven repeatedly during the first 20 minutes, as sudden temperature changes can affect the rise.
The most reliable way to check doneness is with an instant-read thermometer. The center of enriched bread is generally done at approximately 88–93°C.
If you do not have a thermometer, check that the loaf is evenly browned and sounds slightly hollow when gently tapped on the bottom after removing it from the pan.
The interior should be fully baked but still soft and moist. Avoid overbaking, which can make the bread dry and reduce its delicate texture.
Step 14: Cool the Loaf Properly
Remove the pan from the oven and allow the brioche to rest for approximately 5–10 minutes.
Carefully turn the loaf out onto a wire rack.
Allow it to cool for at least 45–60 minutes before slicing. A larger loaf may need even longer.
Although freshly baked bread smells wonderful, cutting into brioche while it is extremely hot can compress the delicate crumb and release excess moisture.
As the loaf cools, the internal structure settles and the texture becomes more stable.
Once cooled, the bread should feel light and soft, with a tender interior and a thin, golden crust.
Step 15: Slice and Serve
Use a sharp serrated bread knife to slice the milk brioche into even pieces.
For breakfast, serve the slices with butter, fruit jam, honey, or a little cream cheese.
For a simple afternoon snack, enjoy a slice with a cup of tea, coffee, or warm milk.
You can also toast the brioche lightly. Toasting brings out the buttery flavor and creates a delicate crispness on the outside while keeping the center soft.
Milk brioche is particularly delicious when served slightly warm, but it should not be overheated because excessive heat can dry it out.
What Makes Milk Brioche Different from Ordinary Bread?
Milk brioche differs from ordinary white bread because it contains a higher proportion of butter and eggs, along with milk and sugar.
Ordinary bread recipes often use flour, water, yeast, and salt. These ingredients create a relatively lean dough that can produce a chewy crumb and a crisp crust.
Brioche, on the other hand, is an enriched dough. The fat from butter and eggs softens the crumb, while milk contributes tenderness and flavor.
Sugar adds a subtle sweetness, and eggs help create a rich color and delicate structure.
The result is bread that feels softer and more luxurious than a basic sandwich loaf.
Although brioche is rich, it should not be greasy. Proper kneading and gradual butter incorporation help distribute the fat evenly throughout the dough.
The Secrets to Extra-Soft Milk Brioche
Use the Correct Butter Consistency
Butter should be soft enough to blend into the dough but not melted.
If the butter is too cold, it may form small pieces that take a long time to incorporate. If it is too warm, it can make the dough greasy and difficult to handle.
The ideal butter should yield to gentle pressure while maintaining its shape.
Knead Until the Dough Becomes Elastic
Gluten development is essential for a light brioche.
A well-kneaded dough can stretch and trap the gas produced by yeast. This creates a fine, tender crumb instead of a dense loaf.
Do not rely solely on kneading time. Pay attention to how the dough looks and feels.
Avoid Adding Too Much Flour
A sticky dough does not automatically mean something has gone wrong.
Adding excessive flour can make the finished bread heavy and dry.
Use a dough scraper, lightly grease your hands if kneading manually, and give the dough time to develop.
Allow Enough Time for Proofing
Yeast needs time to produce gas and help the dough expand.
If your kitchen is cool, the dough may need longer than the estimated times in this recipe.
Follow the appearance and feel of the dough rather than rushing it to meet a strict schedule.
Do Not Skip the Cooling Period
Cooling helps the interior finish setting.
If you cut the loaf too early, the slices may compress and the crumb may seem gummy, even if the bread was baked correctly.
Patience at this stage helps preserve the soft, fluffy texture.
Common Mistakes and How to Avoid Them
The Dough Is Too Sticky
Brioche dough is naturally tacky, particularly before the butter is fully incorporated.
Continue kneading and allow the flour to absorb the moisture. If the dough is extremely loose, check your ingredient measurements and flour type before making adjustments.
If necessary, add a very small amount of flour, one teaspoon at a time, rather than adding a large quantity at once.
The Dough Does Not Rise
Possible causes include inactive yeast, milk that was too hot, a cold room, or insufficient rising time.
Check that your yeast is fresh and that the milk is only lukewarm.
Move the covered bowl to a comfortably warm location and allow more time if the dough is still gradually expanding.
The Butter Will Not Incorporate
The butter may be too cold, or it may have been added too quickly.
Continue mixing at a moderate speed and allow the dough time to come together. If the mixture becomes excessively warm or greasy, stop and cool it briefly before resuming.
The Loaf Is Dense
A dense loaf may result from insufficient kneading, underproofing, too much added flour, or inactive yeast.
Make sure the dough is elastic before the first rise and sufficiently puffy before baking.
Accurate measurements and adequate proofing are particularly important for enriched breads.
The Top Is Too Dark
Brioche browns more readily than lean bread because of its sugar, milk, eggs, and butter.
If the surface becomes dark before the center is fully baked, cover it loosely with foil and continue baking.
You can also check your oven temperature with an oven thermometer if browning is consistently too fast.
The Bread Is Dry
Dry brioche may be overbaked, contain too much flour, or have been stored uncovered.
Measure the flour carefully, monitor the baking time, and store the cooled loaf in an airtight container.
Delicious Variations of Milk Brioche
Once you have mastered the basic recipe, you can adapt the dough to make several different styles of bread.
Vanilla Milk Brioche
Add one teaspoon of vanilla extract to the wet ingredients. For a slightly more dessert-like flavor, increase it to two teaspoons if desired.
The vanilla complements the butter and milk without overpowering the bread.
This version is especially good with fruit preserves, fresh berries, or lightly sweetened cream cheese.
Honey Milk Brioche
Replace approximately 20 grams of the sugar with 20 grams of honey.
Honey contributes a gentle floral sweetness and can help the bread retain moisture. Because honey adds liquid and browns readily, monitor the dough consistency and the loaf’s color during baking.
Cinnamon Milk Brioche
Add one to two teaspoons of ground cinnamon to the dry ingredients.
For a cinnamon-sugar filling, roll the dough into a rectangle, spread a thin layer of softened butter, and sprinkle a mixture of sugar and cinnamon over the surface. Roll it up, place it in the loaf pan, and allow it to proof before baking.
Avoid adding too much filling, because excess sugar and butter can cause gaps in the baked loaf.
Chocolate Chip Milk Brioche
Add approximately 100 grams of small chocolate chips after the dough has developed its gluten and the butter has been incorporated.
Use cool chocolate chips and mix them in gently until distributed.
You can also add a small amount of chopped dark chocolate for a less sweet variation.
Raisin Milk Brioche
Soak approximately 80–100 grams of raisins in warm water for 10 minutes, then drain and dry them thoroughly.
Fold them into the finished dough before the first rise or during shaping.
The raisins add sweetness and create a traditional bakery-style loaf that is delicious toasted.
Braided Milk Brioche
Divide the dough into three equal portions and roll each into a long rope.
Braid the ropes gently, seal the ends, and place the loaf on a lined baking tray or in a suitable pan.
Allow it to rise until puffy, brush with egg wash, and bake until golden and cooked through.
A braid makes the bread look especially attractive when served at breakfast or presented as a homemade gift.
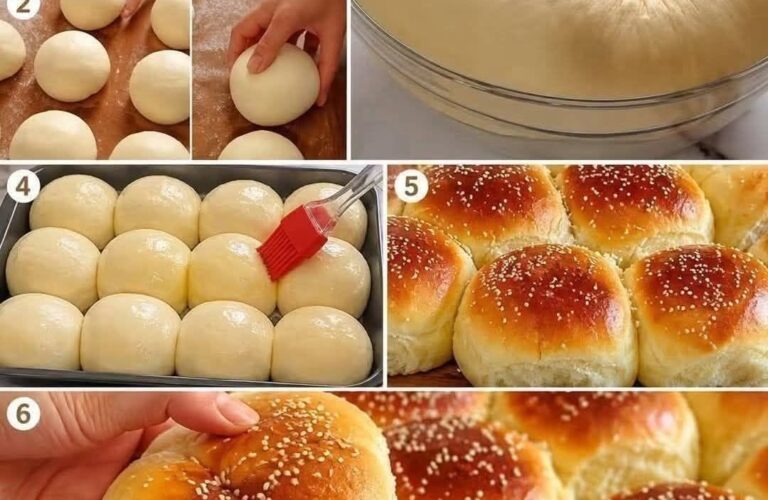
Individual Milk Brioche Rolls
Divide the dough into 10–12 equal portions.
Shape each portion into a smooth ball and place the balls in a greased baking dish, leaving space between them for expansion.
Proof until puffy, brush with egg wash, and bake at 175°C for approximately 15–22 minutes, checking for doneness.
Smaller rolls bake more quickly than a full loaf, so monitor them carefully.
How to Make Milk Brioche Without a Stand Mixer
A stand mixer is convenient, but you can make this recipe entirely by hand.
Start by mixing the flour, sugar, yeast, salt, milk, and eggs until a rough dough forms.
Let it rest for 10 minutes, then knead until it begins to develop elasticity.
Add the softened butter gradually, working each portion into the dough before adding the next. The dough will become sticky and may initially appear messy.
Use a dough scraper to lift and fold the dough. Instead of continuously adding flour, alternate short periods of kneading with brief rests.
If the dough becomes too warm, let it rest in a cool place for a few minutes.
Continue until the dough is smooth and stretchy enough to pass a reasonable windowpane test.
Hand-kneading takes longer and requires patience, but the result can be just as delicious as brioche made in a mixer.
How to Make Milk Brioche Ahead of Time
Milk brioche is well suited to advance preparation because the dough can be refrigerated.
You can prepare the dough in the evening, cover it securely, and refrigerate it overnight.
The following morning, shape the cold dough and place it in the loaf pan. Allow it to rise until puffy before applying the egg wash and baking.
Alternatively, shape the loaf first and refrigerate it if your schedule allows. The next day, check its condition and let it finish proofing as needed.
Refrigeration slows yeast activity but does not stop it completely, so the amount of expansion will depend on the temperature and duration.
Do not assume that a refrigerated loaf is automatically ready for baking. Always check that it has become sufficiently puffy.
How to Store Milk Brioche
At Room Temperature
Allow the loaf to cool completely before storing it.
Place it in an airtight container or a well-sealed food bag and keep it at room temperature in a cool, dry place.
For the best texture, enjoy it within two to three days.
Avoid sealing the bread while it is still warm, because trapped steam can make the crust damp and encourage spoilage.
In the Refrigerator
Refrigeration is generally not ideal for plain bread because it can make the crumb stale more quickly.
If your kitchen is very hot or humid, however, refrigeration may be useful for food safety and storage conditions. Keep the loaf sealed and check it regularly for any signs of spoilage.
For longer storage, freezing is usually the better option.
In the Freezer
Milk brioche freezes well.
Let the loaf cool completely, then wrap it tightly in plastic wrap or freezer-safe packaging.
You can freeze the whole loaf or cut it into slices before freezing. Slices are particularly convenient because you can remove only what you need.
For best quality, use frozen brioche within approximately two to three months.
Thaw the loaf at room temperature while wrapped. Individual slices can be reheated directly from frozen in a toaster if suitable for your appliance.
How to Reheat Milk Brioche
For a soft slice, place the bread in a preheated oven at approximately 150°C for 5–8 minutes.
For a crisp exterior, lightly toast the slices in a toaster or a dry pan.
If the bread has become slightly stale, toasting it with a little butter can restore its appealing flavor and make it suitable for breakfast.
Avoid heating the loaf for too long, as the delicate crumb can dry out quickly.
Serving Ideas for Milk Brioche
Milk brioche is versatile enough to accompany both sweet and savory foods.
Breakfast with Butter and Jam
Spread softened butter over a warm slice and add strawberry jam, apricot preserves, or orange marmalade.
The rich bread balances the fruit’s sweetness and creates a simple, satisfying breakfast.
Brioche French Toast
Cut the loaf into thick slices.
Whisk two eggs with approximately 120 milliliters of milk, a little cinnamon, and a teaspoon of sugar. Dip each slice briefly into the mixture, allowing it to absorb the liquid without becoming overly soggy.
Cook the slices in a lightly buttered pan over medium-low heat until golden on both sides and cooked through.
Serve with fruit, yogurt, or a little maple syrup.
Breakfast Sandwiches
Use lightly toasted brioche slices to make sandwiches with cooked eggs, cheese, and vegetables.
Its mild sweetness pairs nicely with savory fillings, making it a good alternative to ordinary sandwich bread.
Chocolate and Banana Toast
Toast a slice of brioche, spread a thin layer of chocolate hazelnut spread or melted chocolate over it, and add banana slices.
This makes a delicious occasional treat or dessert.
Brioche Bread Pudding
Cut leftover brioche into cubes and place them in a baking dish.
Whisk eggs with milk, a little sugar, and vanilla. Pour the mixture over the bread and let it stand briefly so the cubes absorb the liquid.
Bake at approximately 175°C until the pudding is set and golden. The exact baking time will depend on the depth of the dish and the quantity prepared.
This is an excellent way to use brioche that is no longer at its freshest.
Frequently Asked Questions
Can I use all-purpose flour instead of bread flour?
Yes. All-purpose flour works well for milk brioche and can produce a particularly tender loaf. The dough may behave slightly differently, so focus on its elasticity rather than following an exact kneading time.
Can I use instant yeast?
Yes. The recipe uses instant yeast, which can be mixed directly into the dry ingredients.
If you use active dry yeast, activate it in the lukewarm milk according to the package directions.
Can I use oil instead of butter?
Butter is strongly recommended because it provides brioche with its characteristic flavor and texture. Oil changes the flavor and structure, so a loaf made with oil will not be quite the same as traditional brioche.
Why does the recipe contain so much butter?
Brioche is an enriched bread. Butter gives it a tender crumb, a rich taste, and a soft texture. It also makes the dough more delicate, which is why gradual incorporation and sufficient kneading are important.
Can I reduce the sugar?
Yes. You can reduce the sugar modestly if you prefer a less sweet loaf. Keep in mind that sugar affects flavor, browning, moisture retention, and fermentation.
Can I make the dough without eggs?
Traditional brioche relies on eggs for richness, color, moisture, and structure. An egg-free version would require a different formula, so simply omitting the eggs from this recipe is not recommended.
Why is my dough not smooth?
The dough may need more kneading, or the butter may not be fully incorporated. Continue mixing at a moderate speed and check whether the dough is becoming elastic.
If it is greasy and unusually warm, let it cool briefly before continuing.
Can I bake the dough in a round pan?
Yes. A suitable round cake pan can work if it provides enough room for the dough to rise. Baking time may vary depending on the depth and shape of the pan.
Can I make brioche rolls instead of a loaf?
Yes. Divide the dough into equal portions, shape them into smooth balls, and arrange them in a greased baking dish. Proof until puffy and bake until golden and cooked through.
How do I know the bread is fully baked?
The loaf should have a golden-brown surface and a fully set center. An instant-read thermometer is the most reliable option; aim for approximately 88–93°C in the middle of the loaf.
Why did my brioche collapse?
Collapse can happen when the dough is overproofed, the gluten structure is weak, or the center is underbaked. Ensure the dough is sufficiently kneaded, proof it until puffy rather than fragile, and check the internal temperature before removing it from the oven.
Is milk brioche suitable for sandwiches?
Yes. Once cooled, the loaf can be sliced and used for sweet or savory sandwiches. Its soft crumb and mild sweetness work well with eggs, cheese, and vegetables.
Can I freeze individual slices?
Yes. Slice the cooled loaf, separate the slices with small pieces of baking parchment if desired, and freeze them in a sealed bag. Remove individual portions as needed.
Nutritional Information
The following figures are approximate estimates for one slice when the loaf is divided into 12 slices. Actual values depend on the flour, butter, egg size, and portion size used.
| Nutrient | Approximate amount |
|---|---|
| Calories | 260–290 |
| Protein | 6–8 g |
| Carbohydrates | 32–36 g |
| Fat | 11–14 g |
| Sugar | 5–7 g |
| Fiber | 1–2 g |
Milk brioche is an enriched bread, so it generally contains more fat and calories than a basic white loaf. These values do not account for additional butter, jam, chocolate, or other toppings.
Final Tips for the Best Homemade Milk Brioche
Use fresh yeast, measure the ingredients carefully, and begin with lukewarm rather than hot milk. Knead the dough until it becomes elastic before adding the butter gradually. Resist the temptation to add excessive flour, even if the dough initially feels sticky.
Allow the dough to rise until visibly puffy, shape it gently, and give it sufficient time for the second rise. Brush the surface with egg wash for a golden finish, and cover the loaf loosely with foil if it browns too quickly.
Most importantly, allow the bread to cool before slicing so its delicate interior can settle properly.
The finished milk brioche should have a beautiful golden crust, a soft and fluffy center, and a rich buttery aroma with a subtle sweetness. Serve it fresh for breakfast, toast it for an afternoon snack, or transform leftover slices into French toast and bread pudding.
With accurate measurements, patient kneading, and proper proofing, this homemade milk brioche can become a reliable favorite for everyday baking and special occasions alike.