admin1
Introduction
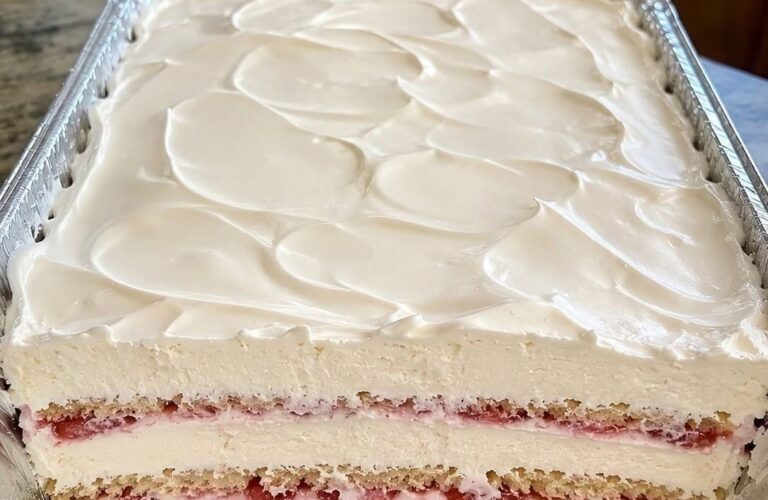
Strawberry Icebox Cake is a beautiful, creamy, refreshing dessert made with layers of sweet strawberries, fluffy whipped cream, and delicate graham crackers that soften into a cake-like texture as they chill in the refrigerator. It is one of the easiest homemade desserts to prepare because it requires no oven, no complicated baking techniques, and no special equipment. With just a handful of everyday ingredients and a little patience while the layers set, you can create a dessert that looks impressive, tastes delicious, and is perfect for almost any occasion.
The magic of Strawberry Icebox Cake comes from the way the ingredients transform during refrigeration. When the graham crackers are layered between whipped cream and fresh strawberries, they gradually absorb moisture from the cream and become soft, tender, and cake-like. The whipped cream holds everything together, while the strawberries add natural sweetness, a juicy texture, and a bright fruity flavor. Once the cake has chilled for several hours, every slice reveals beautiful layers of pale cream, softened crackers, and vibrant red strawberries.
This dessert is especially wonderful during spring and summer, when fresh strawberries are readily available and warm weather makes a chilled treat particularly appealing. It is also a fantastic option for birthdays, family dinners, potlucks, picnics, holiday gatherings, and weekend celebrations. Because the dessert is prepared ahead of time, you can assemble it the day before an event and leave it in the refrigerator until you are ready to serve.
Another reason to love this recipe is its versatility. You can keep it simple with classic graham crackers, strawberries, and whipped cream, or customize it with cream cheese, vanilla pudding, white chocolate, lemon zest, strawberry sauce, or other complementary ingredients. Each variation creates a slightly different experience while preserving the familiar combination of creamy filling, tender layers, and fresh fruit.
Whether you are an experienced home cook or someone who rarely prepares desserts, Strawberry Icebox Cake is an approachable recipe that delivers excellent results with minimal effort. The following recipe explains every step in detail, from selecting the best strawberries to preparing the cream, assembling the layers, chilling the cake, slicing it neatly, and storing leftovers.
Recipe Overview
Preparation time: 30–40 minutes
Chilling time: 6–8 hours, preferably overnight
Total time: Approximately 7–9 hours, including chilling
Servings: 12–15 slices
Difficulty level: Easy
Cooking method: No-bake, refrigerator-set dessert
Recommended pan: 9-by-13-inch baking dish
Best serving temperature: Well chilled
Best make-ahead time: One day before serving
Ingredients
For the Strawberry Layers
- 2 pounds fresh strawberries, washed and thoroughly dried
- 2 tablespoons granulated sugar, optional
- 1 teaspoon fresh lemon juice, optional
For the Whipped Cream Filling
- 3 cups cold heavy whipping cream
- 8 ounces cream cheese, softened to room temperature
- 3/4 cup powdered sugar
- 2 teaspoons pure vanilla extract
- 1 tablespoon instant vanilla pudding mix, optional, for additional stability
- A small pinch of salt, optional
For the Cake Layers
- Approximately 24–30 full graham cracker sheets, depending on the size of your dish
- 1/2 cup finely crushed graham crackers, optional for the topping
Optional Garnishes
- A few additional fresh strawberries
- White chocolate shavings
- A light dusting of powdered sugar
- Finely grated lemon zest
- A small amount of strawberry sauce
- Fresh mint leaves, if desired
The optional ingredients are not necessary for a successful cake. The basic combination of strawberries, whipped cream, and graham crackers is enough to produce a delicious dessert.
Choosing the Best Strawberries
The strawberries are one of the most important ingredients in this recipe because their flavor carries through every layer. Choose berries that are fragrant, bright red, and firm enough to hold their shape when sliced.
Avoid strawberries that are bruised, leaking juice, moldy, or excessively soft. Very ripe strawberries can still be delicious, but they release more liquid and may make the cake watery if they are not handled carefully.
Medium-sized strawberries are particularly convenient because they are easy to slice evenly. Large strawberries work well too, although you may want to cut them into smaller pieces for easier layering.
Fresh strawberries are the best choice for this version of the recipe. Frozen strawberries can release considerable moisture as they thaw, which may prevent the cake from setting properly. If frozen fruit is your only option, thaw it completely, drain away excess liquid, and pat it dry before using it. The finished texture may still be softer than a cake made with fresh fruit.
Wash the strawberries under cool running water shortly before preparing the cake. Do not soak them for a long time, because strawberries can absorb moisture and lose some of their fresh texture. Remove the green tops, then dry the berries thoroughly with clean paper towels.
Once the strawberries are dry, slice them into thin, relatively even pieces. Slices approximately 1/4 inch thick are a useful starting point. Consistent slices make the cake easier to assemble and help ensure that each serving contains a balanced amount of fruit.
If your strawberries are exceptionally sweet, you can use them without adding sugar. If they taste slightly tart, toss the sliced fruit with two tablespoons of sugar and the optional lemon juice. Let the mixture rest for about 5–10 minutes, then drain away any liquid that collects before layering the berries into the cake.
This simple preparation helps control moisture while allowing the strawberry flavor to shine.
Step-by-Step Instructions
Step 1: Prepare the Baking Dish
Choose a 9-by-13-inch baking dish with reasonably straight sides. A glass dish is especially useful because it allows you to see the attractive layers through the sides, although a ceramic or metal dish can also work.
Make sure the dish is clean and completely dry before beginning. You do not need to grease it because the dessert will be served directly from the dish.
If you want to remove the entire cake from the pan before serving, line the dish with parchment paper, leaving some overhang along the long sides. This is optional and works best when the dessert is well chilled and the dish has straight sides.
For the easiest preparation and serving, however, simply assemble the cake in the baking dish and serve it with a wide spatula.
Place the dish on a level refrigerator-safe shelf so the layers remain even while chilling.
Step 2: Wash, Dry, and Slice the Strawberries
Wash the strawberries carefully, remove the green tops, and pat the berries completely dry.
Slice each strawberry into thin pieces. Try to keep the slices similar in thickness so they form even layers without creating large gaps.
Reserve several attractive strawberries for decorating the finished cake. You can leave these whole, slice them vertically, or cut them into halves.
If you are using sugar to sweeten the fruit, combine the sliced strawberries with the sugar and lemon juice in a bowl. Let them stand briefly, then drain the released liquid.
Do not pour the accumulated strawberry juice into the cake. Although it may seem wasteful, the extra liquid can soak the crackers too quickly and cause the layers to become soggy.
Keep the prepared strawberries refrigerated if you are not assembling the cake immediately.
Step 3: Soften the Cream Cheese
Remove the cream cheese from the refrigerator and allow it to soften until it is easy to mix. It should feel smooth when pressed gently with a spoon, but it should not be warm or melted.
Place the cream cheese in a large mixing bowl. Beat it with an electric hand mixer on medium speed until it becomes smooth and creamy.
Scrape the sides and bottom of the bowl with a spatula to remove any firm pieces. Continue beating until no noticeable lumps remain.
This step is important because cream cheese that is too cold can create small lumps in the whipped filling. Smooth cream cheese produces a more consistent texture and helps the filling spread evenly across the crackers.
If you do not have an electric mixer, you can use a sturdy whisk and some patience, although achieving a completely smooth mixture may take longer.
Step 4: Add the Powdered Sugar and Vanilla
Add the powdered sugar to the softened cream cheese. Beat on low speed initially to prevent the sugar from scattering, then increase the speed and mix until combined.
Add the vanilla extract and the optional pinch of salt. Mix again until the filling smells pleasantly fragrant and tastes balanced.
Powdered sugar is preferable to granulated sugar for this filling because it dissolves readily and helps maintain a smooth consistency.
Avoid adding too much sugar. Strawberries already contribute natural sweetness, and the graham crackers contain sugar as well. The cream should complement the fruit rather than overwhelm it.
Taste a small amount of the cream cheese mixture before proceeding. If you prefer a sweeter dessert, add another tablespoon of powdered sugar and mix thoroughly.
Step 5: Whip the Heavy Cream
Pour the cold heavy whipping cream into a separate chilled mixing bowl.
Using cold cream is essential for successful whipping. Cream that is too warm may take longer to whip and may not hold its shape as effectively.
Begin mixing on low speed, gradually increasing to medium-high speed as the cream thickens. Continue until soft peaks form.
Soft peaks mean that when you lift the beaters, the cream forms a peak that gently bends over. At this stage, the cream is thick but still soft and smooth.
Continue whipping briefly until medium peaks form. The cream should hold its shape while remaining silky and spreadable.
Do not overwhip the cream. If it becomes grainy or begins to separate, it has been whipped too far. Properly whipped cream should look smooth and airy.
If you are using a stand mixer, watch the cream closely because it can move from soft peaks to stiff peaks quickly.
Step 6: Combine the Cream Cheese and Whipped Cream
Add approximately one-third of the whipped cream to the cream cheese mixture. Gently fold it in using a flexible spatula.
This first addition lightens the cream cheese mixture and makes the remaining whipped cream easier to incorporate.
Add the remaining whipped cream in two portions, folding gently after each addition. Move the spatula around the sides of the bowl and through the center, lifting the mixture rather than stirring aggressively.
Continue folding until the filling is uniform in color and texture, with no visible streaks of cream cheese or whipped cream.
The finished filling should be fluffy, smooth, and thick enough to spread without immediately running across the crackers.
If you want a more stable filling, you can mix one tablespoon of instant vanilla pudding mix into the cream cheese and powdered sugar before adding the whipped cream. This ingredient is optional and should not be confused with preparing a full batch of pudding.
You can also omit the cream cheese and use sweetened whipped cream alone, although the resulting cake will be lighter and may be less stable when sliced.
Step 7: Prepare the First Layer of Graham Crackers
Arrange a single layer of graham crackers across the bottom of the baking dish.
Break some crackers into smaller pieces as necessary to fill the gaps. The goal is to create a mostly continuous layer that supports the cream and strawberries above it.
The crackers do not need to fit together perfectly. Small gaps are normal, and softened crackers will blend together as the cake chills.
Avoid crushing the crackers into crumbs for the main layers. Whole or broken sheets create the recognizable cake-like structure that makes an icebox cake special.
Do not dip the crackers in milk. They will absorb moisture from the filling while chilling, and dipping them beforehand can make the dessert overly soft.
Step 8: Spread the First Layer of Cream
Spoon approximately one-quarter of the whipped cream filling over the graham crackers.
Use an offset spatula or the back of a large spoon to spread the cream into an even layer. Extend it gently toward the edges of the dish so the crackers are covered.
Try to keep the layer reasonably consistent in thickness. An even layer helps the finished dessert look attractive and ensures that every portion contains a similar amount of cream.
Do not press too firmly while spreading. Excessive pressure may shift the crackers underneath.
The cream should fill most of the small spaces between the crackers without being forced down into the dish.
Step 9: Add the First Strawberry Layer
Arrange a portion of the sliced strawberries over the cream.
Overlap the slices slightly so the fruit covers most of the surface. You do not need to create a perfect pattern, but placing the slices evenly will make the cake easier to portion.
Choose some of the smaller slices for the edges and use larger slices in the middle.
Avoid piling the strawberries too thickly in one area. A balanced layer allows the fruit to remain noticeable without making the dessert difficult to slice.
Gently press a few slices into the cream if necessary, but do not push them all the way through.
Step 10: Repeat the Layers
Add another layer of graham crackers over the strawberries.
Spread another portion of the whipped cream filling on top, followed by another even layer of sliced strawberries.
Continue repeating the pattern until the dish is filled and the ingredients have been used.
A typical arrangement for a 9-by-13-inch dish is:
- Graham crackers
- Whipped cream filling
- Sliced strawberries
- Graham crackers
- Whipped cream filling
- Sliced strawberries
- Graham crackers
- Remaining whipped cream filling
Depending on the thickness of your layers and the size of your dish, you may be able to create additional thin layers. The exact number is less important than maintaining a balanced distribution of crackers, cream, and fruit.
Reserve enough whipped cream to cover the top completely. A smooth cream layer helps protect the strawberries underneath and gives the dessert a neat finish.
Step 11: Finish the Top Layer
Spread the remaining whipped cream evenly across the top of the cake.
Use a spatula to smooth the surface, working from the center toward the edges.
You can leave the top completely smooth for a simple, elegant appearance or create gentle swirls with the back of a spoon.
Arrange the reserved strawberries on top just before chilling if you want them to soften slightly, or wait until serving time for a fresher-looking garnish.
For a more decorative presentation, arrange strawberry halves in rows, create a circular pattern, or scatter thin slices across the surface.
Sprinkle a small amount of crushed graham crackers over the top if desired. You can also add white chocolate shavings or a little lemon zest.
Keep the decoration relatively light. The beauty of Strawberry Icebox Cake comes from its simple layers, creamy texture, and fresh fruit.
Step 12: Cover the Cake
Cover the dish carefully with plastic wrap or a fitted lid.
Try to prevent the covering from touching the surface of the cream. If necessary, insert a few clean toothpicks into the dessert near the edges to support the wrap, making sure they are removed before serving.
Covering the cake protects it from absorbing refrigerator odors and prevents the surface from drying out.
Place the covered dish on a flat shelf in the refrigerator.
Do not place it in the freezer if your goal is a classic refrigerator-set texture. Freezing can make the cream and strawberries firm and icy rather than soft and cake-like.
Step 13: Chill Until the Layers Soften
Refrigerate the cake for at least 6–8 hours. Overnight chilling is even better.
During this time, the crackers absorb moisture from the cream and gradually soften. The separate ingredients begin to behave like a single layered dessert, making it easier to cut and serve.
If you cut the cake too soon, the crackers may remain crunchy, and the cream layers may slide apart. A longer chilling period helps the dessert become cohesive.
For the most reliable results, prepare the cake the evening before serving it the following day.
Keep the refrigerator at 40°F (4°C) or below, and return the cake to the refrigerator promptly after serving.
Step 14: Add Fresh Garnishes Before Serving
Once the cake has chilled, remove the covering and inspect the surface.
If the reserved strawberries look fresh and attractive, you can serve the dessert as it is. Otherwise, add freshly sliced strawberries just before serving.
You may also add a light scattering of graham cracker crumbs, white chocolate shavings, or a little lemon zest.
Avoid adding large amounts of liquid strawberry sauce immediately before serving, as excess sauce can run into the cream and make the top messy.
If you prefer strawberry sauce, serve a small spoonful alongside each slice.
Step 15: Slice and Serve
Use a sharp knife to cut the cake into squares or rectangles.
For cleaner portions, wipe the knife with a warm, damp cloth between cuts. A wide, flat spatula will help lift each serving from the dish.
Because the crackers soften during chilling, the dessert should cut more easily than a freshly assembled version. Some layers may shift slightly when lifted, which is normal for a homemade icebox cake.
Transfer each portion to a chilled dessert plate if desired.
Serve immediately while the cream is cool and the strawberries are fresh. The finished cake should have a soft, creamy texture, tender cake-like layers, and a refreshing strawberry flavor.
What Makes Strawberry Icebox Cake So Special?
Strawberry Icebox Cake is different from a traditional baked cake because it relies on refrigeration rather than heat to develop its final texture.
A traditional cake uses flour, eggs, and leavening ingredients to create a structure during baking. An icebox cake uses ready-made crackers or cookies that soften as they absorb moisture from the cream.
This process is sometimes described as a no-bake transformation. The crackers begin firm and crisp, but after several hours in the refrigerator, they become tender enough to resemble thin cake layers.
The whipped cream filling serves several purposes. It adds sweetness, provides moisture, holds the layers together, and creates a soft contrast with the strawberries.
The strawberries contribute color, freshness, and a naturally fruity flavor that balances the richness of the cream cheese.
The combination works because the ingredients offer different textures and flavors while gradually blending together during chilling.
Another advantage is that the cake can be prepared ahead of time. Instead of spending the entire day baking and decorating a dessert, you can assemble it in advance and allow the refrigerator to do most of the work.
Tips for the Best Strawberry Icebox Cake
Dry the Strawberries Thoroughly
Excess water is one of the main reasons an icebox cake becomes watery.
After washing the strawberries, pat them dry and allow any remaining surface moisture to evaporate. If you add sugar to the fruit, drain away the liquid before assembling the cake.
This small step makes a noticeable difference in the finished texture.
Use Cold Heavy Cream
Cold heavy cream generally whips more effectively than warm cream.
For best results, refrigerate the cream until you are ready to use it. You can also chill the mixing bowl and beaters for a few minutes before whipping.
Avoid Overwhipping
Overwhipped cream can become grainy and difficult to fold smoothly into the cream cheese mixture.
Stop whipping when the cream forms medium peaks and holds its shape while remaining soft.
Make the Layers Even
Even layers help the cake chill uniformly and produce attractive slices.
Spread the cream gently, distribute the strawberries across the surface, and fill large gaps between crackers with smaller pieces.
Do Not Skip the Chilling Time
The cake needs time to develop its signature texture.
Although it may look ready immediately after assembly, the crackers will still be crisp. Allow at least 6–8 hours of refrigeration, preferably overnight.
Use a Suitable Dish
A 9-by-13-inch dish provides plenty of room for several layers and makes the cake easy to serve to a group.
A slightly smaller dish will create thicker layers, while a larger dish will produce a thinner dessert. Adjust the amount of filling and the number of crackers accordingly.
Taste the Strawberries First
Some strawberries are naturally sweet, while others are tart.
Taste a slice before deciding whether to add sugar. Sweet berries may need no additional sweetener, while tart berries can benefit from a small amount.
Keep the Cake Refrigerated
Because the filling contains dairy and the dessert includes fresh fruit, keep it refrigerated until serving.
Do not leave the cake at room temperature for extended periods, particularly in warm weather.
Common Mistakes and How to Avoid Them
The Cake Is Too Watery
This usually happens when the strawberries release too much juice or when the cream filling is too loose.
Dry the fruit thoroughly, drain any liquid produced by sugaring, and use properly whipped cream. Avoid adding extra milk or strawberry juice to the layers.
If you are using cream cheese, make sure it is smooth before folding in the whipped cream.
The Crackers Are Still Crunchy
The cake probably has not chilled long enough.
Return it to the refrigerator and allow several additional hours for the crackers to soften.
The type and thickness of the crackers can also influence how quickly they absorb moisture.
The Cream Is Too Runny
The cream may have been underwhipped, or the mixture may have become too warm.
Make sure the heavy cream is cold and whip it to medium peaks before folding it into the cream cheese mixture.
Avoid using ordinary light cream that is not suitable for whipping.
The Filling Contains Lumps
Cold, firm cream cheese is the most likely cause.
Soften the cream cheese before mixing and beat it until smooth before adding the whipped cream.
If the filling has already been combined and contains small lumps, gently pressing it against the side of the bowl with a spatula may help, but it is easier to prevent the problem at the beginning.
The Layers Slide Apart
This can happen if the cream is too loose, the crackers are not arranged evenly, or the cake has not chilled long enough.
Use a thick filling, spread it evenly, and allow the cake to set overnight when possible.
For especially neat slices, use a sharp knife and a wide spatula.
The Cake Tastes Too Sweet
Reduce the powdered sugar slightly and skip the additional sugar on the strawberries.
You can also add a little lemon zest to the cream for a fresher flavor.
Remember that graham crackers and ripe strawberries already contribute sweetness.
The Strawberries Look Dull on Top
Fresh strawberry slices can lose their bright appearance after extended refrigeration.
For the best presentation, decorate the top with a fresh layer of strawberries just before serving.
You can keep the interior fruit layers assembled the previous day and add the decorative fruit later.
Delicious Variations
Strawberry Cheesecake Icebox Cake
For a richer cheesecake-inspired dessert, increase the cream cheese to 12 ounces and use 2 1/2 cups of heavy whipping cream.
Beat the softened cream cheese with the powdered sugar and vanilla until smooth. Whip the cream separately, then fold it into the cream cheese mixture.
Assemble the cake with graham crackers and strawberries as directed.
The additional cream cheese gives the filling a tangy flavor reminiscent of strawberry cheesecake. Chill overnight for the best texture.
Strawberry Chocolate Icebox Cake
Chocolate and strawberries make a delicious combination.
Prepare the standard cake and add a thin layer of finely grated dark chocolate between some of the cream and strawberry layers.
You can also use chocolate graham crackers or sprinkle chocolate shavings over the finished dessert.
Avoid adding large amounts of melted chocolate directly to the cold filling, because it may firm into small pieces and change the texture.
Strawberry Lemon Icebox Cake
For a brighter flavor, add one to two teaspoons of finely grated lemon zest to the cream cheese mixture.
A small amount of lemon juice can also be added to the strawberries, but avoid using too much liquid.
The lemon adds freshness and balances the sweetness of the cream.
This variation is particularly enjoyable during warm weather.
Strawberry Vanilla Pudding Icebox Cake
Prepare a thicker vanilla-flavored filling by incorporating a small amount of instant vanilla pudding mix into the cream cheese mixture.
Alternatively, prepare vanilla pudding separately according to its package instructions, allow it to cool completely, and fold a portion into the whipped cream filling.
Do not add warm pudding to whipped cream, because heat can cause the cream to lose its structure.
This variation produces a softer, custard-like flavor.
Strawberry White Chocolate Icebox Cake
White chocolate adds a sweet, creamy note that pairs beautifully with strawberries.
Use a small amount of finely grated white chocolate between the layers or sprinkle it over the top before serving.
Because white chocolate is sweet, consider reducing the powdered sugar in the filling.
Strawberry Shortcake Icebox Cake
For a dessert inspired by strawberry shortcake, use vanilla wafer cookies or thin butter cookies instead of graham crackers.
Layer the cookies with whipped cream and sliced strawberries.
The finished dessert will have a delicate vanilla flavor and a soft texture after chilling.
Choose cookies that can absorb moisture without becoming mushy too quickly.
Strawberry Oreo Icebox Cake
Use chocolate sandwich cookies instead of graham crackers for a chocolate-and-strawberry variation.
Whole cookies can be arranged in the dish, or you can use chocolate wafer cookies for thinner layers.
The chocolate flavor contrasts nicely with the sweet strawberries and vanilla cream.
Mixed Berry Icebox Cake
Replace part of the strawberries with blueberries, raspberries, or thinly sliced blackberries.
Use firm, fresh berries and avoid fruit that releases excessive juice.
A mixed berry version creates a colorful dessert with a more complex fruit flavor.
If using raspberries, handle them gently because they can break apart easily.
Strawberry Banana Icebox Cake
Add thin slices of banana between some of the strawberry layers.
The banana provides a soft texture and a sweeter flavor.
Because sliced bananas brown when exposed to air, keep them covered with cream and assemble the cake shortly before chilling.
This version is best enjoyed within a day.
Coconut Strawberry Icebox Cake
Fold a small amount of finely shredded coconut into the whipped cream filling or sprinkle toasted coconut over the top before serving.
The coconut creates a subtle tropical flavor that complements the strawberries.
If you toast the coconut, allow it to cool completely before adding it to the dessert.
Strawberry Almond Icebox Cake
Add a small amount of almond extract to the cream filling, replacing only a portion of the vanilla extract.
Almond extract is potent, so begin with approximately 1/8 teaspoon and increase cautiously if desired.
You can finish the cake with finely chopped toasted almonds, provided the dessert is served to people who can safely eat nuts.
Strawberry Yogurt Icebox Cake
For a tangier variation, replace a small portion of the cream cheese with thick Greek yogurt.
Choose plain, thick yogurt and avoid adding too much, as excess moisture may weaken the filling.
The result will be slightly more tart and creamy, although the texture may be less firm than the original recipe.
How to Make Strawberry Icebox Cake Ahead of Time
One of the biggest advantages of this recipe is that it can be prepared in advance.
For the best results, assemble the cake the evening before you plan to serve it. Cover the dish and refrigerate it overnight.
During the chilling period, the crackers soften and the filling becomes more cohesive. The extra time also makes it easier to cut clean portions.
If you want to prepare the components separately, wash and dry the strawberries, prepare the cream filling, and store each component in the refrigerator. Assemble the cake when you are ready, then allow the completed dessert enough time to chill.
For the freshest appearance, wait until serving day to add decorative strawberry slices to the top.
Avoid assembling the cake several days in advance. Although it may remain edible under proper refrigeration, the strawberries can soften and release moisture, while the crackers may become excessively tender.
A preparation window of approximately 12–24 hours before serving is ideal for this recipe.
How to Store Leftover Strawberry Icebox Cake
Cover leftover cake tightly and store it in the refrigerator at 40°F (4°C) or below.
For the best texture and flavor, enjoy the leftovers within 2–3 days. The exact quality will depend on the ripeness of the strawberries, the moisture in the filling, and how well the cake was covered.
The strawberries may become softer over time, and the crackers will continue absorbing moisture. This is normal, but the texture may become less distinct after several days.
Use a clean serving utensil each time you remove a portion. Return the dish to the refrigerator promptly instead of leaving it on the counter.
If the cake has been left at room temperature for more than two hours, discard it rather than returning it to storage. In temperatures above 90°F (32°C), the safe room-temperature limit is one hour.
Can You Freeze Strawberry Icebox Cake?
Freezing is possible, but the texture will change.
The whipped cream and cream cheese filling may become firmer, while strawberries can release liquid as they thaw. Graham crackers may also become softer or less uniform.
If you want to freeze the cake, place it in a freezer-safe, tightly covered container and freeze it for up to about one month for the best quality.
You can serve it partially frozen for a firmer, semifreddo-like texture, or thaw it in the refrigerator before serving.
For refrigerated-style icebox cake, however, fresh preparation is preferable.
Do not repeatedly thaw and refreeze the dessert, and keep it protected from freezer odors.
Serving Ideas
Strawberry Icebox Cake is delicious on its own, but a few simple additions can make it feel even more special.
Serve each slice with a few fresh strawberries and a light dusting of powdered sugar.
For a richer dessert plate, add a small spoonful of strawberry sauce or a few white chocolate shavings.
For a summer gathering, serve the cake after a meal of grilled vegetables, sandwiches, pasta salad, or roasted chicken. Its cool, fruity flavor makes a pleasant finish to a casual meal.
At birthdays and family celebrations, you can decorate the top with strawberry halves arranged in a neat pattern. If you want to write a short message on the cake, use melted white chocolate or a little thick strawberry sauce, applied sparingly.
For an elegant dinner, cut smaller portions and serve them on chilled plates. A few thin strawberry slices arranged beside each serving can make the presentation look polished without requiring elaborate decoration.
Because the dessert is rich and creamy, moderate portions are often satisfying.
Frequently Asked Questions
Can I Make Strawberry Icebox Cake Without Cream Cheese?
Yes. You can prepare it with sweetened whipped cream alone.
Whip 3 cups of cold heavy whipping cream with approximately 1/2 cup of powdered sugar and 2 teaspoons of vanilla extract until medium-stiff peaks form.
Use the whipped cream to build the layers as directed.
The cake will have a lighter, airier filling, although it may not hold its shape as firmly as the cream cheese version.
Can I Use Cool Whip Instead of Homemade Whipped Cream?
Yes. Thawed frozen whipped topping can be used as a convenient alternative.
For a cream cheese filling, beat the softened cream cheese with the powdered sugar and vanilla, then gently fold in the whipped topping.
Follow the package instructions for thawing and storage. Because whipped topping products differ in sweetness and firmness, you may need to adjust the powdered sugar.
Do I Have to Use Graham Crackers?
No. Vanilla wafers, chocolate wafer cookies, thin butter cookies, and other crisp, relatively dry cookies can work.
The exact chilling time may vary depending on the thickness and moisture content of the cookies.
Choose a cookie that softens during refrigeration without immediately breaking down.
Why Is It Called an Icebox Cake?
The name comes from the traditional icebox, an early type of household food-storage cabinet that used ice to keep food cold before modern refrigerators became common.
These desserts were assembled and chilled rather than baked, making them convenient treats for home cooks.
Today, the refrigerator performs the same basic function by keeping the cake cold while its layers soften and set.
Can I Make It the Same Day I Want to Serve It?
Yes, provided you allow enough chilling time.
Assemble the cake early in the day and refrigerate it for at least 6–8 hours before serving.
If you have only a short amount of time, the crackers may remain firmer and the slices may not hold together as neatly.
Overnight chilling is the more reliable choice.
Can I Use Frozen Strawberries?
Fresh strawberries are recommended because frozen strawberries tend to release more moisture after thawing.
If you use frozen fruit, thaw it completely, drain the liquid, and pat it dry before layering.
Even with these precautions, the finished cake may be softer and less visually defined.
How Can I Make the Cake Less Sweet?
Reduce the powdered sugar in the filling and omit the optional sugar on the strawberries.
You can also add lemon zest for a brighter flavor or use strawberries that are naturally less sweet.
Avoid adding extra sweet toppings if you prefer a balanced dessert.
How Do I Get Clean Slices?
Chill the cake overnight, use a sharp knife, and wipe the blade between cuts.
A wide spatula helps lift each slice without damaging the layers.
For especially neat portions, avoid making the cream layer excessively thick or adding too much strawberry juice.
Can I Prepare It Without an Electric Mixer?
Yes, although whipping cream by hand requires more effort.
Use a large, chilled bowl and a balloon whisk. Whisk the heavy cream until it thickens and forms medium peaks, then fold it into the smooth cream cheese mixture.
Make sure the cream cheese is fully softened before mixing.
Can I Add Strawberry Jam?
Yes. A thin layer of strawberry jam can intensify the fruit flavor.
Use a small amount and spread it thinly over the cream rather than applying a thick layer. Too much jam can make the dessert overly sweet and create sticky layers.
You can also gently swirl a little jam through the filling before assembly.
Is Strawberry Icebox Cake Suitable for a Party?
Absolutely. The recipe serves approximately 12–15 people and can be prepared in advance.
For larger gatherings, prepare two dishes rather than making one excessively thick cake. This allows the layers to chill evenly and makes serving easier.
Keep the dessert refrigerated until it is time to serve.
Approximate Nutrition Information
Nutrition values depend on the brands of crackers, cream, cream cheese, and sugar used, as well as the number of servings.
For a cake cut into 15 portions, a serving may contain approximately:
Calories: 300–420
Carbohydrates: 25–40 grams
Fat: 20–30 grams
Protein: 3–6 grams
Sugar: 15–25 grams
These estimates are intended as a general guide, not an exact nutritional analysis. Larger servings, extra chocolate, additional sugar, and different cookie brands can significantly change the totals.
Final Thoughts
Strawberry Icebox Cake is proof that a wonderful dessert does not need complicated techniques or hours of baking. With fresh strawberries, smooth whipped cream, and crisp graham crackers, you can create a layered treat that becomes soft, creamy, and delicious after a few hours in the refrigerator.
The key to success is straightforward: choose flavorful strawberries, remove excess moisture, whip the cream properly, arrange the layers evenly, and allow the cake enough time to chill.
Once you understand the basic method, you can customize the dessert with chocolate, lemon, vanilla pudding, coconut, or other ingredients that complement the strawberries.
Whether you prepare it for a summer picnic, a family gathering, a birthday celebration, or an ordinary weekend dessert, Strawberry Icebox Cake offers a refreshing combination of fruity sweetness and creamy texture.
Prepare it the day before, keep it chilled, and serve each slice cold for the best experience. The softened cracker layers, fluffy filling, and fresh strawberry flavor make this simple no-bake dessert a recipe worth returning to whenever you want something beautiful, comforting, and easy to share.
Add a concise recipe cardRemove repeated preparation advice