admin1
Death by Chocolate Cake: The Ultimate Rich, Moist, and Decadent Chocolate Cake Recipe
Introduction
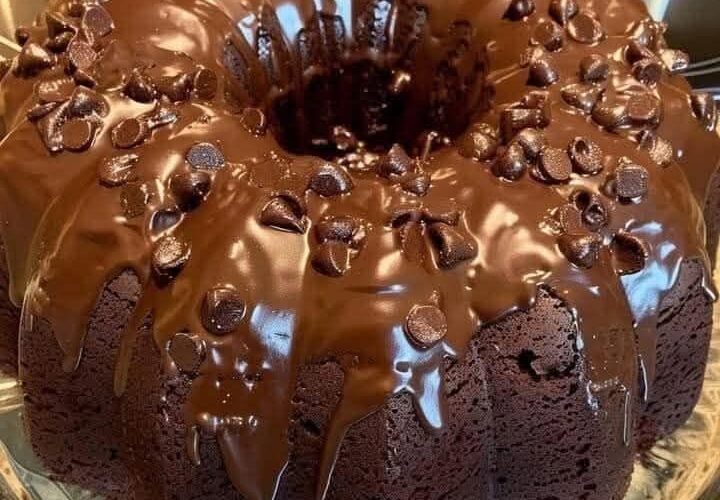
Death by Chocolate Cake is the perfect dessert for anyone who loves deep, rich, and irresistible chocolate flavor. This luxurious cake combines soft and moist chocolate cake layers with silky chocolate frosting, smooth chocolate ganache, and plenty of chocolate goodness in every bite. It is an impressive dessert for birthdays, family gatherings, celebrations, dinner parties, holidays, or any occasion when an ordinary chocolate cake simply is not enough.
The name Death by Chocolate Cake refers to the wonderfully intense chocolate experience created by combining several forms of chocolate in one dessert. The cake itself is tender and moist, the frosting is creamy and rich, and the ganache adds a glossy finish that makes every slice look beautiful. Depending on your preference, you can also add chocolate chips, chocolate shavings, chocolate curls, or crushed chocolate cookies to create additional layers of flavor and texture.
The best part about this homemade recipe is that it uses straightforward ingredients and simple baking techniques. You do not need professional baking equipment or advanced decorating skills to prepare a beautiful cake. With a little patience, careful measuring, and the right baking temperature, you can create a bakery-style chocolate cake in your own kitchen.
This recipe explains every step in detail, from preparing the ingredients to mixing the batter, baking the layers, making the frosting, preparing the ganache, assembling the cake, and storing leftovers properly.
Recipe Overview
Preparation time: 40 minutes
Baking time: 30–38 minutes
Cooling time: 1–2 hours
Frosting and assembly time: 30–45 minutes
Total time: Approximately 3 hours, depending on cooling and decorating.
Servings: 12–16 slices
Cake type: Layered chocolate cake
Texture: Moist, soft, tender, and rich
Flavor: Deep chocolate with a smooth, creamy finish
Difficulty level: Moderate, suitable for home bakers
Recommended pan size: Two 8-inch round cake pans
Ingredients for the Chocolate Cake
The ingredients in this recipe are selected to produce a soft, moist cake with a rich chocolate flavor. Measuring them accurately helps ensure that the cake rises properly and maintains a tender crumb.
Dry Ingredients
2 cups all-purpose flour
All-purpose flour provides the structure of the cake. Measure it by spooning it into your measuring cup and leveling the top rather than packing it tightly. Too much flour can make the finished cake dry or heavy.
2 cups granulated sugar
Sugar sweetens the cake while helping it retain moisture. It also contributes to the cake’s tender texture and balanced chocolate flavor.
3/4 cup unsweetened cocoa powder
Cocoa powder gives the cake its characteristic chocolate taste and dark color. Natural unsweetened cocoa powder works well for this recipe. Dutch-process cocoa can also be used, although the flavor and color may differ slightly.
2 teaspoons baking powder
Baking powder helps the cake rise and creates a lighter texture.
1 1/2 teaspoons baking soda
Baking soda works with the acidic ingredients in the batter to help produce a soft, airy crumb.
1 teaspoon salt
Salt enhances the chocolate flavor and balances the sweetness. Do not skip it, because even a small amount makes a noticeable difference.
Wet Ingredients
2 large eggs
Eggs help bind the ingredients together, contribute structure, and support a tender texture. Room-temperature eggs are easier to mix evenly into the batter.
1 cup whole milk
Milk adds moisture and helps combine the dry ingredients. Whole milk provides a slightly richer result, but reduced-fat milk can also work.
1/2 cup neutral vegetable oil
Oil is responsible for much of the cake’s lasting moisture. It keeps the crumb soft even after refrigeration. Canola oil or another mild-flavored vegetable oil is suitable.
2 teaspoons vanilla extract
Vanilla complements the cocoa and rounds out the chocolate flavor.
1 cup hot coffee or hot water
Hot liquid helps dissolve and bloom the cocoa powder, intensifying its flavor. Coffee adds depth without necessarily making the cake taste like coffee. If you prefer not to use coffee, hot water is an excellent substitute.
Ingredients for the Chocolate Frosting
A generous layer of chocolate frosting makes this cake creamy and delicious while helping the cake layers hold together.
1 cup unsalted butter, softened
Softened butter creates a smooth, creamy base. It should be pliable but not melted.
3 1/2 cups powdered sugar
Powdered sugar sweetens and thickens the frosting. Sifting it helps prevent lumps.
3/4 cup unsweetened cocoa powder
Cocoa powder gives the frosting its rich chocolate color and flavor.
1/3 cup milk or heavy cream
Add the liquid gradually to control the frosting’s consistency. Milk creates a lighter frosting, while heavy cream produces a richer texture.
2 teaspoons vanilla extract
Vanilla adds warmth and balances the cocoa.
A small pinch of salt
Salt helps keep the frosting from tasting excessively sweet.
Ingredients for the Chocolate Ganache
Chocolate ganache gives Death by Chocolate Cake its beautiful glossy finish and adds another layer of chocolate flavor.
200 grams semisweet or dark chocolate, finely chopped
Use baking chocolate or good-quality chocolate bars. Finely chopped chocolate melts more evenly than large pieces.
200 milliliters heavy cream
Heavy cream creates a smooth, pourable ganache. Avoid boiling it aggressively, as excessive heat can affect the final texture.
1 tablespoon unsalted butter, optional
Butter adds shine and a slightly silkier finish.
Optional Chocolate Decorations
You can decorate the cake with any combination of the following ingredients:
- 1/2 cup semisweet chocolate chips
- 1/2 cup mini chocolate chips
- 1/4 cup chocolate shavings
- Chocolate curls made from a chocolate bar
- Crushed chocolate sandwich cookies
- Small chocolate truffles
- Chocolate sprinkles
- A light dusting of cocoa powder
These additions are optional. The cake will still be delicious with only the frosting and ganache.
Equipment Needed
Prepare the following equipment before beginning:
- Two 8-inch round cake pans
- Parchment paper
- Mixing bowls
- Measuring cups and spoons
- Kitchen scale, if available
- Whisk
- Electric hand mixer or stand mixer
- Rubber spatula
- Fine-mesh sieve
- Cooling rack
- Offset spatula or butter knife
- Small saucepan or microwave-safe bowl
- Cake plate or serving stand
Having everything ready before mixing helps the process run smoothly and prevents unnecessary delays.
Step 1: Prepare the Oven and Cake Pans
Preheat your oven to 350°F (175°C). Allow it to reach the correct temperature before placing the cake inside.
Grease two 8-inch round cake pans with a thin layer of butter or neutral oil. Cut parchment paper circles to fit the bottoms of the pans and place them inside.
Lightly grease the parchment paper as well. This extra preparation makes it easier to remove the cakes after baking.
If you do not have parchment paper, grease the pans thoroughly and dust them lightly with flour or cocoa powder. Tap out any excess.
Place the oven rack in the center position. Baking the cake in the center of the oven helps the heat circulate evenly around both pans.
Avoid placing the pans too close to the top or bottom heating elements, because this may cause uneven baking.
Step 2: Measure and Combine the Dry Ingredients
Take a large mixing bowl and add the flour, granulated sugar, cocoa powder, baking powder, baking soda, and salt.
Sift the flour and cocoa powder if they contain lumps. Cocoa powder can sometimes form small clumps that remain visible in the finished batter if they are not broken up properly.
Whisk all the dry ingredients together for approximately 30–45 seconds.
Pay particular attention to the cocoa powder and raising agents. They should be distributed evenly throughout the flour so the cake rises consistently.
Do not add the hot coffee or water at this stage. Keep it separate until the wet and dry ingredients have been combined.
Step 3: Mix the Wet Ingredients
In a separate medium-sized bowl, crack the eggs and whisk them until the yolks and whites are fully combined.
Add the milk, vegetable oil, and vanilla extract.
Whisk until the mixture looks smooth and uniform.
The oil may appear slightly separate from the milk at first, but continued whisking will help distribute it throughout the mixture.
Make sure the eggs are fresh and free from shell fragments.
If your ingredients have been refrigerated, allow the milk and eggs to approach room temperature before mixing. This helps the batter combine more smoothly.
Do not use melted butter in place of the oil without adjusting the recipe, because the two ingredients behave differently as the cake cools.
Step 4: Combine the Wet and Dry Ingredients
Pour the wet mixture into the bowl containing the dry ingredients.
Using a whisk or electric mixer on low speed, mix until the flour is incorporated.
Scrape down the sides and bottom of the bowl with a rubber spatula to make sure no dry pockets remain.
The batter will initially be relatively thick. This is normal.
Avoid beating the mixture for too long after the flour has been added. Excessive mixing can develop too much gluten, making the cake less tender.
Once the ingredients are combined, the mixture should be smooth, although a few tiny lumps are not usually a problem.
Step 5: Add the Hot Coffee or Water
Carefully pour the hot coffee or hot water into the batter in a slow, steady stream while whisking gently.
The batter will become noticeably thinner. Do not worry if it seems much more liquid than a traditional cake batter. This is an expected characteristic of this chocolate cake recipe.
Hot liquid helps bring out the cocoa’s flavor and produces a moist, delicate crumb.
If using coffee, choose a mild or medium-strength brew. The finished cake should taste predominantly of chocolate, with the coffee adding subtle depth.
If you prefer water, use freshly heated water instead.
Continue mixing gently until the liquid is evenly distributed.
Scrape the bottom of the bowl once more to make sure all ingredients are incorporated.
Step 6: Divide the Batter Between the Pans
Place the prepared cake pans on a flat surface.
Divide the batter evenly between the two pans. If you have a kitchen scale, weigh the batter in each pan to achieve layers of similar thickness.
Gently tap each pan against the counter once or twice to release any large trapped air bubbles.
Do not bang the pans forcefully, because this can cause batter to splash and create an uneven surface.
Place the pans on the center rack of the preheated oven, leaving space between them so hot air can circulate.
If your oven has hot spots, rotate the pans only when necessary and preferably after the cakes have begun to set. Opening the oven door too early can cause the layers to sink.
Step 7: Bake the Chocolate Cake Layers
Bake the cakes for approximately 30–38 minutes.
The exact baking time depends on your oven, the cake pans, and the temperature accuracy of your appliance.
Begin checking around the 28-minute mark.
The cakes are usually ready when the following signs appear:
- The tops look set rather than wet.
- The edges begin to pull slightly away from the pans.
- A toothpick inserted into the center comes out clean or with a few moist crumbs.
- The centers spring back gently when touched.
If the toothpick comes out covered in wet batter, continue baking for another 3–5 minutes and check again.
Avoid repeatedly opening the oven during the first 20 minutes, because a sudden temperature change may affect the cake’s rise.
Once the cakes are fully baked, carefully remove the pans from the oven using oven mitts.
Place them on a heat-resistant surface.
Step 8: Cool the Cakes Properly
Allow the cakes to cool in their pans for approximately 10–15 minutes.
This short resting period helps the structure become firm enough to handle.
Run a thin knife around the edges if needed, then gently invert each cake onto a cooling rack.
Remove the parchment paper and allow the cakes to cool completely.
This may take 45–90 minutes, depending on the temperature of your kitchen.
Do not spread frosting onto warm cake. Heat can melt the butter in the frosting, causing it to slide off or become greasy.
For especially neat layers, wrap the completely cooled cakes and refrigerate them for 30–60 minutes before assembly. Chilled cake is generally easier to handle and less likely to crumble.
If you are preparing the cake ahead of time, you can wrap the cooled layers securely and refrigerate them until you are ready to decorate.
Step 9: Prepare the Chocolate Frosting
Place the softened butter in a large mixing bowl.
Beat it with an electric mixer for approximately 2–3 minutes, until it becomes smooth and creamy.
Sift the powdered sugar and cocoa powder into a separate bowl.
Add the sugar mixture to the butter in several small additions, mixing on low speed after each addition.
Starting slowly helps prevent the powdered ingredients from scattering.
Once the cocoa and sugar are incorporated, add the vanilla extract, salt, and approximately half of the milk or cream.
Beat on medium speed until the frosting begins to look smooth.
Add the remaining liquid gradually until the frosting reaches your preferred consistency.
Continue beating for another 1–2 minutes, scraping down the bowl as needed.
The finished frosting should be creamy and spreadable, thick enough to hold its shape but soft enough to glide across the cake.
If the frosting is too thick, add milk one teaspoon at a time.
If it is too thin, add a little more sifted powdered sugar or cocoa powder, depending on your desired sweetness and chocolate intensity.
Avoid adding too much liquid at once because it is easier to thin frosting than to correct an overly runny mixture.
Step 10: Prepare the Chocolate Ganache
Finely chop the chocolate and place it in a heatproof bowl.
Pour the heavy cream into a small saucepan.
Heat the cream over medium-low heat until it is steaming and small bubbles begin to form around the edges. Do not allow it to boil vigorously.
Pour the hot cream over the chopped chocolate.
Let the mixture stand undisturbed for approximately 3–5 minutes. This gives the heat time to soften the chocolate.
Using a spatula, stir slowly from the center outward until the chocolate melts and the mixture becomes smooth.
If the chocolate has not completely melted, warm the mixture gently over a bowl of warm water or in a microwave using short intervals, stirring between each interval.
Add the optional butter and stir until fully incorporated.
The ganache should look glossy and uniform.
Allow it to cool at room temperature until it becomes thick enough to spread or pour without running excessively.
For a pourable drip, it may need around 15–30 minutes of cooling, although room temperature and chocolate type can change this timing.
For a thicker layer, allow it to cool longer.
Step 11: Level the Cake Layers
Place the cooled cake layers on a clean work surface.
If the tops are relatively flat, you can leave them as they are.
If either cake has developed a noticeable dome, use a long serrated knife to trim a thin slice from the top.
Keep the knife level and rotate the cake gradually as you cut.
Remove only what is necessary. Trimming too much can make the layers thinner than intended.
Save the cake scraps for another dessert, or crumble a small amount to use as a decoration.
Leveling the layers helps the finished cake sit straight and makes it easier to spread frosting evenly.
Step 12: Assemble the First Layer
Place one cake layer on a serving plate or cake stand.
If you have a cake turntable, use it to make decorating easier, but it is not essential.
Spread a generous layer of chocolate frosting over the top.
Use an offset spatula or the back of a spoon to smooth the frosting from the center toward the edges.
Aim for an even layer of frosting rather than an excessively thick mound in the middle.
If desired, sprinkle a small handful of chocolate chips over the filling.
Press them lightly into the frosting so they stay in place when the second layer is added.
Leave a small border around the edge if you plan to create a decorative chocolate filling.
Step 13: Add the Second Cake Layer
Carefully lift the second cake layer and position it over the first.
Place it with the flatter side facing upward if you want a smooth top.
Lower it gently rather than dropping it into position.
Check that the edges of the two layers line up. Make small adjustments before pressing the cake down.
Apply gentle pressure to secure the layers without compressing the soft cake.
If a little frosting squeezes out around the edges, smooth it with a spatula.
The cake should now have a visible chocolate filling between the two layers.
Step 14: Apply a Crumb Coat
A crumb coat is a thin layer of frosting that traps loose crumbs and helps create a neat final finish.
Spread a thin coating of chocolate frosting over the top and sides of the cake.
It does not need to look perfect at this stage.
Use the spatula to fill small gaps between the layers and smooth the surface as much as possible.
Refrigerate the cake for approximately 20–30 minutes, or until the frosting feels firm.
This step is especially helpful when working with a moist chocolate cake, because the delicate crumb may release small pieces as you decorate it.
Step 15: Apply the Final Frosting Layer
Remove the chilled cake from the refrigerator.
Spread a thicker layer of chocolate frosting over the top and sides.
Start with the top, spreading the frosting evenly from the center toward the edges.
Next, cover the sides using an offset spatula.
Turn the cake slowly as you work, adding frosting to any exposed areas.
For a rustic finish, create gentle swirls with the back of a spoon.
For a smoother appearance, hold the spatula against the sides while rotating the cake.
Do not worry if the surface is not perfectly smooth. A homemade cake can look beautiful with soft swirls, chocolate shavings, and a glossy ganache topping.
Reserve a little frosting if you would like to pipe decorative borders or rosettes later.
Step 16: Add the Chocolate Ganache
Check the consistency of your cooled ganache.
It should be fluid enough to spread but not so hot or thin that it immediately runs down the cake.
Pour a portion over the center of the cake.
Use a spoon or spatula to guide the ganache toward the edges.
For a chocolate drip effect, gently push small amounts over selected edges, allowing them to run naturally down the sides.
Avoid pouring too much ganache at once. A thick pool can cover the frosting entirely and create a heavy layer that is difficult to slice neatly.
If you prefer a completely covered chocolate top, spread the ganache evenly and allow it to settle.
Let the ganache set for approximately 15–30 minutes before adding delicate decorations.
Step 17: Decorate the Cake
This is the stage where you can make your Death by Chocolate Cake look especially impressive.
For a classic appearance, sprinkle chocolate shavings over the top and arrange a few chocolate curls in the center.
For extra texture, scatter mini chocolate chips around the outer edge.
If you enjoy the flavor of chocolate sandwich cookies, crush a few and sprinkle them over one side of the cake.
You can also pipe small rosettes of reserved chocolate frosting around the top border.
For a celebration cake, arrange small chocolate truffles or pieces of chocolate bark on top.
Try to keep the decorations balanced. A few carefully placed toppings often look more elegant than covering every inch of the cake with large pieces.
If you want a more dramatic finish, combine dark chocolate shavings with a small amount of white chocolate decoration.
Allow the completed cake to rest until the frosting and ganache are sufficiently set.
Step 18: Chill Before Serving
For the cleanest slices, refrigerate the assembled cake for approximately 20–30 minutes before cutting.
This allows the frosting and ganache to firm up slightly.
If you prefer a softer texture, take the cake out of the refrigerator about 20–30 minutes before serving, provided the room is not excessively warm.
Use a long, sharp knife to cut the cake.
For especially neat slices, dip the knife in warm water, wipe it dry, and cut downward in one smooth motion.
Clean the knife between slices to prevent the frosting from smearing across the exposed cake.
Serve each slice on its own dessert plate.
A small spoonful of whipped cream, a few fresh berries, or a light dusting of cocoa powder can complement the richness of the chocolate.
What Makes Death by Chocolate Cake So Special?
Death by Chocolate Cake stands out because several different chocolate textures come together in a single dessert.
The cake layers provide a soft, moist base. The frosting contributes a creamy and sweet chocolate flavor. The ganache adds a smooth, luxurious finish, while chocolate chips or shavings create small differences in texture.
Each element has a purpose.
The cocoa powder creates the main chocolate flavor in the cake and frosting. The hot coffee or water helps develop that flavor in the batter. Oil helps maintain moisture, while the eggs and flour provide structure.
The ganache creates contrast with the fluffy frosting. When properly prepared, it has a smooth texture that complements the tender cake without making the entire dessert feel dry or crumbly.
This balance is what makes the cake so enjoyable. Instead of relying on a single layer of chocolate flavor, it combines several complementary components.
Tips for Making the Moistest Chocolate Cake
Measure the Flour Correctly
Too much flour is one of the most common reasons homemade cakes become dry.
If using measuring cups, spoon the flour into the cup and level it with a straight edge. Do not press it down.
A kitchen scale provides more consistent results.
Use Oil for Lasting Moisture
Oil remains liquid at ordinary room temperatures, helping the cake retain a soft texture even after refrigeration.
A neutral vegetable oil works best because it does not overpower the chocolate flavor.
Avoid Overmixing
Once the flour has been added, mix only until the ingredients are combined.
Overmixing can make the cake tougher and less delicate.
Do Not Overbake
Even a few extra minutes can make a noticeable difference to the moisture level.
Begin checking the cake near the lower end of the recommended baking time and remove it when a toothpick comes out clean or with a few moist crumbs.
Let the Cake Cool Completely
Warm cake can crumble when handled and can melt the frosting.
Allow the layers to cool completely before assembling them.
Choose Good-Quality Cocoa Powder
Cocoa powder is one of the main sources of chocolate flavor in the cake.
Choose an unsweetened cocoa powder that smells rich and chocolatey. Store it in a tightly closed container away from moisture and strong odors.
Allow the Ganache to Cool
Ganache that is too hot can melt the frosting beneath it.
Let it cool until it is glossy, slightly thickened, and still easy to pour.
Common Mistakes and How to Avoid Them
The Cake Turned Out Dry
This may happen if too much flour was added, the cake was baked too long, or the oven was hotter than expected.
Measure the ingredients carefully and check the cake early.
For a future batch, an oven thermometer can help identify temperature differences.
The Cake Sank in the Middle
A sunken center may result from underbaking, opening the oven door too early, or inaccurate measurements of the raising agents.
Make sure the oven is properly preheated and avoid disturbing the cake during the early baking stage.
The Cake Is Difficult to Remove From the Pan
This usually happens when the pan has not been prepared sufficiently or the cake is removed before it has rested.
Grease the pan, line the bottom with parchment paper, and allow the cake to cool for 10–15 minutes before turning it out.
The Frosting Is Too Soft
The butter may have been too warm, or too much milk or cream may have been added.
Chill the frosting briefly, then beat it again. If it remains too soft, incorporate a little additional sifted powdered sugar.
The Frosting Is Too Thick
Add milk or cream in very small amounts until it reaches a smooth, spreadable consistency.
Do not pour in a large quantity at once.
The Ganache Is Grainy
The chocolate may have overheated, or the cream may not have melted it evenly.
Chop the chocolate finely and let the hot cream rest over it for several minutes before stirring. Stir gently from the center outward.
If necessary, warm the mixture very gently while stirring.
The Layers Slide Apart
This can happen if the cake is warm, the filling is too thick, or the frosting has not had time to set.
Cool the layers completely and apply the filling evenly. Chilling the cake before adding the ganache can also improve stability.
Variations of Death by Chocolate Cake
The basic recipe can be adapted to create several different versions without changing the overall character of the dessert.
Death by Chocolate Fudge Cake
For a denser, more indulgent variation, use a thicker layer of chocolate frosting between the cake layers and a generous ganache topping.
You can also spread a thin layer of chocolate fudge sauce between the layers, allowing it to cool and thicken before assembly.
Keep the filling moderate so the cake remains stable when sliced.
Death by Chocolate Chip Cake
Fold approximately 3/4 cup of semisweet chocolate chips into the finished batter.
Tossing the chips with a small amount of the measured flour before adding them may help distribute them evenly, although it does not guarantee that every chip will remain suspended.
Bake as directed and check for doneness near the usual baking time.
Death by Chocolate Oreo-Style Cake
Add crushed chocolate sandwich cookies to the frosting or sprinkle them between the layers.
For a contrasting filling, prepare a small quantity of whipped cream and fold in finely crushed cookies.
Keep any whipped-cream filling refrigerated, and assemble the cake shortly before serving if the filling is particularly soft.
Death by Chocolate Mocha Cake
Replace the hot water with hot coffee and add a small amount of instant espresso powder to the frosting.
This creates a deeper chocolate flavor with a subtle coffee note.
If you do not enjoy coffee, simply leave out the espresso powder.
Death by Chocolate Raspberry Cake
Spread a thin layer of raspberry preserves over the first cake layer before adding the chocolate frosting.
Fresh raspberries can also be arranged on top shortly before serving.
The fruity tartness complements the rich chocolate, making this a lovely option for special occasions.
Death by Chocolate Peanut Butter Cake
Add a thin layer of creamy peanut butter frosting between the cake layers.
You can prepare it by beating softened butter with peanut butter, powdered sugar, and a little milk until smooth.
Keep the peanut butter filling balanced with the chocolate frosting so that neither flavor completely overwhelms the other.
Death by Triple Chocolate Cake
Use cocoa powder in the cake, semisweet chocolate in the ganache, and white or milk chocolate as a decorative topping.
This creates a striking appearance and allows several chocolate flavors to work together.
White chocolate is sweeter than dark chocolate, so use it as an accent rather than an overly thick layer.
Egg-Free Variation
An egg-free version requires a suitable replacement and may have a slightly different texture.
A commercial egg replacer formulated for cakes is a reliable starting point. Follow the manufacturer’s directions for the equivalent of two eggs, and check the package for any additional liquid adjustments.
Because egg replacements vary, the result may not be identical to the original recipe.
Dairy-Free Variation
Use unsweetened plant-based milk, dairy-free chocolate, and a suitable dairy-free butter alternative.
For the ganache, choose a plant-based cream specifically suitable for cooking and check that the chocolate contains no milk ingredients.
The cake’s texture and richness may vary according to the products used.
How to Serve Death by Chocolate Cake
Death by Chocolate Cake is rich enough to serve on its own, but a few simple additions can make the dessert feel even more special.
With whipped cream: A spoonful of lightly sweetened whipped cream provides a soft, airy contrast to the dense chocolate flavor.
With vanilla ice cream: A scoop of vanilla ice cream pairs beautifully with the chocolate cake. Serve it alongside the cake rather than directly on top if you want the frosting to remain neat.
With fresh berries: Strawberries, raspberries, and sliced cherries bring freshness and a pleasant tartness.
With hot coffee: Coffee is a classic accompaniment because its slightly bitter flavor balances the sweetness of the frosting.
With cold milk: A glass of cold milk makes a simple and familiar pairing, especially for children and anyone who enjoys traditional chocolate desserts.
With chocolate sauce: For an especially indulgent presentation, drizzle a small amount of warm chocolate sauce around the plate.
For celebrations: Decorate the top with chocolate curls, candles, or a simple piped border to make the cake suitable for birthdays and special events.
Because the cake is rich, moderately sized slices are usually satisfying.
Storage Instructions
Proper storage helps preserve the cake’s flavor and texture.
Storing at Room Temperature
Because this cake contains butter-based frosting and ganache, refrigeration is the safest general choice for storage, particularly in a warm room.
If the cake is left out for serving, keep the time at room temperature limited and follow the storage guidance for your particular dairy products. Do not leave perishable frosting sitting out for extended periods.
Storing in the Refrigerator
Place the cake in an airtight cake container or cover it carefully to prevent it from absorbing odors.
Refrigerate it at 40°F (4°C) or below.
For best quality, enjoy the cake within approximately 3–4 days.
Before serving, allow a slice to sit at room temperature briefly so the cake softens and the chocolate flavor becomes more noticeable.
Freezing the Cake
The unfrosted cake layers freeze especially well.
Allow them to cool completely, then wrap each layer securely in plastic wrap and place it in a freezer-safe bag or container.
For best quality, use the frozen layers within about 2–3 months.
Thaw them in the refrigerator while still wrapped, then bring them to a suitable temperature for frosting.
You can also freeze individual slices. Place them in a freezer-safe container with parchment paper between the slices to help prevent sticking.
The texture of decorative toppings may change after freezing, so chocolate curls and fresh fruit are best added after thawing.
Frequently Asked Questions
Can I make Death by Chocolate Cake a day ahead?
Yes. You can bake the cake layers one day ahead, allow them to cool completely, wrap them securely, and refrigerate them.
You can also prepare the frosting in advance and refrigerate it in an airtight container. Before using it, let it soften slightly and beat it until smooth.
For the freshest appearance, you can assemble and decorate the cake on the day you plan to serve it, although a fully assembled cake can also be prepared ahead and refrigerated.
Can I use a different cake pan size?
Yes, but the baking time will change.
Two 9-inch pans will produce thinner layers than two 8-inch pans. Begin checking for doneness earlier.
If using a single deep pan, make sure it has sufficient capacity for the batter. A deeper cake may require a longer baking time, and the center must be fully baked before removal.
Avoid filling cake pans more than approximately two-thirds full unless the pan and recipe are specifically designed for a higher fill level.
Why does this recipe use hot coffee?
Hot coffee helps intensify the flavor of cocoa powder.
It does not need to make the cake taste strongly of coffee. However, if you prefer to avoid coffee entirely, use hot water instead.
Can I make the cake without an electric mixer?
Yes. A whisk and a rubber spatula are sufficient for the cake batter.
An electric mixer makes the frosting easier to prepare, but you can also beat softened butter by hand with a sturdy whisk or wooden spoon. Allow extra time to achieve a smooth consistency.
Can I use milk chocolate instead of semisweet chocolate?
Yes, but milk chocolate is sweeter and generally softer than semisweet or dark chocolate.
For the ganache, you may need to adjust the chocolate-to-cream ratio depending on the product you use. Start with a reliable milk-chocolate ganache formula if you want a firm drip or thick topping.
How can I make the chocolate flavor stronger?
Use a good-quality unsweetened cocoa powder, avoid overbaking the cake, and consider using hot coffee instead of water.
You can also use dark chocolate in the ganache and add a small amount of espresso powder to the frosting.
Balance the intensity with enough sweetness and a little salt so the chocolate flavor remains rounded rather than bitter.
How do I get perfectly even slices?
Chill the assembled cake until the frosting and ganache are firm.
Use a long, sharp knife warmed in hot water and wiped dry between cuts. Cut straight down without sawing aggressively.
For a tall cake, a knife with a long blade can make the process easier.
Can I reduce the sweetness?
You can use darker chocolate in the ganache and choose unsweetened cocoa powder for the cake and frosting.
However, reducing the powdered sugar in the frosting too much can make it too soft to spread properly. Make small adjustments and add liquid cautiously.
You can also serve the cake with unsweetened whipped cream or fresh raspberries to balance the sweetness.
Nutritional Information
The following figures are rough estimates for one of 16 slices when the cake is prepared with the ingredients listed. Actual values will vary with the brands used, the amount of frosting and ganache applied, and the size of each slice.
Estimated nutrition per slice:
- Calories: 550–700
- Carbohydrates: 65–85 grams
- Fat: 28–40 grams
- Protein: 5–8 grams
- Sugar: 45–65 grams
These estimates are intended as a general guide rather than a precise nutritional analysis.
Final Thoughts
Death by Chocolate Cake is a wonderful choice when you want a dessert that celebrates chocolate in several delicious forms. Its moist cake layers, creamy chocolate frosting, glossy ganache, and optional chocolate decorations combine to create a rich and memorable dessert.
The key to success is to measure carefully, mix the batter gently, avoid overbaking, and allow the cake layers to cool completely before decorating. Taking your time with the frosting and ganache also helps produce a smoother finish and a more attractive presentation.
Whether you serve it at a birthday party, prepare it for a family gathering, or enjoy a slice as a weekend dessert, this cake offers a classic combination of soft texture and intense chocolate flavor.
Once you have mastered the basic recipe, you can experiment with raspberry, peanut butter, mocha, cookie, or triple-chocolate variations to create your own signature version.
The result is a homemade chocolate cake that looks impressive, tastes indulgent, and is worth sharing with everyone who appreciates a truly delicious chocolate dessert.