admin1
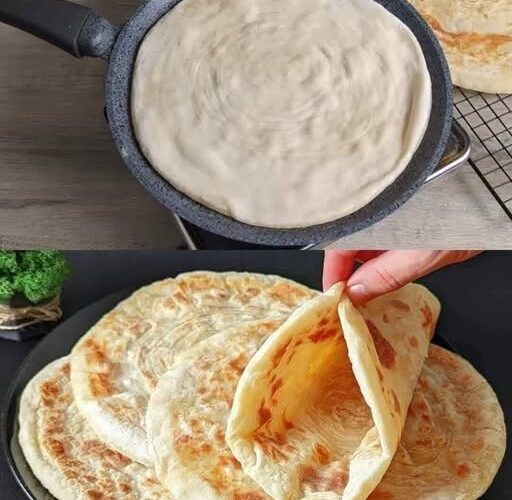
Homemade Soft and Flaky Flatbread Recipe
Homemade soft and flaky flatbread is a simple, delicious, and versatile bread that can be prepared with everyday kitchen ingredients. These flatbreads are soft on the inside, beautifully golden on the outside, and tender enough to fold, roll, or tear into pieces. When prepared correctly, they develop delicate layers that separate easily, creating the wonderful texture shown in the picture.
This homemade flatbread is perfect for breakfast, lunch, dinner, or a quick snack. You can serve it with eggs, vegetables, lentils, chicken, curry, cheese, or your favorite dipping sauce. It is also excellent for wraps, sandwiches, and stuffed flatbread recipes.
The best part is that you do not need an oven, yeast, or any special baking equipment. A mixing bowl, rolling pin, and ordinary frying pan are enough to prepare a delicious batch of soft, homemade flatbreads.
Recipe Overview
Preparation time: 25 minutes
Resting time: 30–45 minutes
Cooking time: 20–30 minutes
Total time: Approximately 1 hour and 30 minutes
Yield: 8 medium flatbreads
Difficulty level: Easy
Cooking method: Stovetop
Texture: Soft, tender, and lightly flaky
Flavor: Mild, buttery, and slightly savory
Ingredients for the Flatbread Dough
Main ingredients
- 3 cups all-purpose flour, approximately 375 grams
- 1 teaspoon salt
- 1 teaspoon sugar, optional
- 2 tablespoons neutral cooking oil
- 1 cup warm water, approximately 240 milliliters, added gradually
- 2 tablespoons plain yogurt, optional, for extra tenderness
The exact amount of water may vary depending on the flour you use. Begin with most of the water and add the remainder little by little until the dough becomes soft, smooth, and manageable.
Ingredients for the flaky layers
- 4 tablespoons softened butter or ghee
- 2 tablespoons cooking oil
- 2–3 tablespoons flour for dusting and layering
You can use melted butter instead of softened butter, but allow it to cool slightly before spreading it over the dough. Ghee gives the flatbread a rich, traditional flavor, while neutral oil creates a lighter taste.
Optional ingredients for extra flavor
- ½ teaspoon garlic powder
- ½ teaspoon dried parsley
- ¼ teaspoon black pepper
- 1 tablespoon finely chopped fresh coriander
- A small pinch of cumin seeds
These ingredients are optional. If you want flatbread that tastes similar to traditional plain roti or paratha, keep the dough simple and leave out the additional seasonings.
Understanding the Secret Behind Soft and Flaky Flatbread
The secret to making flatbread like the one in the picture is not complicated. It depends on three important things: soft dough, sufficient resting time, and a suitable layering technique.
The dough should be soft enough to stretch without tearing. If it is too stiff, the cooked bread may become dry or chewy. If it is excessively sticky, it will be difficult to roll and shape.
Resting allows the flour to absorb the water properly and helps the dough become more relaxed. This makes the dough easier to roll into thin circles.
Finally, a light coating of butter, ghee, or oil between layers helps prevent the dough from sticking together completely. During cooking, the layers can separate slightly, creating a soft, delicate interior.
You do not need to make the dough paper-thin or use complicated folding methods. A simple spiral or folded-layer technique can produce excellent results at home.
Step 1: Prepare the Flour Mixture
Take a large mixing bowl and add the all-purpose flour.
Add the salt and, if you prefer a very slightly rounded flavor, the optional sugar. Mix the dry ingredients thoroughly using a spoon or your clean fingers.
Make sure the salt is distributed evenly throughout the flour. This helps every flatbread taste consistent rather than having some areas that are saltier than others.
If you want to make a more nutritious variation, you can replace up to one-third of the all-purpose flour with whole-wheat flour. Keep in mind that whole-wheat flour generally absorbs more water and may produce a slightly denser flatbread.
For the softest, most flexible result, regular all-purpose flour is an excellent choice.
Step 2: Add the Oil and Yogurt
Pour the cooking oil into the flour mixture.
If you are using yogurt, add it now as well. Mix everything together until the oil is distributed throughout the flour and the mixture resembles slightly damp crumbs.
The oil helps make the dough easier to handle and contributes to a tender texture. Yogurt adds moisture and a little softness, although it is not essential to the recipe.
Do not add the butter intended for the flaky layers at this stage. That butter will be used later, after the dough has rested and been divided.
Keeping the dough ingredients and layering ingredients separate makes the process easier to manage.
Step 3: Add the Warm Water Gradually
Begin adding warm water a little at a time.
Stir with a spoon or your hand as you pour. The flour will gradually absorb the water and begin forming a rough dough.
Avoid pouring in all the water at once because different brands of flour absorb different amounts of liquid.
When the mixture begins to come together, stop adding water temporarily and check its consistency.
The dough should feel soft and slightly tacky, but it should not be so wet that it sticks heavily to your fingers.
If the dough appears dry or crumbly, add another teaspoon or tablespoon of water as needed. If it feels too sticky, allow it to rest briefly before deciding whether it needs a small amount of additional flour.
A soft dough is one of the most important requirements for making flexible flatbread.
Step 4: Knead the Dough
Transfer the dough to a clean work surface or continue kneading it inside the bowl.
Push the dough away from you with the heel of your hand, fold it back toward yourself, and turn it slightly. Repeat this movement steadily.
Continue kneading for approximately 8–10 minutes by hand.
At first, the dough may look uneven and feel a little rough. As you continue kneading, it should become smoother, more elastic, and easier to handle.
You do not need to knead aggressively. Consistent, gentle pressure is enough.
If the dough sticks slightly to your hands, lightly oil your hands rather than adding large amounts of extra flour. Too much additional flour can make the finished flatbread firm.
When ready, the dough should form a smooth ball and stretch gently without immediately breaking apart.
Step 5: Rest the Dough
Place the kneaded dough back into the mixing bowl.
Lightly coat its surface with a little oil to prevent it from drying out. Cover the bowl with a clean kitchen towel, plate, or suitable cover.
Allow the dough to rest at room temperature for 30–45 minutes.
During this time, the flour absorbs moisture more evenly, and the dough becomes easier to roll. Resting also helps reduce the tendency of the dough to shrink back when you try to flatten it.
Do not skip this step if you want soft, flexible flatbreads.
If your kitchen is particularly warm, 30 minutes may be sufficient. If the dough still feels resistant when stretched, allow it to rest for another 10–15 minutes.
Step 6: Divide the Dough into Equal Portions
Once the dough has rested, transfer it to a lightly oiled work surface.
Knead it gently for a few seconds to bring it together again.
Divide the dough into 8 equal portions. Roll each portion between your palms to form a smooth ball.
Try to make the portions approximately the same size so that the flatbreads cook evenly.
Place the dough balls on a plate and cover them with a clean towel while you work.
Keeping the unused portions covered prevents a dry skin from forming on the dough, which can cause cracks during rolling.
If you prefer smaller flatbreads, divide the dough into 10 portions. For larger flatbreads, use 6 portions instead.
Step 7: Prepare the Butter Mixture
Place the softened butter or ghee in a small bowl.
Add the cooking oil and stir until the mixture is smooth and spreadable.
The mixture should be soft enough to spread in a thin layer without pulling or tearing the dough.
If your butter is too firm, let it soften at room temperature. If it has melted completely, allow it to cool until it is no longer hot.
The purpose of this mixture is to create a thin coating between the dough layers. You do not need to use a thick layer of butter, because excessive fat can leak out during cooking and make the bread greasy.
A light, even coating is ideal.
Step 8: Roll the First Dough Portion
Take one dough ball and place it on a lightly floured work surface.
Flatten it gently with your fingers before using a rolling pin.
Roll the dough outward from the center, turning it occasionally to maintain a round shape.
Continue until you have a thin circle approximately 8–9 inches in diameter, depending on the size of your dough portion.
Try to keep the thickness reasonably even throughout the circle. If one side is much thicker than the other, the flatbread may cook unevenly.
Do not worry if the circle is not perfectly round. Homemade flatbread can be rustic and still turn out beautifully.
If the dough keeps shrinking back, cover it and allow it to rest for another 5–10 minutes before continuing.
Step 9: Apply the Butter Mixture
Spread a thin layer of the butter-and-oil mixture over the rolled dough.
Use the back of a spoon, a pastry brush, or your fingertips to distribute it evenly.
Leave a very small border around the edge if you prefer less butter escaping during folding.
Sprinkle a light dusting of flour over the surface. This helps keep the layers distinct and makes the dough easier to handle.
Avoid adding too much flour. A heavy coating may leave dry patches inside the cooked bread.
The surface should look lightly coated rather than soaked.
Step 10: Shape the Flatbread into Layers
There are two useful ways to shape the dough. Both can produce tender flatbread, so choose whichever method feels easiest.
Method A: Spiral-shaped flatbread
After spreading the butter mixture, make a small cut from the center of the circle to its outer edge.
Take one side of the cut and begin rolling the dough around itself in a circular direction, forming a cone-like shape as you work.
Continue until the entire circle has been rolled into a compact cone.
Stand the cone upright on the work surface and gently press its tip toward the base. The dough will form a small layered bundle.
Turn the bundle into a compact disc, keeping the layers inside.
Repeat with the remaining dough portions.
This method creates a spiral of dough layers that can separate gently during cooking.
Method B: Folded flatbread
Alternatively, spread the butter mixture over the rolled circle and fold the dough into a long strip.
You can fold one side toward the center and then fold the opposite side over it. Lightly grease the exposed surface if needed.
Fold the strip again to create a compact square or rectangle.
Press it gently to hold its shape, taking care not to squeeze out all the butter mixture.
This method is straightforward and produces a soft flatbread with delicate layers.
For a first attempt, the folded method is often the easiest to manage.
Step 11: Rest the Shaped Dough
Once all the portions have been shaped, place them on a lightly greased plate.
Cover them with a clean kitchen towel or food-safe cover.
Allow them to rest for another 10–15 minutes.
This second rest makes the dough easier to flatten without excessive resistance. It also helps prevent the layers from tightening when you roll the shaped portions again.
Do not leave the dough uncovered, especially in a dry kitchen.
If the surface dries out, small cracks may form during rolling, and the finished flatbread may become less tender.
Step 12: Roll the Layered Dough into Flatbreads
Take one shaped dough portion and place it on a lightly floured surface.
Press it gently with your fingers to flatten it.
Using a rolling pin, roll it outward into a circle approximately 7–8 inches in diameter, or to a size that fits comfortably in your frying pan.
Apply gentle, even pressure. The aim is to flatten the dough without completely crushing its layered structure.
If butter begins to escape from the edges, use a little less pressure and dust the work surface lightly with flour.
Do not roll the dough so thin that it becomes transparent. A moderate thickness helps the flatbread remain soft and gives the layers enough structure to separate during cooking.
Repeat the process for the remaining portions, keeping the rolled flatbreads covered until you are ready to cook them.
Step 13: Heat the Frying Pan
Place a heavy frying pan, cast-iron skillet, or nonstick pan over medium heat.
Allow it to warm for a few minutes.
The pan should be hot enough to cook the dough steadily but not so hot that the outside burns before the center cooks.
To test the temperature, place a small piece of dough in the pan. It should begin cooking gradually and develop light spots without turning dark immediately.
If the dough becomes brown almost instantly, reduce the heat.
If it remains pale and dry for a long time, increase the heat slightly.
A moderately hot pan is the key to achieving a golden exterior and a soft interior.
Step 14: Cook the First Side
Carefully place one rolled flatbread into the hot pan.
Allow it to cook for approximately 45–90 seconds, depending on its thickness and the heat of the pan.
You should begin to see small bubbles forming on the surface. Light golden patches may appear on the underside.
Do not press down too firmly with a spatula at this stage. The dough needs time to heat through and develop its structure.
If the flatbread begins puffing in places, that is a good sign that steam is forming between parts of the dough.
The surface may look uneven, but this is normal for homemade layered flatbread.
Step 15: Flip and Cook the Other Side
When the underside develops light golden spots, carefully flip the flatbread with a spatula.
Cook the second side for another 45–90 seconds.
Small golden-brown patches should appear across the surface.
If the flatbread looks dry, you can brush a very small amount of butter or oil over the cooked surface.
Flip it once more if necessary and cook briefly until the bread is fully cooked and no raw, doughy areas remain.
The exact cooking time will depend on the thickness of the flatbread, the pan, and the heat level.
Avoid cooking it for too long, because excessive heat can remove moisture and make the bread stiff.
Step 16: Encourage the Layers to Separate
Once both sides are lightly golden, you may notice that the flatbread has puffed slightly.
If desired, gently press the surface with a clean spatula for a few seconds, moving around the edges. Do not press hard enough to flatten the bread completely.
The trapped steam helps the inner layers separate, creating the delicate texture visible in the picture.
Some flatbreads will puff more than others. This depends on how evenly the dough was rolled, how the layers were formed, and the temperature of the pan.
Even if the bread does not puff dramatically, it can still be soft and delicious.
Remove the cooked flatbread from the pan when it is evenly cooked and has attractive golden patches.
Step 17: Keep the Flatbreads Soft
Transfer the cooked flatbread to a plate lined with a clean kitchen towel.
Cover it loosely with another towel while you cook the remaining portions.
Stacking the warm flatbreads allows some of their moisture to remain inside. This helps keep them soft and flexible rather than allowing them to dry out in the open air.
If you like a richer flavor, brush each warm flatbread with a small amount of butter or ghee.
For a lighter finish, leave them plain or brush them with just a little oil.
Continue cooking the remaining flatbreads, adjusting the heat as needed.
If the pan begins accumulating dark flour particles, carefully wipe it with a suitable heat-safe utensil or turn off the heat briefly before cleaning it safely.
Step 18: Check the Final Texture
After cooking all the flatbreads, take one and gently separate a section near its edge.
The interior should be soft and tender, with visible thin layers if you used the spiral or folded method.
The exterior should have scattered golden-brown spots rather than a uniformly dark, hard crust.
The bread should bend easily without cracking.
If it feels stiff, the pan may have been too hot, the dough may have been too firm, or the flatbread may have cooked for too long.
If it feels doughy in the middle, it may need slightly longer cooking over medium-low heat.
Once you understand how your pan behaves, it becomes much easier to produce consistent results.
Step 19: Serve the Homemade Flatbread
Serve the flatbreads while they are warm and soft.
You can place them in a stack on a serving plate or arrange them individually beside your main dish.
They are delicious with scrambled eggs, omelets, lentils, chickpeas, vegetable curry, grilled chicken, or a simple bowl of yogurt.
For breakfast, spread a little butter over a warm flatbread and serve it with tea.
For lunch, use it as a wrap filled with cooked chicken, lettuce, cucumber, and a mild sauce.
For dinner, serve it alongside curry, soup, or roasted vegetables.
The mild flavor makes these flatbreads suitable for many different cuisines.
Tips for Making Extra-Soft Flatbread
Use the right amount of water
The dough should be soft and pliable. Dry dough is one of the most common reasons flatbread turns out tough.
Add water gradually, paying attention to the feel of the dough rather than relying only on the measurement.
Allow enough resting time
Resting is essential because it makes the dough easier to roll and helps it retain a tender texture.
If you have time, give the dough the full resting period rather than rushing directly from kneading to rolling.
Avoid adding excessive flour
Use just enough flour to prevent sticking.
Too much flour during rolling can make the surface dry and leave excess flour in the pan, causing dark patches and an unpleasant taste.
Spread the fat evenly
A thin, even layer of butter, ghee, or oil helps separate the dough layers.
Too much fat may leak out, while too little can make the layers stick together more firmly.
Keep the dough covered
Cover both the dough balls and the shaped portions whenever they are not being handled.
This prevents the outer surface from drying out.
Cook over moderate heat
High heat can burn the outside while leaving the inside undercooked.
Medium heat usually gives the best balance between browning and cooking the interior.
Avoid pressing too hard
Pressing the bread too aggressively with a spatula may flatten its layers and squeeze out moisture.
Gentle handling helps preserve its soft texture.
Common Mistakes and How to Fix Them
The flatbread turns out hard
This usually happens when the dough is too dry, the pan is too hot, or the bread cooks for too long.
Next time, make a softer dough, allow it to rest properly, and reduce the cooking time slightly.
Keep the cooked flatbreads covered so that they do not lose moisture.
The dough keeps shrinking
Dough that resists rolling often needs more rest.
Cover it and wait another 5–10 minutes before trying again.
Avoid stretching it forcefully because this can cause uneven thickness and tearing.
The flatbread sticks to the rolling pin
The dough may be too wet, or the work surface may need a light dusting of flour.
Add a small amount of flour to the rolling pin and work surface, but avoid adding so much that the dough becomes dry.
The layers do not separate
Make sure the dough is rolled evenly and the butter mixture is spread across the surface.
A light dusting of flour between the layers may help. Also, avoid rolling the final dough portion too thin or pressing it excessively.
The flatbread burns quickly
Reduce the heat and allow the pan to cool slightly before cooking the next one.
Remove excess flour from the pan if it has started to burn.
The bread becomes oily
Use less butter or oil between layers and avoid adding extra fat to the pan unless necessary.
A well-seasoned nonstick pan may require very little additional oil.
The center remains uncooked
The dough may be too thick, or the heat may be too high.
Roll the flatbread to a more even thickness and cook it over moderate heat for slightly longer.
Delicious Variations
Garlic Butter Flatbread
To prepare garlic butter flatbread, mix softened butter with a little finely minced garlic.
Spread a thin layer over the cooked flatbread or use a small amount between the dough layers.
Finish with finely chopped coriander or parsley if desired.
This version is especially good with soups, roasted vegetables, and chicken dishes.
Herb Flatbread
Add dried parsley, oregano, or a small amount of finely chopped coriander to the dough.
Use a light hand with the herbs so that they complement the bread without overwhelming its mild flavor.
Serve with yogurt dip, hummus, or grilled vegetables.
Whole-Wheat Flatbread
Replace up to one-third of the all-purpose flour with whole-wheat flour.
You may need additional water and a slightly longer resting time because whole-wheat flour absorbs more moisture.
The result will have a nuttier flavor and a somewhat heartier texture.
Cheese Flatbread
Sprinkle a small amount of grated cheese over the rolled dough before folding it.
Use a cheese that melts well, and seal the edges as neatly as possible.
Cook over medium-low heat to give the cheese time to melt without burning the bread.
Be careful when opening the hot flatbread, as melted cheese can be very hot.
Spiced Flatbread
Add a small pinch of cumin, coriander powder, or black pepper to the flour mixture.
You can also sprinkle a little spice mixture between the layers.
This version pairs well with lentils, beans, vegetable curry, and yogurt.
Breakfast Flatbread
Serve the warm flatbread with scrambled eggs, cheese, sliced tomatoes, and cucumber.
You can also fold it around a cooked egg and vegetables to make a quick breakfast wrap.
Stuffed Flatbread
Prepare a simple filling using cooked mashed potatoes, chopped coriander, a little salt, and mild spices.
Place a small quantity of filling in the center of a dough portion and seal it carefully.
Flatten it gently with a rolling pin, taking care not to tear the dough. Cook over medium heat until both sides are golden and the filling is thoroughly heated.
Stuffed versions may require slightly longer cooking than plain flatbreads.
How to Store Homemade Flatbread
Storing at room temperature
If you plan to eat the flatbreads within a short period, keep them covered in a clean container or wrapped in a clean kitchen towel.
Do not leave cooked bread exposed to the air for long periods because it can become dry.
For food safety, refrigerate cooked flatbreads within two hours of cooking, or within one hour if the surrounding temperature is above 32°C (90°F).
Storing in the refrigerator
Allow the flatbreads to cool until they are no longer steaming heavily.
Place them in an airtight container or a sealed food-safe bag. If stacking them, you can place small pieces of baking paper between them to make separation easier.
Refrigerate for approximately 3–4 days.
For the best quality, reheat only the number of flatbreads you plan to eat.
Freezing the flatbread
These flatbreads can also be frozen.
Allow them to cool completely, then place baking paper between individual flatbreads so that they do not freeze into one solid stack.
Transfer the stack to a freezer-safe bag or airtight container, remove excess air, and label it with the date.
For the best texture, use within about 2 months.
Thaw in the refrigerator or reheat carefully from frozen, making sure the bread heats thoroughly.
How to Reheat Flatbread Without Making It Hard
Reheating in a frying pan
Heat a frying pan over medium-low heat.
Place one flatbread in the pan and warm it for approximately 20–40 seconds on each side, adjusting the time according to its thickness.
If the bread seems dry, lightly sprinkle a few drops of water into the pan beside it and cover briefly with a lid. Do not pour water directly onto the hot bread.
The gentle steam can help restore some softness.
Reheating in the microwave
Place a flatbread on a microwave-safe plate.
Cover it with a slightly damp paper towel and heat in short intervals of approximately 10–15 seconds.
Check the texture between intervals because overheating can make the bread chewy.
Reheating in the oven
Preheat the oven to approximately 160°C (320°F).
Wrap a small stack of flatbreads in foil and warm for around 5–10 minutes, checking that they are heated through.
Avoid leaving them in the oven too long, because they may dry out.
Frequently Asked Questions
Can I make this flatbread without yeast?
Yes. This recipe does not require yeast because it relies on a simple flour-and-water dough. The resting time helps the dough become easier to handle, while the layering technique creates its characteristic texture.
Can I use milk instead of water?
Yes. You can replace some of the water with milk for a slightly richer flavor and softer texture.
Begin by replacing about one-quarter of the water with milk. Adjust the liquid gradually until the dough reaches the desired consistency.
Can I make the dough in advance?
Yes. You can prepare the dough ahead of time and refrigerate it in a covered container.
For best results, use it within approximately 24 hours. Allow the chilled dough to sit at room temperature for about 20–30 minutes before shaping, provided the dough remains safe and properly refrigerated.
Can I use olive oil?
Yes. Mild olive oil can be used in the dough and between the layers.
It may give the flatbread a slightly different flavor. Neutral vegetable oil is a good choice if you want the bread to taste more traditional and mild.
Why does my flatbread not puff up?
Puffing depends on the moisture in the dough, how evenly it is rolled, the structure of the layers, and the temperature of the pan.
Some flatbreads puff dramatically, while others develop only small bubbles. Full puffing is not necessary for a soft result.
Can I make the recipe without butter?
Yes. Replace the butter with oil or use ghee if you prefer.
The flavor and texture will change slightly, but the bread can still be tender and delicious.
Can I prepare the flatbread with only flour, water, and salt?
Yes. Flour, water, and salt are enough to create a basic flatbread.
However, adding a little oil to the dough can improve tenderness, and using a small amount of fat between layers helps produce the flaky texture shown in the picture.
What kind of pan works best?
A heavy nonstick pan, cast-iron skillet, or flat griddle works well.
The most important factor is even heat distribution. A pan with hot spots may brown one section before the rest of the bread is cooked.
How do I know when the bread is fully cooked?
The surface should have golden spots, the dough should no longer look wet, and the center should feel cooked rather than gummy.
If you are unsure, cook it a little longer over moderate heat rather than turning up the temperature sharply.
Serving Suggestions
Homemade flatbread can be served in many ways.
For a traditional breakfast, pair it with scrambled eggs, an omelet, or yogurt.
For a satisfying lunch, use it to wrap cooked chicken, fresh vegetables, and a mild sauce.
For dinner, serve it with lentils, chickpeas, vegetable curry, grilled meat, or a bowl of homemade soup.
For a simple snack, brush a warm flatbread lightly with garlic butter and serve it with yogurt dip.
You can also cut the cooked bread into triangles and serve it alongside hummus or another favorite dip.
Because the flavor is mild, it works equally well with savory fillings and simple spreads.
Final Recipe Notes
The most important part of this recipe is to keep the dough soft, give it enough time to rest, and cook the flatbreads over moderate heat. These three steps make a noticeable difference in the final texture.
For the best layered result, spread the butter mixture thinly, fold or spiral the dough gently, and avoid pressing the final flatbread too hard while rolling.
Keep the cooked flatbreads covered as you prepare the remaining portions. This helps them retain their moisture and remain flexible when served.
Once you have made the recipe a few times, you can adjust the thickness, size, seasoning, and amount of butter to suit your preferences.
These homemade soft and flaky flatbreads are simple enough for everyday meals yet delicious enough to serve to guests. With their golden spots, tender centers, and delicate layers, they make a wonderful addition to almost any meal.