admin1
Air Fryer KFC-Style Fried Chicken
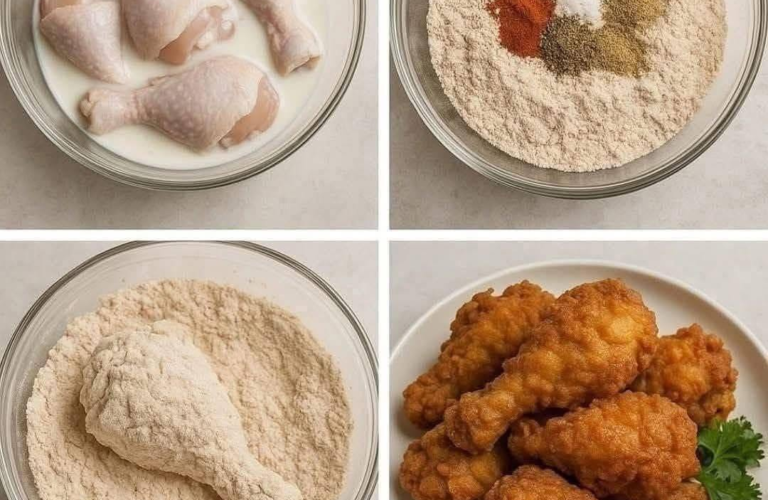
Air fryer KFC-style fried chicken is a delicious homemade version of the famous restaurant-style chicken, featuring tender, juicy meat, a flavorful seasoned coating, and a crispy, golden-brown crust. This recipe recreates the taste and texture of classic Southern-style fried chicken without requiring a deep fryer or a large quantity of oil.
The secret to excellent air fryer fried chicken is combining a well-seasoned marinade, a carefully balanced flour coating, and the right air-frying technique. The chicken is marinated in buttermilk and spices to help tenderize the meat, then coated in seasoned flour to create a craggy crust with plenty of crunchy edges.
Although this recipe is inspired by the flavor and texture of KFC-style chicken, it is a homemade interpretation rather than the restaurant’s original secret recipe. You can adjust the spices, heat, and seasoning to suit your preferences.
Recipe Overview
Preparation time: 25 minutes
Marinating time: 2–8 hours, preferably overnight
Cooking time: 25–40 minutes, depending on the chicken pieces and air fryer
Total time: Approximately 3–9 hours, including marinating
Servings: 4 people
Difficulty: Moderate
Cooking method: Air frying
Main ingredients: Chicken, buttermilk, flour, paprika, garlic powder, onion powder, and aromatic spices
Texture: Crispy outside, juicy and tender inside
Flavor: Savory, peppery, aromatic, and mildly spicy
Why You Will Love This Air Fryer Fried Chicken
This recipe is perfect for anyone who loves crispy fried chicken but wants a practical way to prepare it at home.
The chicken develops a flavorful crust with a combination of flour, spices, and a small amount of oil. Because the air fryer circulates hot air around the chicken, the coating becomes crisp and golden without being submerged in oil.
The buttermilk marinade adds a gentle tang and helps the seasoning cling to the meat. It also contributes to a tender texture when the chicken is cooked properly.
Another advantage is that you can customize the flavor. Add more black pepper for a stronger peppery taste, increase the paprika for a deeper color, or add cayenne pepper for extra heat.
The recipe works with bone-in drumsticks, thighs, and smaller chicken pieces. Boneless chicken can also be used, although the cooking time will be shorter.
Ingredients
For the Chicken
- 1.2 kg chicken pieces, preferably drumsticks and thighs
- 1 cup buttermilk
- 1 large egg
- 1 tablespoon hot sauce, optional
- 1 teaspoon salt
- 1 teaspoon garlic powder
- 1 teaspoon paprika
- ½ teaspoon freshly ground black pepper
If you cannot find buttermilk, you can make a substitute by mixing 1 cup of milk with 1 tablespoon of lemon juice or white vinegar. Let the mixture stand for 5–10 minutes before using it.
For the best results, use chicken pieces of similar size so they cook at approximately the same rate.
For the KFC-Style Seasoned Flour Coating
- 2 cups all-purpose flour
- ¼ cup cornstarch
- 2 teaspoons paprika
- 1½ teaspoons garlic powder
- 1½ teaspoons onion powder
- 1 teaspoon dried oregano
- 1 teaspoon dried thyme
- 1 teaspoon dried basil
- 1 teaspoon ground white pepper
- 1 teaspoon ground black pepper
- 1 teaspoon salt, or to taste
- ½ teaspoon ground mustard
- ½ teaspoon ground ginger
- ½ teaspoon celery seed, finely ground, optional
- ½ teaspoon cayenne pepper, optional
- ½ teaspoon baking powder
The combination of flour and cornstarch helps produce a crisp coating. The herbs provide an aromatic, savory flavor, while white pepper, black pepper, paprika, garlic, and onion create a seasoning profile reminiscent of classic fast-food fried chicken.
Baking powder helps make the coating lighter and more textured. Use it in a modest amount so that it supports the crust without leaving an unpleasant taste.
For Air Frying
- 2–3 tablespoons neutral cooking oil
- Cooking oil spray, if available
Canola, sunflower, or vegetable oil works well. Choose an oil suitable for the cooking temperature.
A light, even layer of oil helps the flour coating brown and crisp. Do not soak the chicken in oil, because excessive oil can make the crust heavy rather than crunchy.
Equipment Needed
- Air fryer
- Large mixing bowls
- Measuring cups and spoons
- Whisk or fork
- Tongs
- Shallow dish for the flour mixture
- Cooking brush or oil spray bottle
- Instant-read food thermometer, recommended
- Wire rack or plate for resting the cooked chicken
A thermometer is particularly useful when preparing bone-in chicken because the outside may become golden before the meat near the bone is fully cooked.
Step 1: Prepare the Chicken
Start by choosing fresh or completely thawed chicken pieces. Drumsticks and thighs are especially suitable because their higher fat content helps them remain juicy during cooking.
If the chicken pieces are unusually large, you can separate them into smaller portions to make cooking more consistent.
Pat the chicken dry with paper towels before placing it in the marinade. Do not wash raw chicken in the sink, as splashing water can spread bacteria to nearby surfaces.
Remove any excess skin or loose pieces of fat if desired, but leaving the skin on can contribute to a more traditional fried-chicken texture.
If you are using skinless chicken, the recipe will still work, although the finished coating may be slightly different.
Step 2: Prepare the Buttermilk Marinade
In a large bowl, combine the buttermilk, egg, hot sauce if using, salt, garlic powder, paprika, and black pepper.
Whisk until the mixture is smooth and evenly combined.
The buttermilk supplies moisture and mild acidity, while the egg helps the marinade cling to the chicken. Garlic, paprika, and black pepper begin seasoning the meat before the flour coating is added.
Add the chicken pieces and turn them several times until every piece is coated.
Make sure the marinade reaches the folds and creases around the chicken pieces. If necessary, use clean tongs to turn the pieces rather than handling them repeatedly.
Cover the bowl and refrigerate.
For good flavor, marinate the chicken for at least 2 hours. Four to eight hours is an excellent range for this recipe, and overnight marinating can also work.
Keep the chicken refrigerated throughout marinating. Do not leave raw chicken at room temperature for several hours.
Step 3: Prepare the Signature-Style Seasoning
While the chicken marinates, prepare the seasoned flour mixture.
Place the all-purpose flour and cornstarch in a wide, shallow bowl. Add paprika, garlic powder, onion powder, oregano, thyme, basil, white pepper, black pepper, salt, mustard, ginger, celery seed if using, cayenne pepper if desired, and baking powder.
Whisk the ingredients together thoroughly.
Take your time with this step. The herbs and spices should be evenly distributed throughout the flour so that each piece of chicken receives a consistent flavor.
Paprika gives the coating a warm color and mild sweetness. Garlic and onion powder provide a savory foundation, while thyme, oregano, and basil add herbal notes.
White pepper contributes a distinctive warmth that works particularly well in restaurant-style chicken seasoning. Black pepper adds a sharper flavor, and cayenne supplies optional heat.
If you prefer mild chicken, omit the cayenne pepper and use the listed amounts of black and white pepper.
Step 4: Create a Craggy, Crunchy Coating
One of the most important characteristics of classic fried chicken is its uneven, textured crust.
To recreate that texture in an air fryer, drizzle 1–2 tablespoons of the buttermilk marinade into the seasoned flour mixture. Using a fork, gently mix until small irregular flour clumps form.
These little clumps attach to the chicken during coating and create extra crunchy ridges when cooked.
Do not add too much liquid. The flour should remain mostly dry, with scattered small clumps rather than becoming a thick paste.
This simple technique can make a noticeable difference in the final texture.
Step 5: Coat the Chicken Thoroughly
Remove one chicken piece from the marinade and allow the excess liquid to drip back into the bowl.
Place it in the seasoned flour mixture.
Press the flour firmly against the chicken, turn the piece, and coat all sides. Pay attention to the edges, the underside, and any creases where the coating might otherwise remain thin.
Lift the chicken and gently shake away loose excess flour.
For a thicker crust, return the floured chicken briefly to the marinade, then coat it in the flour a second time. Press gently so the second layer adheres.
A double coating can create a more substantial crust, but avoid leaving thick patches of wet flour. In an air fryer, those areas may remain pale or floury if they do not receive enough oil.
Transfer the coated chicken to a clean plate or wire rack.
Repeat with the remaining pieces.
Important: Do not put raw-chicken marinade or flour that has contacted raw chicken back into the finished seasoning mixture. Discard contaminated leftovers safely.
Step 6: Let the Coating Set
Allow the coated chicken to rest for approximately 5–10 minutes while you prepare the air fryer.
This short resting period gives moisture time to hydrate the flour, helping the coating adhere to the chicken.
It also reduces the likelihood of the coating falling off when you turn the pieces during cooking.
Keep the chicken refrigerated if the preparation takes longer. The resting time is intended for coating adhesion, not for leaving raw chicken at room temperature for an extended period.
Step 7: Preheat the Air Fryer
Preheat the air fryer to 190°C (375°F) for approximately 3–5 minutes, or follow the preheating instructions for your appliance.
A preheated air fryer helps the coating begin cooking promptly and encourages more even browning.
Lightly brush or spray the basket with oil if the manufacturer’s instructions permit it.
Do not use aerosol sprays containing additives that may damage a nonstick basket. A refillable oil sprayer or a small amount of oil applied with a brush is a good alternative.
Step 8: Arrange the Chicken in the Basket
Place the coated chicken pieces in the air fryer basket in a single layer.
Leave space between the pieces so hot air can circulate around them.
Do not stack the chicken or crowd the basket. Overcrowding traps moisture, prevents proper browning, and can leave the coating soft.
Depending on the size of your air fryer, you may need to cook the chicken in two or more batches.
Lightly brush or spray the exposed flour coating with oil. Turn the pieces carefully and apply a little oil to the other side as well.
The goal is to moisten the dry flour lightly, not to drench the coating.
Look for a fine, even sheen across the flour. Completely dry patches may remain powdery after cooking, so pay special attention to the thickest areas of coating.
Step 9: Air-Fry the Chicken
Cook the chicken at 190°C (375°F), turning the pieces carefully halfway through cooking.
Approximate cooking times are:
| Chicken piece | Approximate cooking time |
|---|---|
| Small drumsticks | 22–28 minutes |
| Medium drumsticks | 25–32 minutes |
| Bone-in thighs | 25–35 minutes |
| Large bone-in pieces | 30–40 minutes |
| Boneless thighs | 16–22 minutes |
| Boneless chicken strips | 10–16 minutes |
These times are estimates, not guarantees. Actual cooking time depends on the thickness of the chicken, starting temperature, air fryer model, basket size, and how many pieces are cooking at once.
Turn the chicken gently with tongs halfway through cooking. If one side is browning more quickly than the other, rotate the pieces to improve even cooking.
Avoid repeatedly opening the basket because each opening releases heat and may lengthen the cooking time.
During the final few minutes, check the color of the crust. It should be golden to deep golden brown, with a dry, crisp appearance.
If the coating is becoming too dark before the chicken is cooked through, reduce the temperature slightly and continue cooking until the center reaches a safe temperature.
Step 10: Check That the Chicken Is Fully Cooked
The most reliable way to determine whether chicken is cooked is to measure its internal temperature.
Insert an instant-read thermometer into the thickest part of the meat without touching the bone.
Chicken must reach an internal temperature of 74°C (165°F) to be considered safe to eat.
Check several of the largest pieces, especially if you are cooking a mixture of drumsticks and thighs.
If a piece has not reached the safe temperature, return it to the air fryer and cook for several more minutes before checking again.
Do not rely on crust color alone. Chicken can look beautifully browned while the meat inside still needs additional cooking.
Step 11: Rest the Chicken Before Serving
Transfer the cooked chicken to a clean wire rack or plate.
Let it rest for approximately 3–5 minutes before serving. This allows the juices to settle and gives the crust a moment to firm up.
A wire rack is especially useful because it allows air to circulate underneath the chicken. Placing very hot chicken directly on a flat plate can trap steam underneath and soften the bottom crust.
Avoid covering the chicken tightly with foil, since trapped steam can make the coating less crisp.
Serve while the chicken is hot and the crust is at its best.
The Secret to Extra-Crispy Air Fryer Fried Chicken
Air fryer fried chicken can become wonderfully crisp, but it behaves differently from chicken cooked in a deep fryer. A few small adjustments help produce the best possible result.
Use cornstarch with flour
All-purpose flour creates the main crust, while cornstarch helps make it lighter and crisper.
The suggested ratio of 2 cups flour to ¼ cup cornstarch provides a good balance of structure and crunch without making the coating excessively delicate.
Add small flour clumps
Those tiny clumps formed by mixing a little marinade into the flour create an irregular surface. The extra texture helps the chicken resemble traditional crunchy fried chicken.
Keep the clumps small and distribute them throughout the flour rather than forming large lumps.
Apply enough oil
Air fryers use circulating hot air rather than a bath of hot oil. Consequently, flour coating that remains completely dry may not brown properly.
Use a light but even application of oil on the outside of each piece. If the coating still looks chalky after the first part of cooking, carefully apply a little additional oil to the dry areas.
Do not overcrowd the basket
Air needs to circulate freely around the chicken. When pieces touch or overlap, moisture can accumulate and the crust may become patchy.
Cooking in batches is often the easiest way to improve crispness.
Avoid excessive marinade
A thick layer of wet marinade can cause the flour to slide off or become gummy.
Allow excess marinade to drip away before coating, then press the seasoned flour firmly onto the chicken.
Let the coating adhere
A short rest after dredging gives the flour time to cling to the chicken. This helps reduce bare patches when the pieces are turned.
Use a rack for resting
Once cooked, transfer the chicken to a wire rack instead of piling it into a bowl. Keeping the pieces separated allows steam to escape and preserves the crust.
How to Make the Flavor More Like Classic Fast-Food Fried Chicken
The familiar flavor of restaurant-style fried chicken comes from a balance of savory seasoning, peppery warmth, aromatic herbs, and a rich, well-browned coating.
For a stronger savory flavor, make sure the flour is adequately seasoned. An under-seasoned coating may taste bland even if the chicken itself has been marinated.
For a more pepper-forward result, add a little extra white pepper and black pepper. White pepper provides a different kind of warmth from black pepper, so using both creates a more layered flavor.
For a deeper golden color, retain the paprika in the coating and apply oil evenly. Avoid increasing the cooking temperature excessively to force browning, as the crust may darken before the inside is done.
For an herbal flavor, keep the oregano, thyme, and basil. If you prefer a simpler fast-food-style profile, reduce the herbs slightly and emphasize the garlic, onion, paprika, and pepper.
For a spicy version, add cayenne pepper to both the marinade and flour mixture. Start with small amounts and adjust the next time you prepare the recipe.
Remember that this is a homemade seasoning blend inspired by the general flavor of classic fried chicken. It is not the verified proprietary blend used by KFC.
Optional Variation: Extra-Crunchy Double-Coated Chicken
If you prefer a thick, rugged crust, use a double-coating method.
Prepare the chicken and marinade as described above. Dip each piece into the seasoned flour, pressing the flour onto the surface. Briefly return the piece to the marinade, allowing excess liquid to drip away, and then coat it in flour again.
Press the second coating onto the chicken gently, creating small flakes and ridges.
Let the coated pieces rest for 5–10 minutes, then apply oil thoroughly but lightly before air frying.
Because the double coating is thicker, you may need to apply additional oil to dry patches during cooking. Keep the chicken in a single layer and allow enough room for air circulation.
This variation creates a more substantial crust, although the result will still differ from deep-fried chicken.
Optional Variation: Spicy Air Fryer Fried Chicken
For a hotter version, add the following to the seasoned flour:
- 1 teaspoon cayenne pepper
- ½ teaspoon extra black pepper
- ½ teaspoon chili powder
- ½ teaspoon smoked paprika
Add 1 teaspoon of hot sauce to the marinade if you enjoy a stronger spicy flavor.
Mix the spices thoroughly into the flour before coating the chicken.
The cayenne provides direct heat, the black pepper contributes a sharp peppery note, and smoked paprika introduces a subtle smoky flavor.
If preparing chicken for people who prefer mild food, keep the cayenne separate and serve the spicy seasoning as an optional accompaniment instead.
Optional Variation: Mild Family-Style Fried Chicken
For a milder flavor, omit the cayenne pepper and hot sauce.
Use the listed amounts of garlic powder, onion powder, paprika, oregano, thyme, and black pepper. If you want a less peppery crust, reduce the white pepper slightly.
The result will still be savory and aromatic without a strong chili heat.
Serve it with mashed potatoes, corn, coleslaw, or plain rice for an easy family meal.
Optional Variation: Boneless KFC-Style Chicken
Boneless chicken thighs are a good choice if you want tender pieces that cook more quickly than bone-in chicken.
Cut the thighs into evenly sized pieces, marinate them as directed, and coat them in the seasoned flour.
Air-fry at 190°C (375°F) for approximately 16–22 minutes, turning halfway through, depending on the thickness.
Smaller boneless pieces may cook sooner, so begin checking their temperature early. Every piece must reach 74°C (165°F) internally.
For chicken strips, cut the meat into evenly sized strips and begin checking after approximately 10 minutes.
Boneless chicken is especially convenient for wraps, sandwiches, lunchboxes, and homemade chicken baskets.
Optional Variation: Air Fryer Fried Chicken Sandwich
Turn this recipe into a crispy chicken sandwich by using boneless chicken thighs or large chicken breast pieces.
After marinating and coating, air-fry the chicken until the coating is crisp and the thickest part reaches 74°C (165°F).
Toast soft burger buns lightly. Spread mayonnaise or a simple garlic sauce on the bottom bun, then add lettuce, tomato, pickles, and the crispy chicken.
Finish with the top bun and serve immediately.
For a spicy sandwich, add hot sauce to the mayonnaise or use a spicy seasoning blend for the chicken.
Choose chicken pieces that fit the bun without requiring excessive thickness. If using chicken breast, cut or flatten it evenly so it cooks consistently.
Optional Variation: Garlic and Herb Fried Chicken
For an aromatic variation, increase the garlic powder slightly and add a little more dried thyme and oregano.
You can also prepare a simple garlic-herb dip by combining mayonnaise, plain yogurt, minced garlic, lemon juice, and chopped parsley.
Serve the dip alongside the chicken rather than pouring it over the crust. This keeps the coating crisp for longer.
The garlic and herbs complement the savory chicken seasoning without overpowering it.
Best Side Dishes to Serve with Air Fryer Fried Chicken
Air fryer fried chicken pairs well with a variety of classic sides.
Creamy coleslaw: Finely shredded cabbage and carrots mixed with a creamy dressing provide a refreshing contrast to the crunchy chicken.
Mashed potatoes: Smooth potatoes with butter and milk make a comforting accompaniment. Add gravy if desired.
Corn on the cob: Boiled, steamed, or air-fried corn adds sweetness and a pleasant contrast to the peppery crust.
French fries: Prepare homemade potato fries in the air fryer for a fast-food-inspired meal. Cook them separately to prevent overcrowding.
Biscuits: Soft buttermilk biscuits work well with the savory chicken and can be served with butter or honey.
Fresh salad: Lettuce, cucumber, tomato, and a light dressing provide a fresh side option.
Rice: Plain steamed rice or lightly seasoned rice makes a simple accompaniment, especially when serving the chicken as a family dinner.
Pickles: Tangy cucumber pickles balance the richness of the coating and are particularly good in chicken sandwiches.
How to Make Homemade Coleslaw
A creamy coleslaw is one of the easiest sides to prepare for fried chicken.
Ingredients
- 3 cups finely shredded cabbage
- ½ cup grated carrot
- ¼ cup mayonnaise
- 1 tablespoon plain yogurt
- 1 teaspoon lemon juice or vinegar
- 1 teaspoon sugar, optional
- Salt and black pepper to taste
Method
Place the cabbage and carrot in a mixing bowl.
In a separate small bowl, combine the mayonnaise, yogurt, lemon juice, sugar if using, salt, and pepper.
Pour the dressing over the vegetables and toss until evenly coated.
Refrigerate for 15–30 minutes before serving to allow the flavors to combine.
Keep the coleslaw refrigerated until it is time to eat. Serve it in a separate bowl so its moisture does not soften the chicken coating.
How to Make a Simple Chicken Dipping Sauce
A creamy dipping sauce adds another layer of flavor to the finished chicken.
Ingredients
- ¼ cup mayonnaise
- 2 tablespoons plain yogurt
- 1 teaspoon lemon juice
- ½ teaspoon garlic powder
- ½ teaspoon paprika
- A pinch of black pepper
- Salt to taste
Method
Combine all the ingredients in a small bowl and stir until smooth.
Taste and adjust the lemon juice, salt, and paprika as needed.
Cover and refrigerate for 15 minutes before serving.
For a spicy sauce, add a small amount of hot sauce. For a sweeter version, add a little honey.
Serve the sauce separately and use clean utensils rather than dipping partially eaten chicken back into the shared bowl.
Common Mistakes to Avoid
Mistake 1: Using Too Much Marinade on the Chicken
Excess marinade can create a thick, wet layer beneath the flour coating.
The result may be a crust that separates from the meat or remains doughy in places.
The solution is simple: allow excess marinade to drip away before dredging, then press the seasoned flour onto the chicken.
Mistake 2: Leaving the Flour Completely Dry
A dry coating may remain pale and powdery in an air fryer.
Apply a light, even layer of oil before cooking and check for dry patches during the cooking process.
You do not need to soak the coating. The goal is to give the flour enough oil to brown.
Mistake 3: Crowding the Basket
When too many chicken pieces are packed together, air circulation is reduced.
This can lead to uneven cooking and a softer crust.
Cook in batches and leave space around each piece.
Mistake 4: Cooking at an Excessively High Temperature
A very high temperature may brown the flour quickly while the meat remains undercooked.
Use the recommended starting temperature of 190°C (375°F), then adjust modestly if your appliance consistently browns too quickly or too slowly.
Always check the internal temperature.
Mistake 5: Turning the Chicken Too Early
If the coating has not begun to set, moving the chicken may remove some of the flour crust.
Allow the first side to cook sufficiently before turning, then use tongs to rotate the pieces gently.
Mistake 6: Skipping the Thermometer
The appearance of the chicken is not a reliable indicator of internal doneness.
Check the thickest part of the meat and make sure it reaches 74°C (165°F).
Mistake 7: Stacking the Chicken After Cooking
Piling hot pieces together traps steam and softens the crust.
Rest the chicken in a single layer on a wire rack instead.
Mistake 8: Using Old or Moist Flour
Flour that has absorbed moisture may form unwanted lumps and coat the chicken unevenly.
Use fresh, dry flour and mix it thoroughly with the seasonings before coating.
Mistake 9: Applying Too Much Oil
Excess oil can collect in the basket and make the coating greasy.
Apply oil in a thin, even layer, using a brush or refillable spray bottle.
Mistake 10: Ignoring Differences Between Air Fryers
Different appliances circulate heat differently. Basket-style air fryers, oven-style air fryers, and larger models may require different cooking times.
Use the recipe times as a starting point, then rely on the crust’s appearance and a thermometer to determine when the chicken is ready.
Troubleshooting Guide
| Problem | Likely cause | How to improve it |
|---|---|---|
| Coating is pale | Too little oil or insufficient cooking | Lightly oil dry areas and continue cooking |
| Coating is soft | Crowded basket or trapped steam | Cook in batches and rest on a rack |
| Flour falls off | Excess marinade or insufficient resting | Drain the marinade and rest the coated chicken |
| Crust is too dark | Temperature too high or pieces too small | Reduce heat slightly and check earlier |
| Chicken is dry | Overcooking or very small pieces | Check temperature early and remove each piece when safely cooked |
| Thick flour patches remain | Coating is too heavy or too dry | Shake off excess flour and apply oil evenly |
| Uneven browning | Pieces are different sizes or poorly arranged | Use similar-sized pieces and turn halfway |
| Seasoning tastes weak | Flour is under-seasoned | Measure the spices carefully and distribute them thoroughly |
Can You Prepare the Chicken Ahead of Time?
Yes. Preparing parts of the recipe in advance makes mealtime easier.
You can mix the dry seasoning blend ahead of time and store it in an airtight container in a cool, dry place. Label the container so you remember what it contains.
You can also marinate the chicken in advance, provided it remains refrigerated and is cooked within a safe storage period. For best texture, coat the chicken relatively close to cooking time.
If you need to prepare the chicken earlier, keep the raw chicken refrigerated in a covered container and avoid leaving it on the counter.
Once the chicken has been coated, air-fry it as soon as practical. The coating can become increasingly wet if it sits for too long.
How to Store Leftover Fried Chicken
Allow leftover chicken to cool slightly, then place it in a shallow, covered container and refrigerate it within 2 hours of cooking.
For safety, cooked chicken should generally be refrigerated at 4°C (40°F) or below and eaten within 3–4 days.
Do not leave cooked chicken sitting at room temperature for extended periods.
If you want to freeze leftovers, place the cooled chicken in a freezer-safe, airtight container or bag. For best quality, use it within approximately 2–3 months.
Label the container with the date so you can keep track of storage time.
How to Reheat Air Fryer Fried Chicken
The air fryer is an excellent way to restore some of the crispness of refrigerated fried chicken.
Preheat the air fryer to approximately 175°C (350°F).
Arrange the chicken in a single layer and heat for about 5–10 minutes, depending on the size and thickness of the pieces.
Turn the pieces halfway through reheating if necessary.
Larger bone-in pieces may need additional time. Check that the chicken reaches an internal temperature of 74°C (165°F) when reheating leftovers.
If the coating looks very dry, avoid adding excessive oil. A small amount may help, but too much can make the crust greasy.
Do not reheat chicken repeatedly. Reheat only the quantity you intend to eat.
Can You Freeze Uncooked Coated Chicken?
Freezing raw chicken requires careful handling because the coating can become wet during thawing.
For the most reliable texture, freeze raw chicken separately from the flour coating, then thaw it safely in the refrigerator before marinating and coating.
If you choose to freeze fully coated raw chicken, arrange the pieces separately on a freezer-safe tray until firm, then transfer them to a suitable sealed container. The coating may be less crisp after thawing.
Never thaw chicken on the counter. Thaw it in the refrigerator, or use another food-safe thawing method.
For the best quality, freshly coated chicken generally gives the most consistent air fryer results.
Frequently Asked Questions
Does air fryer KFC-style chicken taste exactly like the restaurant version?
No. This recipe recreates the general flavor and texture of classic seasoned fried chicken, but it will not taste exactly like the restaurant version. Deep frying and air frying use different cooking methods, and the restaurant’s proprietary seasoning formula is not reproduced here.
The homemade version can still be savory, peppery, aromatic, and delicious.
Can I make this recipe without buttermilk?
Yes. Mix 1 cup of milk with 1 tablespoon of lemon juice or white vinegar and allow it to stand for 5–10 minutes.
Use this mixture in place of buttermilk. The flavor and texture may differ slightly, but it works well for a homemade marinade.
Can I use chicken breast?
Yes. Cut the breast into evenly sized portions or use smaller pieces so they cook more consistently.
Chicken breast is leaner than thighs, so watch the cooking time carefully to avoid drying it out. Every piece must reach 74°C (165°F) internally.
Can I make this recipe without eggs?
Yes. Omit the egg and use the buttermilk mixture alone. The coating may adhere somewhat differently, so allow excess marinade to drip away and press the seasoned flour firmly onto the chicken.
Why is my chicken not crispy?
The most common reasons are insufficient oil, overcrowding, too much wet marinade, or a thick layer of flour that has not hydrated properly.
Use a single layer, apply oil evenly, and let the coating rest briefly before cooking.
Should I use parchment paper?
Perforated air fryer parchment can be useful if your appliance’s instructions permit it, but it may reduce airflow and browning underneath the chicken.
Never place loose parchment in a preheating air fryer without food weighing it down. It can lift into the heating element and create a fire hazard.
For the crispest results, a clean basket or rack that allows air circulation is usually preferable.
Can I use frozen chicken?
Thawing the chicken completely before marinating and coating is recommended. Frozen chicken will not absorb the marinade properly, and the flour coating will not adhere as intended.
Thaw it safely in the refrigerator, pat it dry, and continue with the recipe.
Can I make the chicken gluten-free?
You can experiment with a gluten-free all-purpose flour blend and cornstarch. Check that all seasonings and other ingredients are labeled gluten-free if this is necessary for dietary reasons.
The crust may have a slightly different texture, so cooking time and oil application may need adjustment.
Can I cook different chicken pieces together?
Yes, but choose pieces of similar thickness whenever possible.
Small drumsticks may finish before large thighs. Check each piece separately and remove pieces once they are safely cooked, leaving larger pieces in the air fryer for longer if necessary.
Can I make the coating without cornstarch?
Yes. Replace the cornstarch with an equal quantity of all-purpose flour. The crust may be slightly less crisp, but the recipe will still work.
Is this recipe completely oil-free?
The chicken can technically be cooked with no added oil, but the flour coating is much more likely to remain pale, dry, or powdery.
A small amount of oil helps the crust brown and improves the texture.
How do I keep the chicken crispy for longer?
Keep the cooked pieces in a single layer on a wire rack and avoid covering them tightly.
If cooking multiple batches, keep the finished chicken warm in an oven at a low temperature, provided it is held at a food-safe temperature. Avoid placing hot pieces in a closed container where steam can accumulate.
Approximate Nutrition Information
The nutritional values depend on the chicken pieces, whether the skin is retained, how much flour adheres, and how much oil is absorbed.
An approximate serving of two small to medium bone-in pieces may provide:
- Calories: 350–500
- Protein: 30–40 g
- Carbohydrates: 15–30 g
- Fat: 15–30 g
- Sodium: 500–1,000 mg
These are broad estimates rather than laboratory-tested nutrition facts. Larger portions, extra coating, skin-on chicken, dipping sauces, and additional salt can increase the totals substantially.
Final Recipe Notes
For the best air fryer KFC-style fried chicken, focus on four essential details: a flavorful buttermilk marinade, a well-seasoned flour mixture, an even layer of oil, and enough space in the air fryer basket.
Marinate the chicken for several hours for better flavor, create small flour clumps for a textured crust, and press the coating onto each piece before cooking. Turn the chicken carefully halfway through and check the internal temperature rather than relying on appearance alone.
Most importantly, do not expect air frying to duplicate every characteristic of deep-fried restaurant chicken. Instead, use this recipe to create your own version with a crisp coating, juicy chicken, and a satisfying blend of pepper, herbs, garlic, and paprika.
Serve it hot with creamy coleslaw, mashed potatoes, corn, biscuits, or fries for a complete homemade fried-chicken meal.