admin1
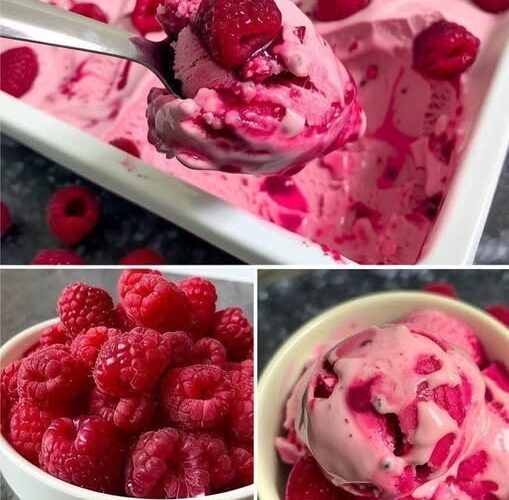
Homemade Raspberry Ice Cream
Homemade raspberry ice cream is a wonderfully creamy, fruity, and refreshing dessert made with sweet raspberries, rich cream, milk, sugar, and a hint of vanilla. Every spoonful combines the smooth texture of traditional ice cream with the bright, slightly tart flavor of fresh raspberries. Its beautiful pink color, delicate berry aroma, and naturally sweet taste make it an excellent dessert for summer afternoons, family gatherings, birthday parties, or whenever you crave something cold and delicious.
This raspberry ice cream recipe is designed to give you a rich, smooth, scoopable dessert without requiring complicated ingredients or professional equipment. You can prepare it with fresh or frozen raspberries, and you can make it with an ice cream machine or use the simple no-churn method explained below.
The secret to excellent homemade raspberry ice cream is balancing the sweetness of the cream and sugar with the natural tartness of the raspberries. Preparing the raspberry mixture properly also helps create a smoother texture and gives the finished ice cream a more concentrated berry flavor.
What Makes Raspberry Ice Cream So Special
Raspberry ice cream is different from ordinary vanilla ice cream because it combines a rich dairy base with the distinctive flavor of raspberries. Raspberries have a naturally sweet and tangy taste that keeps the dessert from feeling overly rich. Their fragrant berry flavor works beautifully with cream, vanilla, and a little lemon juice.
When homemade, raspberry ice cream can taste especially fresh because you control the quality of the fruit and the amount of sugar. You can leave some raspberry seeds for a traditional homemade texture or strain the puree to create a smoother, more refined dessert.
Another wonderful feature of this recipe is its versatility. You can serve the ice cream in bowls, place it between cookies, add it to milkshakes, or use it as a topping for warm brownies, pancakes, waffles, and fruit desserts.
Preparation Time and Serving Size
Preparation time: 25–35 minutes
Cooking time: 8–12 minutes for the raspberry mixture
Chilling time: 4–6 hours, preferably overnight
Freezing time: 6–8 hours or until firm
Total time: Approximately 10–14 hours, including chilling and freezing
Servings: 8–10 portions
Yield: Approximately 1.2–1.5 liters, depending on the ingredients and the amount of air incorporated during churning
Difficulty level: Easy to moderate
Equipment required: A medium saucepan, mixing bowls, measuring cups or a kitchen scale, a whisk, a spatula, a blender or food processor, and a freezer-safe container. An ice cream machine is optional.
Ingredients for Homemade Raspberry Ice Cream
The following ingredients create a creamy raspberry ice cream with a balanced berry flavor and a smooth consistency.
For the Raspberry Puree
- 300 grams fresh or frozen raspberries
- 60 grams granulated sugar
- 1 teaspoon fresh lemon juice
- 1 teaspoon water, if needed
For the Creamy Ice Cream Base
- 500 milliliters heavy whipping cream, preferably containing 35% fat
- 250 milliliters whole milk
- 150 grams granulated sugar
- 1 teaspoon pure vanilla extract
- A small pinch of salt
- 2 large egg yolks, optional for a custard-style ice cream
Optional Ingredients for Extra Flavor
- 1 tablespoon honey for a rounded sweetness
- 1 teaspoon finely grated lemon zest
- 2 tablespoons raspberry jam for a more intense berry flavor
- 50 grams finely chopped white chocolate
- 50 grams fresh raspberries for adding small fruit pieces
- 1 teaspoon powdered milk for a slightly fuller dairy flavor
The optional ingredients are not necessary for the basic recipe. Start with the main ingredients, then experiment with additions once you have made your first batch.
Choosing the Best Raspberries
The quality of your raspberries has a major effect on the finished ice cream. Fresh, ripe raspberries generally provide a fragrant aroma, attractive color, and balanced sweet-tart flavor.
Choose berries that are brightly colored, plump, and free from visible mold. Avoid fruit that smells fermented or has become excessively soft. A few slightly imperfect berries are fine if they are fresh and safe to eat.
Frozen raspberries are also an excellent choice. They are often harvested when ripe and work especially well in cooked fruit purees. There is no need to thaw them completely before cooking, although allowing them to soften slightly can make them easier to measure and stir.
If your raspberries are particularly tart, you may need a little extra sugar. If they are very sweet and flavorful, you can reduce the sugar slightly. Make adjustments gradually because the mixture will taste less sweet once frozen.
For a more delicate texture, you can strain the cooked puree through a fine-mesh sieve to remove most of the seeds. This step takes a little extra time, but it produces a smoother ice cream that feels especially luxurious.
Step 1: Prepare the Raspberries
Begin by measuring 300 grams of fresh or frozen raspberries. If using fresh berries, remove any leaves or stems and discard fruit that has spoiled.
Rinse fresh raspberries gently under cool running water only when necessary, because they are delicate and can absorb water or break apart easily. Drain them carefully and pat them dry with a clean paper towel.
Place the raspberries in a medium saucepan. Add 60 grams of granulated sugar and one teaspoon of lemon juice.
The sugar begins drawing moisture from the fruit, while the lemon juice brightens the raspberry flavor. It should not make the mixture taste strongly of lemon. Instead, it helps the natural berry flavor stand out.
If the raspberries are frozen, add them directly to the saucepan. They will release their liquid as they warm.
Step 2: Cook the Raspberry Mixture
Place the saucepan over medium-low heat and stir gently with a wooden spoon or heat-resistant spatula.
As the raspberries warm, they will soften and release their juice. Continue cooking for approximately 8–12 minutes, stirring occasionally to prevent sticking.
The berries will gradually break down into a thick, fragrant mixture. Use the back of your spoon to crush any large pieces that remain.
Avoid cooking the mixture over excessively high heat. Gentle cooking helps preserve the fruit’s flavor and prevents the sugar from scorching.
When the puree has thickened slightly and the raspberries have broken down, remove the saucepan from the heat.
If the mixture appears extremely watery, cook it for another minute or two. You want a concentrated puree rather than a thin raspberry juice because excess water can create icy crystals in the finished dessert.
The puree does not need to become as thick as jam. It should remain soft enough to blend easily into the ice cream base.
Step 3: Strain the Raspberry Puree
For smooth raspberry ice cream, place a fine-mesh sieve over a clean bowl.
Pour the warm raspberry mixture into the sieve and press it gently with the back of a spoon. The juice and soft fruit pulp will pass through, while most of the seeds remain behind.
Scrape the underside of the sieve occasionally to collect the puree.
Continue until you have extracted as much of the soft fruit as possible. Discard the seeds left in the sieve, or reserve them for another use if desired.
If you enjoy a more rustic, homemade texture, you can skip this step. Leaving the seeds in the puree gives the ice cream a more noticeable raspberry character.
Taste the puree carefully after it has cooled slightly. It should have a clear raspberry flavor and a pleasant balance of sweetness and tartness.
Remember that frozen desserts taste less sweet than room-temperature mixtures, so the puree should not taste completely bland before it is added to the cream.
Step 4: Cool the Raspberry Puree Completely
Transfer the strained raspberry puree to a clean bowl.
Allow it to cool at room temperature until it is no longer steaming, then cover it and place it in the refrigerator.
Chill for approximately 1–2 hours, or until completely cold.
This step is important because warm fruit puree can soften whipped cream and interfere with the texture of no-churn ice cream. It can also warm an ice cream base that has already been chilled.
For the best results, prepare the raspberry puree a day ahead and refrigerate it overnight.
If you are short on time, place the bowl in a larger bowl filled with ice water and stir occasionally until cool. Do not put a very hot saucepan directly into the refrigerator.
Step 5: Prepare the Creamy Base
Place the heavy whipping cream and whole milk in a large mixing bowl if you are using the no-churn method with whipped cream, or in a saucepan if you are preparing the custard-style version.
For the basic no-churn method, the cream must be cold. Cold cream whips more effectively and holds its shape better.
The whole milk helps balance the richness of the cream, while the heavy cream gives the ice cream its soft, creamy mouthfeel.
Add the vanilla extract and a small pinch of salt to the dairy mixture. The vanilla adds warmth and depth, while the salt subtly enhances the sweetness and fruit flavor.
Keep the ingredients simple. Raspberry should remain the main flavor, with vanilla supporting it rather than overpowering it.
Step 6: Make the No-Churn Ice Cream Base
For the easiest version, use 500 milliliters of cold heavy whipping cream and 250 milliliters of whole milk as separate components.
Pour the heavy cream into a chilled mixing bowl. Using an electric mixer, beat it at medium speed until soft peaks form.
Soft peaks mean the cream holds a gentle shape when you lift the beaters, but the tip bends over. Gradually increase the speed if necessary, but watch the cream carefully.
Continue beating only until the cream reaches medium peaks. It should be fluffy and hold its shape without looking grainy or stiff.
Do not overwhip the cream, because overbeaten cream can become lumpy and eventually separate into butter and liquid.
In a separate bowl, whisk together the whole milk, sugar, vanilla extract, and salt until the sugar has mostly dissolved. Because this version contains no cooked custard, the sugar must be mixed thoroughly to reduce any graininess.
For an even smoother result, use fine granulated sugar or superfine sugar.
Fold the milk mixture gradually into the whipped cream using a flexible spatula. Move the spatula around the sides of the bowl, bring the mixture up from the bottom, and turn it over gently.
Avoid vigorous stirring. The goal is to retain as much air as possible while creating a uniform base.
The mixture should look thick, pale, and creamy.
Step 7: Add the Raspberry Puree
Remove the chilled raspberry puree from the refrigerator.
Add approximately three-quarters of the puree to the creamy ice cream base. Fold gently until the mixture becomes evenly pink or develops a soft pink-and-white marbled appearance.
You can fully combine the puree for a consistent raspberry flavor throughout the ice cream. Alternatively, fold it in only partially if you prefer visible raspberry ribbons.
Taste a small spoonful of the mixture before freezing. If the raspberry flavor seems too mild, add a little more puree. If the mixture tastes too tart, a small amount of extra sugar dissolved into a spoonful of milk can help, although the sugar should be dissolved before being added.
Do not add large quantities of thin liquid at this stage. Too much additional liquid can make the final ice cream harder and icier.
Reserve the remaining puree for swirling through the ice cream just before freezing.
Step 8: Create Raspberry Swirls
A raspberry swirl adds beautiful ribbons of fruit throughout the finished dessert.
Spoon approximately one-third of the raspberry ice cream mixture into a freezer-safe container.
Add a few small spoonfuls of the reserved raspberry puree over the surface. Use a second layer of ice cream mixture, followed by another small amount of puree.
Repeat until all the mixture has been transferred to the container.
Insert a butter knife or skewer and gently draw a few broad curves through the mixture. Avoid stirring repeatedly, because excessive mixing will distribute the puree completely and remove the distinct ribbons.
The aim is to create attractive streaks of deeper raspberry color throughout the pale pink base.
Smooth the surface gently with a spatula.
If desired, scatter a few very small pieces of fresh raspberry over the top, but keep additions modest so that the ice cream remains easy to scoop.
Step 9: Cover and Freeze
Cover the container with a tight-fitting lid. If the container has a loose lid, press a piece of freezer-safe parchment directly against the surface of the ice cream before closing it.
This helps reduce exposure to air and limits the formation of ice crystals.
Place the container on a level shelf in the freezer, away from the freezer door if possible. The temperature should be approximately -18°C or colder.
Freeze for at least 6–8 hours, or until the ice cream is firm enough to scoop.
For the best texture, leave it overnight.
Avoid repeatedly opening the freezer or stirring the mixture during freezing. This no-churn recipe relies on the air incorporated into the whipped cream, so repeated disturbance is unnecessary.
After freezing, the ice cream should be creamy, fragrant, and rich, with a refreshing raspberry flavor and occasional ribbons of fruit.
How to Make Raspberry Ice Cream With an Ice Cream Machine
If you own an ice cream machine, you can prepare a slightly different base that produces a traditional churned texture.
For this method, use the raspberry puree, heavy cream, whole milk, sugar, vanilla, and salt listed in the ingredients. You can omit the optional egg yolks for a simpler churned version.
Combine the whole milk, sugar, vanilla, and salt in a bowl. Stir until the sugar dissolves as much as possible, then mix in the heavy cream.
Add the fully chilled raspberry puree and stir until evenly combined.
Cover the mixture and refrigerate for at least 4 hours, preferably overnight. A thoroughly chilled base freezes more efficiently in the machine and helps create a finer texture.
Prepare the ice cream machine according to the manufacturer’s instructions. If the machine requires a frozen bowl, make sure it has been frozen for the recommended amount of time.
Pour the chilled mixture into the machine and churn according to the manufacturer’s instructions, commonly around 20–30 minutes.
The mixture should gradually thicken until it resembles soft-serve ice cream. The exact time depends on the machine, the temperature of the ingredients, and the size of the batch.
If you want a raspberry swirl, transfer the churned ice cream to a freezer-safe container in layers, adding small spoonfuls of reserved puree between them.
Freeze for another 2–4 hours for a firmer consistency.
The machine-churned version often has a lighter, more traditional ice cream texture because churning incorporates air while the mixture freezes.
How to Make Raspberry Custard Ice Cream
For a richer, classic ice cream with a custard-style base, use the two optional egg yolks listed in the ingredients.
This method requires a little more care, but it creates a smooth and luxurious texture.
Place the whole milk, half of the heavy cream, and approximately half of the sugar in a saucepan. Warm the mixture over medium-low heat until steaming but not boiling.
Meanwhile, place the egg yolks in a separate heatproof bowl with the remaining sugar. Whisk until the mixture becomes slightly lighter and the sugar is distributed.
Slowly pour a small amount of the warm milk mixture into the egg yolks while whisking continuously. This gradual process is called tempering. It warms the yolks gently and helps prevent them from scrambling.
Continue adding the warm liquid in a slow stream, whisking throughout.
Pour the tempered egg mixture back into the saucepan. Cook over low heat, stirring continuously with a spatula and scraping the bottom and corners of the pan.
Heat the custard gently until it reaches 71–74°C and thickens enough to coat the back of a spoon. Use a food thermometer to check the temperature rather than relying only on appearance. Do not allow the custard to boil.
Remove the saucepan from the heat and stir in the remaining cold cream. For food safety, make sure the custard reaches the appropriate temperature throughout.
Strain the custard through a fine-mesh sieve into a clean bowl. Cool it promptly in an ice bath, stirring occasionally, and refrigerate until thoroughly cold.
Once chilled, fold or blend in the cold raspberry puree. Churn the mixture in an ice cream machine according to the manufacturer’s instructions, then freeze until firm.
The result is a dense, smooth, custard-style raspberry ice cream with a particularly rich mouthfeel.
Tips for the Creamiest Raspberry Ice Cream
Use Cold Ingredients
For no-churn ice cream, cold heavy cream whips more effectively than warm cream. Keep the cream refrigerated until you are ready to use it.
Reduce Excess Water in the Fruit
Raspberries contain plenty of moisture. Cooking them into a concentrated puree helps prevent the final dessert from becoming icy.
Do Not Overwhip the Cream
The whipped cream should hold soft to medium peaks. Overwhipping can create a grainy texture that carries through into the finished dessert.
Fold Rather Than Beat
Once the whipped cream is ready, use a spatula to combine the ingredients gently. Excessive mixing removes air and makes the mixture denser.
Allow Enough Freezing Time
A few hours may produce a soft mixture, but overnight freezing generally gives a more stable texture. Keep the container covered to protect the ice cream from freezer odors and moisture loss.
Use a Suitable Container
A shallow, freezer-safe container helps the mixture freeze more evenly than a very deep container. A container with a tight-fitting lid also protects the surface.
Let It Soften Before Scooping
Homemade ice cream may be quite firm directly from a cold freezer. Leave it at room temperature for approximately 5–10 minutes before serving, depending on the temperature of your freezer.
Balance the Fruit and Cream
Too little raspberry puree creates a mild flavor, while too much watery puree can lead to ice crystals. The quantities in this recipe are designed to provide a noticeable berry taste without overwhelming the creamy base.
How to Serve Raspberry Ice Cream
Homemade raspberry ice cream is delicious on its own, but a few simple serving ideas can make it feel even more special.
Raspberry Ice Cream in a Bowl
Scoop two or three small portions into a chilled dessert bowl. Add a fresh raspberry or a little raspberry puree on top. The simple presentation allows the fruit flavor to remain the focus.
Raspberry Ice Cream in Waffle Cones
Serve the ice cream in crisp waffle cones for a traditional ice cream shop experience. The crunchy cone provides a pleasant contrast to the soft, creamy filling.
Raspberry Ice Cream With Chocolate Sauce
Drizzle a small amount of warm chocolate sauce over a scoop of raspberry ice cream. Chocolate and raspberry complement each other beautifully, creating a dessert that tastes rich without requiring much extra preparation.
Raspberry Ice Cream With Fresh Fruit
Serve it alongside sliced strawberries, blueberries, peaches, or additional raspberries. Choose ripe fruit for the best flavor and a colorful presentation.
Raspberry Ice Cream With Brownies
Place a scoop of raspberry ice cream beside a warm chocolate brownie. The cold, fruity ice cream contrasts with the warm, soft chocolate dessert.
Raspberry Ice Cream Milkshake
Add two scoops of raspberry ice cream and approximately 150–200 milliliters of cold milk to a blender. Blend until smooth, adding more milk if needed.
Pour into a chilled glass and serve immediately. For a thicker milkshake, use less milk; for a thinner drink, add a little more.
Raspberry Ice Cream Sandwiches
Place a scoop of slightly softened ice cream between two cookies. Chocolate cookies, vanilla biscuits, and oatmeal cookies all pair well with raspberry.
Press gently, smooth the edges, and freeze the sandwiches until firm before serving.
Raspberry Ice Cream With Cheesecake
Serve a scoop alongside a slice of plain cheesecake. The bright berry flavor complements the rich cream cheese filling, while a spoonful of raspberry puree can tie the two desserts together.
Variations of Raspberry Ice Cream
Once you have mastered the basic recipe, you can create several delicious variations using the same preparation method.
Raspberry and White Chocolate Ice Cream
Prepare the recipe as directed. When the ice cream mixture is almost fully combined, fold in 50 grams of finely chopped white chocolate.
For the best distribution, use small pieces rather than large chunks. The white chocolate adds sweetness and a creamy texture that pairs especially well with the tanginess of raspberries.
You can also add a few white chocolate curls on top before serving.
Raspberry Chocolate Chip Ice Cream
Add 50 grams of mini chocolate chips to the finished ice cream base before transferring it to the freezer container.
Dark chocolate provides a slightly bitter contrast, while milk chocolate creates a sweeter dessert.
Fold the chips in gently so they remain evenly distributed.
Raspberry Vanilla Ice Cream
For a softer, more delicate flavor, increase the vanilla extract to approximately 1½ teaspoons.
Keep the raspberry puree quantity unchanged, and use a good-quality vanilla extract. The additional vanilla rounds out the tartness of the fruit without hiding its distinctive flavor.
Raspberry Cheesecake Ice Cream
Prepare the basic ice cream mixture and add approximately 100 grams of softened cream cheese, whisked until smooth with a little of the milk mixture.
Fold it into the base before adding the raspberry puree.
For a cheesecake-inspired finish, add small pieces of plain digestive biscuit or graham crackers when layering the ice cream in the container.
Use dry biscuit pieces and avoid adding too many, as they can soften during storage.
Raspberry Strawberry Ice Cream
Replace approximately 100 grams of the raspberries with 100 grams of chopped strawberries.
Cook the fruits together with the sugar and lemon juice, then puree and chill as directed.
The strawberries create a softer, sweeter fruit flavor, while the raspberries maintain the bright berry aroma.
Raspberry Lemon Ice Cream
Add one teaspoon of finely grated lemon zest to the fruit mixture while it cooks.
The lemon zest contributes fragrant citrus oils that complement the raspberries. Avoid adding excessive lemon juice, because too much acidity can make the fruit flavor sharp and may affect the balance of the dairy mixture.
Raspberry Yogurt Ice Cream
For a tangier variation, replace part of the heavy cream with thick, plain full-fat yogurt.
This changes the texture and richness, so it is best treated as a variation rather than a direct one-for-one substitution. Start by replacing approximately 150 milliliters of cream with 150 grams of thick yogurt, adjusting the remaining ingredients as needed.
The result will be more tart and less rich than the original version. Because yogurt contains additional water and acidity, the finished texture may be firmer or icier.
Raspberry Coconut Ice Cream
For a coconut-inspired variation, replace the whole milk with an equal quantity of well-stirred canned coconut milk and use a suitable coconut cream in place of some or all of the dairy cream.
This creates a distinct coconut flavor and changes the fat and water balance. For a fully dairy-free version, use plant-based whipping cream specifically designed for whipping and freezing.
Check the product labels to ensure that all ingredients meet your dietary requirements.
Common Mistakes and How to Avoid Them
The Ice Cream Is Too Hard
Homemade ice cream can become very firm because it lacks some of the stabilizers used in commercial products.
Let it soften at room temperature for 5–10 minutes before scooping. Using sufficient cream and allowing the sugar to dissolve properly can also improve the texture.
The Ice Cream Contains Ice Crystals
Ice crystals may form when the raspberry puree is too watery, the container is poorly covered, or the mixture freezes slowly.
Cook the fruit until slightly concentrated, chill the ingredients thoroughly, and store the finished ice cream in a tightly sealed container.
Try not to repeatedly thaw and refreeze the dessert.
The Raspberry Flavor Is Too Weak
The fruit may have been underripe or the puree may have contained too much water.
Use fragrant, ripe berries and cook the puree until it has a more concentrated flavor. You can also add a small quantity of raspberry puree or raspberry jam, making sure the mixture does not become too watery or excessively sweet.
The Ice Cream Tastes Too Tart
Raspberries naturally vary in acidity. If the finished mixture tastes too sharp, add a little more sugar to the puree during cooking next time.
Make changes gradually and taste the cooled puree before combining it with the cream.
The Mixture Looks Grainy
Graininess in no-churn ice cream can occur if the cream is overwhipped or if the ingredients are mixed too aggressively.
Stop whipping when soft to medium peaks form and fold the remaining ingredients gently with a spatula.
If using the custard method, keep the heat low and stir continuously to avoid scrambling the egg yolks.
The Ice Cream Does Not Freeze Firmly
A mixture with too much liquid or too much sugar may remain soft for longer than expected.
Measure the ingredients accurately and avoid adding extra milk or juice. Make sure the freezer is cold enough and allow the ice cream to freeze overnight if necessary.
The Ice Cream Has Too Many Seeds
Strain the cooked raspberry puree through a fine-mesh sieve before cooling. Press the fruit gently to extract the pulp, but avoid forcing large amounts of seeds through the mesh.
This extra step gives the finished dessert a smoother, more refined consistency.
Can You Make Raspberry Ice Cream Without an Ice Cream Machine?
Yes. The no-churn method in this recipe is specifically designed for people who do not own an ice cream machine.
Whipping the heavy cream incorporates air into the mixture, helping create a lighter texture. The sweetened milk and raspberry puree provide flavor, while freezing allows the mixture to become firm.
The important steps are to whip the cream correctly, chill the fruit puree thoroughly, fold the ingredients gently, and freeze the mixture in a covered container.
An ice cream machine is helpful but not essential for this version.
Can You Use Frozen Raspberries?
Yes. Frozen raspberries work very well in this recipe and are often convenient when fresh berries are expensive or unavailable.
Measure the frozen fruit by weight and cook it with the sugar and lemon juice just as you would fresh raspberries.
Frozen berries may release more liquid as they thaw, so allow the mixture to simmer gently until the excess moisture has reduced.
Always cool the puree completely before adding it to the cream.
Can You Make Raspberry Ice Cream Without Eggs?
Yes. The main no-churn recipe contains no eggs, so there is no need to prepare a custard.
The cream provides richness and the whipped structure helps create a soft texture. The milk and raspberry puree contribute flavor without requiring egg yolks.
If you prefer a churned version without eggs, combine the chilled milk, cream, sugar, vanilla, salt, and raspberry puree, then churn according to your ice cream machine’s instructions.
How to Store Homemade Raspberry Ice Cream
Store raspberry ice cream in an airtight, freezer-safe container.
Keep it at approximately -18°C or colder and avoid leaving it on the counter for extended periods. Return the container to the freezer promptly after serving.
For the best flavor and texture, enjoy the ice cream within approximately 2–3 weeks. It may remain safe for longer if continuously frozen and handled properly, but its texture and flavor can gradually deteriorate.
Use a clean scoop each time to avoid introducing crumbs or other ingredients into the container.
If the ice cream melts substantially, do not repeatedly refreeze it. Melting and refreezing can create a coarse texture, and food safety becomes a concern if it has been held at room temperature for too long.
Nutritional Information
The nutritional values below are estimates for the basic no-churn recipe, assuming the batch makes approximately 10 servings. Actual values will vary according to the cream, milk, sugar, portion size, and final yield.
| Nutrient | Estimated amount per serving |
|---|---|
| Calories | 250–320 |
| Protein | 2–4 g |
| Carbohydrates | 25–32 g |
| Total fat | 15–22 g |
| Sugars | 24–30 g |
These figures are approximate, not laboratory measurements. If you need precise nutritional information, calculate it using the specific ingredients and weights you use.
Frequently Asked Questions
Does raspberry ice cream taste sour?
It should taste fruity, creamy, and slightly tangy rather than unpleasantly sour. Raspberries naturally contain acids, so their flavor is more refreshing than that of some sweeter fruits. Adjust the sugar gradually if the berries are particularly tart.
Should I cook the raspberries before making ice cream?
Cooking is recommended because it concentrates the flavor and reduces excess moisture. It also softens the fruit, making it easier to create a smooth puree. The puree must be cooled completely before being added to the cream.
Can I leave the raspberry seeds in?
Yes. Leaving the seeds in gives the ice cream a more rustic texture and saves preparation time. Straining is optional, but it is recommended if you prefer a very smooth dessert.
Can I use raspberry jam instead of fresh fruit?
Raspberry jam can be used as part of the flavoring, but it is not a perfect substitute for the fruit puree. Jam is usually sweeter and thicker, and its flavor may be less fresh.
For the best result, use the cooked raspberry puree as the main fruit ingredient and add a spoonful or two of jam if you want a stronger, sweeter raspberry swirl.
Why does homemade ice cream become hard in the freezer?
Homemade ice cream often has fewer stabilizers and less controlled air incorporation than commercial ice cream. A cold freezer can make it particularly firm.
Allow it to stand briefly before scooping, and keep the container sealed to protect the texture.
Can I reduce the sugar?
You can reduce the sugar slightly, especially if your raspberries are naturally sweet. However, sugar does more than add sweetness: it also affects how firmly the mixture freezes.
Reducing it too much may make the ice cream harder and less pleasant to scoop. Make small adjustments rather than removing most of the sugar.
Can I prepare the recipe the day before serving?
Yes. Preparing the raspberry puree a day in advance can actually make the process easier. You can also prepare the entire ice cream the day before serving, allowing it to freeze overnight.
For the best presentation, take it out of the freezer a few minutes before serving.
Can children help prepare this recipe?
Children can help measure the ingredients, stir the cooled puree into the cream, and create raspberry swirls. An adult should handle the hot saucepan, electric mixer where appropriate, and any food-safety steps involving the custard version.
Final Thoughts
Homemade raspberry ice cream is a delicious way to enjoy the bright flavor of raspberries in a rich, creamy dessert. With a concentrated raspberry puree, cold heavy cream, whole milk, sugar, and a touch of vanilla, you can make an impressive treat using straightforward ingredients.
The no-churn method is particularly convenient because it does not require an ice cream machine. Simply prepare and cool the raspberry puree, whip the cream, fold the ingredients together, add a few attractive raspberry swirls, and freeze until firm.
For an even more indulgent dessert, try adding white chocolate, chocolate chips, or cheesecake-inspired biscuit pieces. If you prefer a more traditional texture, use the ice cream machine method or prepare the optional custard base.
Serve your raspberry ice cream in bowls or cones, alongside brownies, with fresh fruit, or blended into a milkshake. However you enjoy it, the combination of smooth cream and sweet-tart raspberries makes this homemade dessert a lovely addition to any occasion.