admin1
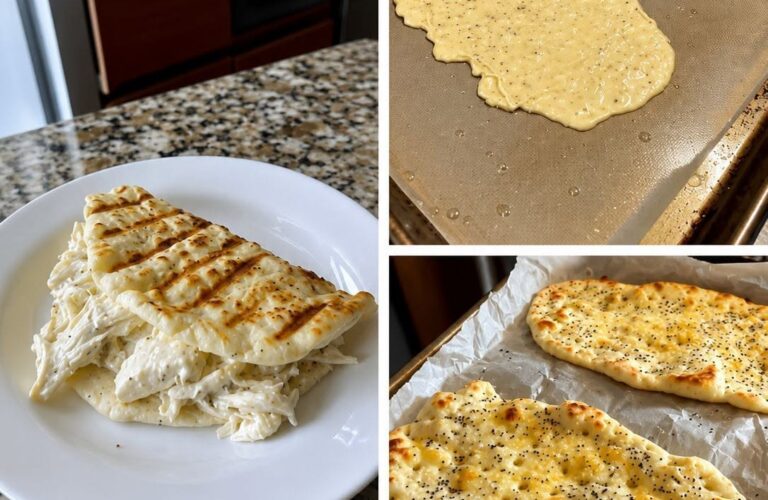
Homemade Soft and Fluffy Garlic Herb Flatbread with Creamy Shredded Chicken
This homemade garlic herb flatbread is soft, fluffy, golden on the outside, and wonderfully tender on the inside. Inspired by the flatbreads shown in the picture, this recipe creates beautiful, irregularly shaped breads brushed with melted butter, garlic, and herbs, then baked until lightly golden with delicious toasted spots. The flatbreads can be served alongside a creamy shredded chicken filling, folded around your favorite ingredients, or enjoyed warm straight from the oven.
The best part about this recipe is that you do not need a traditional tandoor or any special bread-making equipment. You can prepare the dough in your kitchen, shape it by hand, and bake it on an ordinary baking tray. The finished bread is flexible enough to fold, soft enough to tear easily, and flavorful enough to serve as a homemade alternative to naan, wraps, or store-bought flatbread.
The recipe includes detailed instructions for preparing the dough, making the garlic butter, baking the bread, preparing the creamy shredded chicken shown in the picture, and assembling everything into a delicious meal.
Recipe Overview


9
Preparation time: 25–30 minutes
Dough resting time: 60–90 minutes
Cooking time: 15–20 minutes
Total time: Approximately 1 hour 45 minutes to 2 hours 20 minutes
Yield: 6 medium flatbreads
Serving size: 1 flatbread, with chicken filling as desired
Cooking method: Oven baking, with optional stovetop or grill finishing
Texture: Soft, fluffy, tender, and lightly crisp around the edges
Flavor: Buttery, garlicky, mildly savory, and fragrant with herbs
Why You Will Love This Homemade Flatbread
This recipe is ideal for anyone who loves freshly baked bread with a soft interior and a lightly golden exterior. The dough is enriched with yogurt and oil, which help keep the finished bread tender. A little sugar encourages yeast activity and supports browning, while proper resting gives the dough time to develop its structure.
The garlic butter adds a wonderful aroma without overwhelming the natural flavor of the bread. Black sesame seeds or nigella seeds provide an attractive finish and a subtle nutty flavor.
These flatbreads are also versatile. You can serve them with creamy chicken, grilled vegetables, cheese, scrambled eggs, lentils, soups, or curries. You can even use them as homemade sandwich wraps.
Unlike many packaged flatbreads, these are freshly prepared with simple ingredients and can be customized to suit your family’s preferences.
Ingredients for the Flatbread Dough

The following ingredients make six medium flatbreads.
Dry ingredients
- 3 cups all-purpose flour, approximately 375 grams
- 2 teaspoons instant yeast, approximately 7 grams
- 1 tablespoon sugar
- 1 teaspoon salt
- 1 teaspoon baking powder, optional for extra softness
Wet ingredients
- ¾ cup warm water, approximately 180 milliliters, plus a little extra if needed
- ½ cup plain yogurt, approximately 120 grams
- 2 tablespoons olive oil or neutral cooking oil
- 1 tablespoon milk powder, optional for a slightly richer flavor
The water should feel comfortably warm rather than hot. Very hot water can damage the yeast, preventing the dough from rising properly.
Plain, unsweetened yogurt is recommended. It adds moisture, a gentle tang, and tenderness to the bread. If your yogurt is particularly thick, you may need a little extra water to bring the dough together.
All-purpose flour works well for this recipe. Bread flour can also be used, although it may produce a slightly chewier texture.
Ingredients for Garlic Herb Butter
The garlic butter gives the finished bread its signature aroma and golden appearance.
- 4 tablespoons unsalted butter
- 2 tablespoons olive oil
- 3 garlic cloves, finely minced
- 1 tablespoon chopped fresh parsley
- ½ teaspoon dried oregano
- ¼ teaspoon salt, or to taste
- ½ teaspoon black sesame seeds or nigella seeds, optional
- A pinch of black pepper, optional
For a milder garlic flavor, use two cloves instead of three. For a stronger flavor, add a little extra garlic, but avoid burning it when preparing the butter.
Fresh parsley provides a clean, herbal finish. Dried parsley can be substituted if fresh herbs are unavailable.
Ingredients for the Creamy Shredded Chicken Filling

The creamy shredded chicken shown in the plated portion of the picture is a delicious filling for these flatbreads. The chicken is tender, lightly seasoned, and coated in a creamy sauce that complements the garlic butter bread.
- 500 grams boneless, skinless chicken breast
- 1 tablespoon olive oil
- 1 tablespoon butter
- 3 garlic cloves, minced
- ½ small onion, finely chopped
- ½ teaspoon salt, or to taste
- ½ teaspoon black pepper
- ½ teaspoon paprika
- ½ teaspoon dried oregano
- ½ teaspoon garlic powder, optional
- ½ cup cooking cream, approximately 120 milliliters
- ¼ cup milk, approximately 60 milliliters
- ¼ cup grated mozzarella or cheddar cheese, optional
- 1 tablespoon chopped fresh parsley
- 1 teaspoon lemon juice, optional
For a lighter-tasting sauce, use milk with a little cream cheese instead of cooking cream. For a thicker and richer filling, add a small amount of grated cheese.
Equipment Needed
You do not need specialized equipment to make this recipe.
- A large mixing bowl
- Measuring cups and spoons or a kitchen scale
- A wooden spoon or silicone spatula
- A clean work surface
- A rolling pin, optional
- A baking tray
- Baking parchment
- A small saucepan for the garlic butter
- A pastry brush or spoon
- A clean kitchen towel
- A saucepan for cooking the chicken
- Two forks for shredding the chicken
A stand mixer with a dough hook is optional, but kneading by hand works perfectly well.
Step 1: Prepare the Yeast Mixture
If you are using instant yeast, you can mix it directly into the flour. However, checking the yeast first is useful if the packet has been open for a while.
Pour approximately 180 milliliters of warm water into a small bowl. Add the sugar and yeast, then stir gently.
Allow the mixture to stand for 5–10 minutes if you are using active dry yeast. A light layer of foam indicates that the yeast is active.
Instant yeast may not produce a dramatic layer of foam, so follow the instructions on the packet.
Make sure the water is not too hot. If it feels hot against your skin, allow it to cool slightly before adding the yeast.
Step 2: Combine the Dry Ingredients
Place the flour in a large mixing bowl. Add the salt, baking powder if using, and milk powder if desired.
Whisk or stir the ingredients together so that the salt and baking powder are evenly distributed.
Add the instant yeast directly if you have not already dissolved it in water.
Mixing the dry ingredients thoroughly helps create an even texture throughout the finished bread.
Step 3: Add the Yogurt, Oil, and Water
Make a small well in the center of the flour mixture.
Add the yogurt, olive oil, and yeast mixture if prepared separately.
Use a wooden spoon to combine the ingredients. Continue mixing until a rough, shaggy dough begins to form.
The dough may look slightly uneven at this stage. That is completely normal.
If there are dry patches of flour at the bottom of the bowl, add water one tablespoon at a time. If the dough feels excessively wet and cannot be handled, sprinkle in a little flour, but avoid adding too much.
The ideal dough should feel soft, moist, and slightly tacky. It should not be stiff or dry.
This softness is one of the most important secrets to achieving flatbread similar to the bread in the picture.
Step 4: Knead the Dough Until Smooth
Transfer the dough to a lightly oiled work surface.
Knead for approximately 8–10 minutes by hand. Push the dough forward with the heel of your hand, fold it back toward yourself, and turn it slightly before repeating the motion.
At first, the dough may stick to your hands. Resist the temptation to add large amounts of flour.
Instead, lightly oil your hands and continue kneading. As the flour absorbs the moisture and the gluten develops, the dough should become smoother and more elastic.
The dough is ready when it feels soft and springy and begins to pull away from the work surface more easily.
If you press it gently with one finger, the indentation should gradually begin to spring back.
Proper kneading helps the flatbreads hold their shape while remaining soft enough to fold after baking.
Step 5: Allow the Dough to Rise
Lightly grease a clean bowl with a little oil.
Place the dough inside and turn it once so that the surface has a thin coating of oil.
Cover the bowl with a clean kitchen towel, reusable cover, or plastic wrap.
Leave the dough in a comfortably warm place for approximately 60–90 minutes, or until it has visibly increased in size and is roughly doubled.
The exact time depends on the room temperature and the activity of your yeast. In a cool kitchen, the dough may need longer.
Avoid placing the bowl directly beside a very hot stove or on an excessively hot surface.
During this resting period, the yeast produces gas that expands the dough. This process contributes to the soft, airy texture of the finished bread.
Do not rush this step. Properly risen dough is easier to shape and generally produces a lighter flatbread.
Step 6: Prepare the Garlic Herb Butter
While the dough rises, prepare the garlic butter.
Place the butter and olive oil in a small saucepan over low heat.
Once the butter has melted, add the minced garlic.
Stir gently for approximately 30–60 seconds, just until the garlic becomes fragrant. Do not allow it to turn dark brown, as burnt garlic can taste bitter.
Remove the saucepan from the heat.
Stir in the chopped parsley, oregano, salt, and black pepper if using.
Set the mixture aside.
If the butter begins to solidify while you work, warm it gently again. It should be easy to brush or spoon over the bread.
For an especially fresh flavor, reserve a little chopped parsley to sprinkle over the flatbreads immediately after baking.
Step 7: Prepare the Baking Tray
Preheat your oven to 220°C, or approximately 425°F.
If your oven has a fan setting, use approximately 200–210°C, depending on how strongly your oven circulates hot air.
Place baking parchment on a large baking tray. Lightly brush it with oil if needed.
A preheated oven is important because flatbread benefits from a strong initial burst of heat. This helps the dough rise quickly and encourages golden patches to develop on the surface.
Position an oven rack in the middle or upper-middle section of the oven.
If your baking tray is large enough, you may bake two flatbreads at once. Leave sufficient space between them because the dough can spread slightly.
Never place parchment paper in direct contact with a heating element or use it above the maximum temperature recommended by its manufacturer.
Step 8: Divide the Dough
Once the dough has risen, gently press it down to release some of the larger air pockets.
Transfer it to a lightly oiled work surface.
Divide the dough into six approximately equal portions.
For more consistent results, use a kitchen scale. If the entire dough weighs around 750 grams, each portion will be approximately 125 grams, although the final weight depends on the exact ingredients used.
Shape each portion into a loose ball.
Cover the dough balls with a clean towel and let them rest for 10–15 minutes.
This short resting period relaxes the gluten, making the dough easier to stretch into the long, irregular shapes shown in the picture.
If the dough repeatedly springs back while shaping, leave it covered for another five minutes before trying again.
Step 9: Shape the Flatbreads
Take one dough ball and place it on a lightly oiled surface.
Use your fingertips to press it into a thick oval. Gently stretch the dough outward until it becomes an elongated flatbread.
You can also use a rolling pin if you prefer a more even shape.
Aim for an oval approximately 20–25 centimeters long, depending on the size of your dough portions and baking tray.
Keep the center reasonably thin while leaving the edges slightly thicker. This creates a pleasant contrast between the tender center and the soft, puffy border.
Do not make the dough paper-thin. Very thin dough can become crisp rather than fluffy.
For the rustic appearance in the picture, allow the edges to remain slightly uneven. Perfectly symmetrical shapes are not necessary.
If the dough tears, gently pinch the tear closed and continue shaping.
Transfer the shaped dough to the prepared tray.
Repeat with the remaining portions, leaving enough room for the flatbreads to expand.
Step 10: Add the Garlic Butter and Seeds
Brush a light layer of garlic butter over each uncooked flatbread.
Make sure the surface is coated evenly, but avoid pooling large amounts of butter around the edges.
Sprinkle the tops with black sesame seeds or nigella seeds if desired.
Nigella seeds have a distinctive savory flavor, while black sesame seeds provide a milder, nutty taste.
For a more traditional-looking finish, you can also sprinkle a little dried oregano over the surface.
If you prefer a particularly soft finish, reserve some garlic butter for brushing the bread after baking rather than using all of it before the bread enters the oven.
Step 11: Bake the Flatbreads
Place the tray in the preheated oven.
Bake for approximately 10–15 minutes, checking the bread after the first 8–10 minutes.
The exact cooking time depends on the thickness of the dough, your oven, and the size of the flatbreads.
During baking, the dough should puff in places, and the surface should develop golden patches.
The edges may become lightly browned while the center remains soft and flexible.
If you prefer a more deeply golden surface, you can finish the bread briefly under the oven’s grill or broiler. Watch it continuously during this stage because the surface can brown very quickly.
The flatbreads should be fully baked before serving. If the centers still look wet or doughy, return them to the oven for a few additional minutes.
Transfer the cooked bread to a plate or wire rack.
Brush with a little more garlic butter while warm.
Avoid stacking the bread uncovered for too long, as the surface can dry out. If you want especially soft flatbreads, cover them loosely with a clean kitchen towel for a few minutes after baking.
Step 12: Make the Flatbreads Even Softer
The bread shown in the picture has a tender, slightly puffy texture. There are several simple techniques that help you achieve similar results at home.
First, keep the dough soft. Adding too much flour during kneading is one of the most common reasons homemade flatbread becomes tough.
Second, allow enough time for the dough to rise. Yeast needs time to produce the gas that helps create a lighter structure.
Third, avoid rolling the dough too thinly. A slightly thicker flatbread retains more moisture and remains flexible.
Fourth, do not overbake. Once the bread is cooked and lightly golden, remove it from the oven rather than leaving it inside until the entire surface becomes dark brown.
Finally, brush the bread with garlic butter and cover it loosely while it is still warm. This helps the surface stay tender.
Step 13: Cook the Chicken for the Filling
Now prepare the creamy shredded chicken.
Place the chicken breast in a saucepan and add enough water to cover it. You can add a small pinch of salt and a little black pepper for flavor.
Bring the water to a gentle simmer.
Cook the chicken until the thickest part reaches an internal temperature of 74°C, or 165°F. Cooking time depends on the thickness of the chicken, so use a food thermometer when possible.
Remove the chicken from the water and allow it to rest for approximately five minutes.
Place it on a clean cutting board.
Using two forks, pull the chicken apart into thin strands.
For the best texture, shred the chicken while it is still warm. It is usually easier to separate into tender strands before it cools completely.
Set the shredded chicken aside while you prepare the sauce.
You can also use leftover cooked chicken, provided it has been stored safely and is reheated thoroughly.
Step 14: Prepare the Creamy Garlic Sauce
Place a large skillet over medium-low heat.
Add the olive oil and butter.
Once the butter has melted, add the finely chopped onion. Cook for approximately three to four minutes, stirring occasionally, until the onion softens.
Add the minced garlic and cook for another 30–60 seconds.
Stir in the paprika, black pepper, oregano, and garlic powder if using.
Keep the heat moderate so that the garlic does not burn.
Pour in the milk and cooking cream.
Stir gently to combine the ingredients into a smooth sauce.
Allow the mixture to simmer gently for three to five minutes, stirring occasionally, until it begins to thicken slightly.
Avoid boiling the sauce vigorously. High heat can cause some cream-based sauces to separate or become less smooth.
If you want a richer filling, stir in the grated mozzarella or cheddar until melted.
If the sauce becomes too thick, add a tablespoon or two of milk. If it seems too thin, allow it to simmer gently for another minute or two.
Taste the sauce and adjust the salt and pepper.
Step 15: Add the Shredded Chicken
Add the shredded chicken to the skillet.
Use a wooden spoon or spatula to mix it thoroughly into the creamy sauce.
Continue cooking over low heat for approximately two to three minutes, stirring gently until the chicken is evenly coated and hot throughout.
Add the lemon juice if desired. A small amount can brighten the creamy flavor without making the filling taste strongly of lemon.
Stir in the chopped parsley just before removing the skillet from the heat.
The finished chicken should be moist, creamy, and easy to spoon onto the flatbread.
If the filling is too dry, add a little warm milk. If it is too loose, let it simmer gently until it reaches a consistency that will stay on the bread without running everywhere.
Remove the pan from the heat and allow the filling to cool slightly before assembling the flatbreads.
Step 16: Assemble the Flatbread with Creamy Chicken

Place one warm flatbread on a clean plate or cutting board.
Spoon a generous amount of creamy shredded chicken over one half of the bread.
Spread the filling into an even layer, leaving a small border around the edge.
Fold the other half over the filling to create a half-moon shape.
Press very gently so that the bread holds its shape without squeezing out too much filling.
For a presentation similar to the picture, brush the top lightly with garlic butter and place the folded flatbread on a preheated grill pan for a short time.
Press gently with a spatula to create attractive grill marks.
Turn the bread carefully if you want marks on both sides. Because the filling is already cooked, you only need to warm the assembled flatbread and lightly toast the exterior.
Alternatively, leave the flatbread ungrilled for a softer texture.
Transfer it to a serving plate and add a little chopped parsley if desired.
Repeat with the remaining flatbreads.
Step 17: Optional Grill-Pan Finish
If you want the distinctive dark grill marks shown on the plated flatbread, a grill pan is an excellent finishing tool.
Preheat a clean grill pan over medium heat.
Brush the pan with a very thin layer of oil.
Place the assembled flatbread on the pan and cook for approximately one to two minutes, checking the underside regularly.
When the bread develops visible golden grill marks, turn it carefully.
Cook the second side briefly until warmed through.
Avoid pressing too hard because the creamy filling may escape from the sides.
If you do not have a grill pan, a regular skillet works well. It will create a lightly toasted surface rather than raised grill marks.
You can also serve the baked flatbread without grilling it. The bread will still be delicious, soft, and flavorful.
How to Serve Homemade Garlic Herb Flatbread
These flatbreads are suitable for lunch, dinner, or a filling homemade snack.
Serve them warm with the creamy shredded chicken filling and a fresh salad made with lettuce, cucumber, tomatoes, and a light lemon dressing.
For a Mediterranean-inspired meal, add sliced cucumber, tomatoes, and a little yogurt sauce.
For a spicy version, mix a small amount of chili sauce into the chicken filling.
For a cheesy version, add mozzarella to the filling and warm the assembled bread until the cheese melts.
For a simpler meal, serve the flatbread with hummus, roasted vegetables, or a bowl of soup.
The bread can also be cut into strips and served alongside creamy dips.
If you prefer to keep the recipe vegetarian, replace the chicken with sautéed mushrooms, roasted vegetables, or a mixture of spinach and cheese.
Delicious Variations
Cheesy Garlic Flatbread
Add ½ cup of grated mozzarella to the top of each flatbread during the final few minutes of baking.
Allow the cheese to melt and develop a few golden spots.
Brush the finished bread with garlic butter and sprinkle with parsley.
For extra flavor, add a little grated cheddar or Parmesan.
Spicy Chicken Flatbread
Add ½ teaspoon of chili flakes or a small amount of chili powder to the chicken seasoning.
You can also stir a teaspoon of your favorite chili sauce into the cream sauce.
Balance the heat with a little extra yogurt sauce when serving.
Herb and Sesame Flatbread
Replace the oregano with a combination of dried thyme, parsley, and rosemary.
Sprinkle the surface with black sesame seeds or nigella seeds before baking.
This variation is particularly good when served alongside soups, grilled vegetables, or roasted chicken.
Yogurt Flatbread
For a simple alternative, omit the yeast and use a quick yogurt-based dough made with self-rising flour.
Mix approximately 2 cups of self-rising flour with 1 cup of plain Greek yogurt, adding a little extra flour only as needed to handle the dough.
Divide into portions, roll into flat rounds, and cook in a lightly oiled skillet until golden and cooked through.
This quicker variation will have a different texture from the yeast-risen flatbread, but it is useful when you do not have time to wait for the dough to rise.
Whole-Wheat Flatbread
Replace up to half of the all-purpose flour with whole-wheat flour.
Because whole-wheat flour absorbs more moisture, you may need to add a little extra water.
The finished bread will have a more pronounced wheat flavor and a slightly denser texture.
For the softest result, avoid replacing all the flour unless you are prepared to adjust the liquid and kneading time.
Dairy-Free Garlic Flatbread
Use an unsweetened plant-based yogurt in the dough and replace the butter with olive oil or a dairy-free butter alternative.
For the filling, use an unsweetened plant-based cooking cream and omit the cheese or choose a suitable dairy-free alternative.
Check ingredient labels if you need to avoid dairy completely.
Troubleshooting: Common Flatbread Problems
Why Did My Flatbread Turn Out Hard?
Hard flatbread is often caused by dough that is too dry, excessive flour during kneading, or baking for too long.
Next time, add the water gradually but make sure the dough remains soft. Knead until smooth, allow the dough to rise properly, and remove the bread from the oven as soon as it is cooked and lightly golden.
Brushing the bread with garlic butter and covering it loosely while warm can also help maintain a tender texture.
Why Did My Dough Not Rise?
The yeast may be old, the water may have been too hot, or the room may have been too cold.
Check the expiration date on the yeast packet.
If you are using active dry yeast, test it in warm water with a little sugar before mixing the dough.
Give the dough additional time if the kitchen is cool. It is better to judge the rise by the dough’s appearance than to rely only on the clock.
Why Is My Flatbread Dense?
Dense bread can result from insufficient kneading, inadequate rising time, or dough that is too stiff.
Make sure the ingredients are properly incorporated and knead until the dough feels smooth and elastic.
Allow the dough to rise until it has visibly expanded.
Avoid flattening the dough excessively during shaping, and do not press all the air out of it after the first rise.
Why Is the Bread Pale?
The oven may not have been fully preheated, or the surface may not have had enough time to brown.
Make sure the oven reaches the required temperature before baking.
A light coating of oil or garlic butter can encourage browning.
If the bread is fully cooked but still pale, use a brief grill finish while watching carefully.
Why Is the Chicken Filling Watery?
The sauce may need additional simmering time, or too much liquid may have been added.
Let the filling simmer gently until it thickens.
If it remains thin, stir in a little grated cheese or a small amount of cream cheese, if desired.
Remember that the filling will thicken slightly as it cools.
Why Does the Filling Fall Out?
The filling may be too loose, or too much may have been placed inside the bread.
Allow the chicken mixture to cool slightly before assembling the flatbreads.
Use a moderate amount of filling and leave a border around the edges.
Fold the bread gently and warm it on a skillet if you want the outside to hold its shape more firmly.
Storage Instructions
Storing the Flatbread
Allow the flatbreads to cool until they are no longer steaming heavily.
Place them in an airtight container or a resealable food-storage bag.
Store at room temperature for up to one day if your kitchen conditions are suitable, or refrigerate for approximately three to four days for longer storage.
For the softest texture, place a piece of parchment between the flatbreads if you are stacking them.
Freezing the Flatbread
These flatbreads freeze well.
Allow them to cool completely before freezing.
Place parchment paper between each flatbread and store them in a freezer-safe bag or container.
Freeze for up to approximately two to three months for best quality.
When ready to eat, thaw in the refrigerator or reheat directly from frozen using a skillet or oven until heated through.
Brush with a little garlic butter after reheating to refresh the flavor and texture.
Storing the Creamy Chicken
Place the cooked chicken filling in a shallow, airtight container and refrigerate promptly.
Refrigerate within two hours of cooking, or within one hour if the surrounding temperature is above 32°C (90°F).
Use the refrigerated chicken filling within three to four days.
Reheat until the center reaches 74°C (165°F), stirring the filling so that it heats evenly.
Freeze the filling separately from the flatbread if you want to prepare the recipe in advance. Frozen cooked chicken filling is best used within approximately two to three months for quality.
Thaw frozen chicken in the refrigerator rather than leaving it at room temperature.
Make-Ahead Instructions
This recipe is convenient for meal preparation because the dough, garlic butter, and chicken filling can be prepared separately.
You can make the garlic butter a day ahead and refrigerate it in a covered container. Warm it gently before brushing it over the bread.
You can cook and shred the chicken in advance, then refrigerate it until you are ready to prepare the creamy sauce.
The dough can also be prepared ahead and refrigerated after kneading. Place it in a covered, lightly oiled container and refrigerate it for up to about 24 hours. The dough may continue to rise slowly in the refrigerator.
Before shaping, allow the chilled dough to sit at room temperature until it becomes easier to stretch. If it has not risen sufficiently, give it additional time in a warm place.
For the best texture, bake the flatbreads shortly before serving and assemble them with the chicken while the bread is still warm.
Frequently Asked Questions
Can I Make This Flatbread Without Yeast?
Yes. You can use the quick yogurt-flatbread variation described above. The texture will be slightly different because it will not have the same yeast-developed flavor and airy structure.
If you want bread closer to the picture, yeast is the preferred option.
Can I Cook the Flatbread on the Stovetop?
Yes. Preheat a heavy skillet over medium heat and lightly grease it.
Place one shaped flatbread in the skillet and cook until bubbles begin to appear and the underside develops golden spots.
Flip the bread and cook the other side until fully cooked.
The cooking time will depend on thickness, but approximately two to four minutes per side is a useful starting point.
Lower the heat if the exterior browns before the center cooks.
Can I Use Self-Rising Flour?
You can use self-rising flour for a quick, yeast-free variation. However, it is not a direct replacement for plain flour in the yeast-based recipe because self-rising flour already contains raising agents.
For the recipe above, all-purpose flour is the most reliable choice.
Can I Prepare the Bread Without Yogurt?
Yes. Replace the yogurt with a suitable amount of milk or water, adding it gradually until the dough reaches the correct consistency.
The flavor and softness may change slightly. Yogurt contributes moisture and tenderness, so the dough may require some adjustment when it is omitted.
What Are the Black Seeds on Top?
The small black seeds can be black sesame seeds or nigella seeds, also known as kalonji.
Both can be used, although their flavors are different. Black sesame seeds have a nutty flavor, while nigella seeds have a stronger, savory, slightly onion-like taste.
Use whichever you prefer, or omit them entirely.
Can I Make the Chicken Filling Without Cream?
Yes. Use milk with a little cream cheese, or prepare a simple sauce using milk and a small flour-and-butter mixture.
For a lighter sauce, use milk and seasonings, then thicken gently over low heat.
The texture will differ from a cream-based filling but can still be delicious.
How Do I Reheat the Flatbread Without Drying It Out?
Warm the bread in a covered skillet over low heat with a few drops of water added to the pan, taking care that the water does not soak the bread.
Alternatively, wrap the bread loosely in foil and warm it in a moderate oven.
Avoid prolonged heating, as it can make the bread tough.
Final Recipe Summary
This homemade garlic herb flatbread with creamy shredded chicken combines soft, yeast-risen bread with fragrant garlic butter and a rich, savory filling. The dough is prepared with flour, yeast, yogurt, oil, and warm water, then kneaded, rested, shaped into rustic ovals, and baked until lightly golden.
The garlic butter gives the bread its rich aroma, while black sesame or nigella seeds provide a traditional-looking finish. The creamy shredded chicken makes the flatbread satisfying enough to serve as a complete meal.
For the best result, remember three important points: keep the dough soft, give it enough time to rise, and avoid overbaking. Serve the bread warm, brush it with fresh garlic butter, and add the creamy chicken just before serving.
Whether you make it for a family dinner, a weekend lunch, or a homemade alternative to takeaway wraps, this flatbread is a versatile recipe that can be adapted with cheese, herbs, vegetables, or your favorite seasonings.