admin1
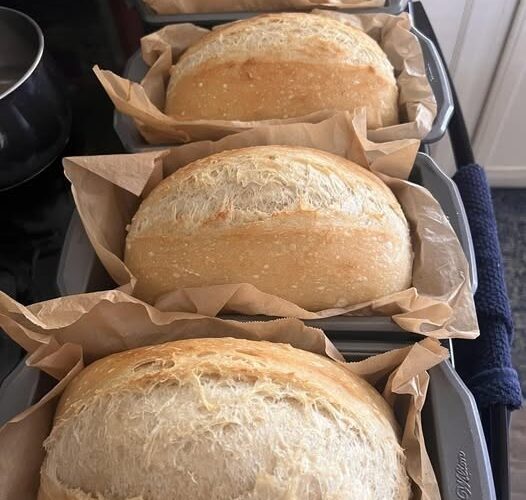
Soft and Fluffy Gluten-Free Bread: The Ultimate Homemade Recipe
Soft, fluffy gluten-free bread is one of the most satisfying breads to make at home. It has a tender crumb, a delicate golden crust, and a light, airy texture that makes every slice perfect for sandwiches, breakfast toast, lunchboxes, and comforting snacks. Unlike many gluten-free breads that turn out dry, dense, crumbly, or hard after cooling, this recipe focuses on moisture, structure, and careful preparation to create a loaf that stays soft and delicious.
The secret to excellent gluten-free bread is understanding that gluten-free flour behaves differently from ordinary wheat flour. Traditional bread relies on gluten to stretch, trap air, and create an elastic structure. Gluten-free bread needs a different combination of ingredients to achieve a similar result. A carefully balanced flour blend, psyllium husk, yeast, warm liquid, and the right mixing and rising techniques help produce a loaf with a wonderfully soft interior.
This recipe is designed for home bakers who want reliable results without complicated techniques. You do not need to knead the dough for a long time, and you do not need professional baking equipment. With a mixing bowl, a loaf pan, a kitchen scale or measuring cups, and a little patience, you can make a beautiful homemade loaf that is suitable for everyday meals.
Recipe Overview
Preparation time: 25 minutes
Rising time: 60–90 minutes, depending on room temperature
Baking time: 45–55 minutes
Cooling time: At least 2 hours
Total time: Approximately 3 hours and 30 minutes
Yield: One medium loaf, approximately 10–12 slices
Difficulty level: Moderate and beginner-friendly
Texture: Soft, fluffy, moist, and tender
Flavor: Mild, slightly yeasty, and pleasantly savory
Dietary information: Gluten-free when all ingredients are certified gluten-free. This recipe contains eggs and dairy if prepared with the optional milk-based ingredients specified below.
Why This Gluten-Free Bread Turns Out Soft and Fluffy
The most important feature of this recipe is its balance of ingredients. Every ingredient has a particular purpose, and understanding those purposes will help you achieve consistent results.
Gluten-free bread flour blends often contain rice flour, tapioca starch, potato starch, corn starch, or other gluten-free ingredients. These provide the foundation of the loaf, but they do not naturally create the elastic network found in wheat dough.
Psyllium husk helps solve this problem. When mixed with water, it forms a gel that improves the dough’s ability to hold together. It helps trap the gases produced by yeast, supports the loaf as it rises, and makes the finished bread less crumbly.
Yeast provides the characteristic bread flavor and creates carbon dioxide during fermentation. These tiny gas bubbles expand inside the dough, helping it rise and giving the bread a lighter texture.
Eggs contribute structure, moisture, and tenderness. They also help the bread develop a pleasing color during baking. The egg whites provide additional structure, while the yolks contribute richness.
Oil helps keep the crumb tender. It reduces the perception of dryness and makes the bread more pleasant to eat after it has cooled.
A small amount of sugar feeds the yeast and helps balance the flavor. Most of the sugar is used during fermentation and browning, although the exact amount remaining in the finished bread varies.
Finally, the correct amount of liquid is essential. Gluten-free bread dough is generally much wetter and stickier than traditional wheat dough. Trying to make it feel like ordinary kneadable bread dough by adding extra flour is one of the most common reasons gluten-free loaves turn out dense.
Ingredients for Soft and Fluffy Gluten-Free Bread
Measure the ingredients carefully for the most reliable results.
Dry Ingredients
3 cups gluten-free all-purpose flour blend, approximately 420 grams
Choose a gluten-free flour blend intended for bread or yeast baking. A blend containing rice flour and starches generally works well. If the package already contains xanthan gum, check the manufacturer’s instructions before adding any more.
2 tablespoons whole psyllium husk, approximately 12–15 grams
Psyllium husk is one of the most useful ingredients for improving the texture of gluten-free bread. Whole husk is suitable for this recipe. If using finely powdered psyllium, use a smaller quantity because it absorbs liquid more quickly and can make the dough excessively firm.
2 teaspoons instant yeast, approximately 6–7 grams
Instant yeast can be mixed directly with the dry ingredients. If you are using active dry yeast, dissolve it in some of the warm water first and allow it to become foamy before proceeding.
2 tablespoons granulated sugar, approximately 25 grams
Sugar provides a mild sweetness and helps support yeast activity. You can reduce it slightly, but avoid changing several ingredients at once when testing a new recipe.
1 teaspoon fine salt, approximately 5 grams
Salt enhances the flavor and balances the yeast and sugar. Distribute it evenly throughout the flour mixture.
1 teaspoon baking powder, approximately 4 grams
This is optional. A small amount may provide additional lift, although the yeast and proper dough consistency are the primary sources of volume.
Wet Ingredients
1¾ cups warm water, approximately 420 milliliters
Start with the measured amount, but reserve around 2 tablespoons until you have mixed the dough. Different flour blends absorb different amounts of water, so you may need to adjust slightly.
The water should feel comfortably warm rather than hot. Excessively hot water can damage the yeast.
2 large eggs, at room temperature
Room-temperature eggs mix more evenly into the dough. If you forgot to take them out of the refrigerator, place them in a bowl of lukewarm water for several minutes before cracking them.
3 tablespoons neutral oil, approximately 45 milliliters
Sunflower, canola, or another mild-tasting oil works well. Olive oil can also be used if you prefer a slightly more pronounced flavor.
1 teaspoon apple cider vinegar
The vinegar adds a little acidity that can improve the flavor balance of the loaf. It is not essential, so a mild white vinegar can be substituted.
Optional Ingredients for Extra Tenderness
2 tablespoons milk powder
Milk powder can contribute a richer flavor and help the crust brown. Use a gluten-free product and omit it if you need a dairy-free loaf.
1 tablespoon honey
Honey adds a gentle sweetness and moisture. It can replace the granulated sugar, although using both is unnecessary for this recipe.
1 tablespoon sesame seeds or poppy seeds
These are optional toppings that add a little texture and flavor. Use them only if you enjoy seeded bread.
Equipment You Will Need
A standard loaf pan measuring approximately 8½ by 4½ inches or 9 by 5 inches works well. The smaller pan generally produces a taller loaf, while the larger pan produces a slightly wider loaf.
You will also need a large mixing bowl, a small bowl for preparing the psyllium gel, a whisk, a sturdy spoon or electric mixer, a spatula, baking paper, and a wire cooling rack.
A kitchen scale is particularly helpful when working with gluten-free flour because cup measurements can vary significantly depending on how the flour is packed.
Step 1: Prepare the Loaf Pan
Begin by preparing the loaf pan before mixing the dough.
Lightly grease the inside of the pan with oil. Line the bottom and long sides with baking paper, leaving a little paper extending above the edges. These extensions will help you lift the loaf out after baking.
If you are using a nonstick pan, greasing and lining it still provides extra protection against sticking.
Set the prepared pan aside while you mix the ingredients.
Preparing the pan first is helpful because gluten-free dough can begin fermenting quickly once the yeast becomes active. You do not want to leave the mixed dough sitting unnecessarily while searching for baking paper or measuring ingredients.
Step 2: Mix the Dry Ingredients
Place the gluten-free flour blend in a large mixing bowl.
Add the instant yeast, sugar, salt, and optional baking powder. If you are using milk powder, add it at this stage as well.
Whisk everything together thoroughly for approximately 30 seconds.
This step is important because gluten-free flour blends can contain several different powders and starches. Mixing the dry ingredients evenly helps prevent concentrated pockets of salt, yeast, or leavening ingredients.
If your flour contains visible lumps, sift it before mixing. This is especially helpful when the flour has been stored for a long time or exposed to humidity.
Do not add the eggs or oil yet. First, prepare the psyllium mixture so that it has time to hydrate.
Step 3: Prepare the Psyllium Gel
Pour the warm water into a separate bowl.
Sprinkle the psyllium husk gradually over the water while whisking. Continue whisking until the mixture is evenly combined.
Allow it to stand for approximately 3–5 minutes.
During this time, the psyllium absorbs water and forms a thick gel. The mixture should become slightly viscous and cohesive.
This gel is an important part of the recipe because it helps replace some of the binding and elasticity that gluten would normally provide.
If the mixture becomes extremely stiff before you have combined it with the flour, your psyllium may be more finely ground than expected or may absorb more liquid than the recipe assumes. Add a small splash of water and stir until it becomes easier to mix.
Avoid leaving the gel for an unnecessarily long time before adding the other ingredients, as it will continue to thicken.
Step 4: Add the Eggs, Oil, and Vinegar
Crack the eggs into the psyllium gel and whisk until the mixture is reasonably smooth.
Add the oil and apple cider vinegar.
Whisk again until the ingredients are evenly incorporated.
The mixture may look slightly thick or slippery because of the psyllium. This is normal.
Make sure the eggs are thoroughly combined before adding the dry ingredients. Unevenly mixed eggs can create inconsistent pockets of moisture in the finished loaf.
If you are using honey instead of granulated sugar, remember that the honey should be included in the wet mixture. Do not automatically add it in addition to all the sugar unless you want a sweeter loaf.
Step 5: Combine the Wet and Dry Mixtures
Pour the wet mixture into the bowl of dry ingredients.
Using a sturdy spoon, spatula, or electric mixer with a paddle attachment, mix until no dry patches of flour remain.
The dough should be thick, sticky, and somewhat paste-like. It will not behave like traditional wheat bread dough, and it should not be expected to form a smooth elastic ball.
Scrape the sides and bottom of the bowl to ensure that all the flour is incorporated.
Mix for another 2–3 minutes with a mixer on low to medium speed, or continue stirring firmly by hand. This helps distribute the psyllium gel and moisture throughout the flour.
Check the consistency before adding the reserved water.
If the mixture looks dry, cracked, or difficult to combine, add a little water at a time. If it looks extremely loose and almost pourable, allow it to stand for a few minutes before making any changes because the psyllium may still be absorbing moisture.
The ideal dough should hold its shape when transferred to the pan but remain soft enough to spread with a spatula.
Do not add extra flour simply because the dough feels sticky. Excess flour can make the finished bread heavy and dry.
Step 6: Transfer the Dough to the Pan
Scrape the dough into the prepared loaf pan.
Use a wet spatula to spread it evenly into the corners. Smooth the top gently, creating a slightly rounded surface if you prefer a traditional loaf shape.
Because gluten-free dough is sticky, dipping the spatula in water makes it easier to work with. You can also lightly wet your fingers to smooth the surface without pulling the dough apart.
Tap the pan gently on the countertop once or twice to release any large trapped air pockets. Do not bang it forcefully, as this may disturb the developing structure.
Make sure the dough is distributed evenly. If one side is much higher than the other, the loaf may bake unevenly.
At this stage, the dough may look more like thick batter than conventional bread dough. That is perfectly normal for this style of gluten-free loaf.
Step 7: Let the Bread Rise
Cover the loaf pan loosely with lightly oiled plastic wrap or a clean kitchen towel.
Place it in a warm, draft-free area.
Allow the dough to rise for approximately 45–75 minutes, depending on the temperature of your kitchen and the activity of your yeast.
The exact time will vary. In a cool kitchen, the dough may need longer. In a warm kitchen, it may rise more quickly.
Rather than relying entirely on the clock, watch the dough.
It should become noticeably puffier and increase in volume. A rise of roughly one-third to one-half is a useful starting point for this recipe, although the ideal amount depends on your flour blend and pan size.
Avoid waiting for the dough to double automatically. Gluten-free dough can lose its structure if it rises too far, causing the loaf to collapse during baking.
If the surface develops large bubbles, begins to sag, or looks fragile, it may already have risen enough.
While the dough rises, begin preheating the oven to 190°C conventional heat, or approximately 180°C fan-assisted heat.
Allow the oven to preheat fully before placing the bread inside.
Step 8: Prepare the Surface for Baking
Once the dough has risen, examine the surface.
If you want a smooth, simple loaf, you can bake it without adding anything.
For a lightly golden top, brush the surface very gently with a small amount of oil or beaten egg. If using egg wash, keep the layer thin so that it does not weigh down the delicate dough.
You may sprinkle sesame seeds or poppy seeds on top if desired.
Do not press the seeds firmly into the dough. A light sprinkling is enough.
If the dough has risen substantially, handle the pan carefully when moving it to the oven. Sudden movement or rough handling can disturb the delicate air pockets.
Step 9: Bake the Gluten-Free Bread
Place the loaf pan on the middle rack of the preheated oven.
Bake for approximately 45–55 minutes.
The exact baking time depends on your oven, the size of your loaf pan, the flour blend, and the amount of moisture in the dough.
During the first 30 minutes, avoid opening the oven door unnecessarily. A sudden temperature change may affect the loaf’s rise before the interior has set.
After approximately 35–40 minutes, check the color. The top should be golden brown, and the loaf should look set rather than wet or shiny.
If the crust is becoming too dark before the center is baked, loosely cover the top with a piece of foil and continue baking.
Gluten-free bread often needs a little longer in the oven than its appearance suggests. A beautiful golden crust does not necessarily mean that the interior is fully cooked.
If you have a food thermometer, check the center of the loaf. An internal temperature around 96–99°C is a useful indication that the bread has baked through, although the exact ideal temperature varies with the formulation.
When properly baked, the loaf should feel lighter than expected for its size and should have a firm, set exterior.
Step 10: Remove the Bread from the Pan
When the loaf is baked, remove the pan from the oven and let it rest for approximately 10 minutes.
Use the baking paper to lift the loaf carefully out of the pan.
Place it directly on a wire rack.
Do not leave the bread sitting in the hot pan for too long. Trapped steam can make the sides damp and affect the crust.
At the same time, do not slice it immediately. Gluten-free bread continues to set as it cools, and cutting too early can produce a sticky or gummy interior.
The loaf may feel slightly firm on the outside at first. This is normal and does not necessarily mean that it is dry.
Step 11: Cool Completely Before Slicing
Allow the bread to cool for at least 2 hours before slicing. A larger or particularly moist loaf may benefit from additional cooling time.
This is one of the most important steps in making soft gluten-free bread.
As the loaf cools, moisture redistributes throughout the crumb and the internal structure becomes more stable. Cutting it while hot can compress the soft interior and make the slices appear underbaked.
Once the loaf has cooled, use a sharp serrated bread knife.
Hold the loaf gently without squeezing it. Use a light sawing motion rather than pressing the knife straight down.
Cut slices approximately 1–1.5 centimeters thick, adjusting the thickness depending on whether you want sandwich bread or toast.
The finished slices should be tender enough for sandwiches but strong enough to hold their shape when handled carefully.
What the Finished Bread Should Look Like
A successful loaf should have a lightly golden crust and an evenly baked interior.
The crumb should be soft, moist, and reasonably uniform, with small air pockets throughout. It may not look exactly like traditional wheat bread because gluten-free flour blends behave differently, but it should not be dense, wet, or excessively crumbly.
The flavor should be mild enough to pair with sweet or savory fillings.
You should be able to spread a little butter over a slice without the bread immediately falling apart. When toasted, the slices should become lightly crisp around the edges while remaining tender inside.
If your first loaf is slightly denser than expected, do not be discouraged. Small differences in flour composition, psyllium grind, water absorption, and rising time can significantly affect the result.
The Best Flour Blend for Soft Gluten-Free Bread
Choosing the right flour blend is essential because gluten-free flours do not all behave the same way.
Gluten-Free All-Purpose Flour Blend
A balanced commercial blend is the easiest choice for beginners.
Look for a blend that is suitable for yeast breads, not merely cakes or cookies. Some blends contain gums or other binders, while others do not.
If the package specifically says that the flour is not suitable for yeast baking, it may produce a loaf that is less elastic or more crumbly.
Rice Flour-Based Blends
Rice flour is commonly used in gluten-free baking because it has a mild flavor.
However, rice flour alone generally does not provide the softness and structure desired in a sandwich loaf. It works better when combined with starches and suitable binding ingredients.
Tapioca Starch
Tapioca starch can help create a softer, more flexible crumb.
It may improve the texture of gluten-free bread when used as part of a balanced blend. Too much, however, can make the interior excessively chewy or slightly gummy.
Potato Starch
Potato starch can help lighten the texture and improve moisture retention.
It is not the same as potato flour, which is made from the whole potato and behaves differently. Substituting one for the other without adjusting the recipe may change the texture considerably.
Oat Flour
Certified gluten-free oat flour can add a mild, wholesome flavor.
However, it absorbs liquid differently from starch-based blends and may make the loaf denser if used in large quantities. It is better to use it in a tested formulation rather than replacing all the flour with oat flour.
For the most reliable first attempt, use a commercial gluten-free blend intended for bread and follow its guidance on added binders.
How to Make Gluten-Free Bread Extra Soft
Several small techniques can make a noticeable difference in the final loaf.
Measure the Flour Carefully
Too much flour is one of the most common causes of dense gluten-free bread.
If using cups, spoon the flour lightly into the measuring cup and level the top. Do not scoop directly from the bag and pack the flour down.
A kitchen scale is even more reliable because it measures the actual quantity rather than the volume.
Do Not Add Too Much Psyllium
Psyllium is helpful, but using too much can create a heavy or rubbery crumb.
Different products vary in how finely they are ground and how much water they absorb. Start with the amount specified in the recipe and avoid adding extra simply because the dough appears sticky.
Keep the Dough Moist
Gluten-free dough generally needs more water than many beginners expect.
A dough that is too stiff may struggle to rise and can produce dry, crumbly slices.
Add reserved water gradually until the mixture is soft and cohesive. Do not try to achieve the same firmness as ordinary wheat bread dough.
Give the Yeast Enough Time
Yeast needs warmth, moisture, and time to work.
If your kitchen is cold, the dough may rise slowly. Allow it to become visibly puffier rather than forcing the process by placing it in an excessively hot environment.
Very hot conditions can damage the yeast or cause the dough to rise too rapidly and lose structure.
Avoid Overproofing
More rising time does not always produce a lighter loaf.
If the dough expands too much before baking, its structure may not support the air pockets, and the bread can sink.
Bake when the dough has risen visibly and looks airy but still holds its shape.
Bake the Center Thoroughly
A loaf that is underbaked may appear soft when warm but become gummy after slicing.
Use the full baking time as a guide, and check the center if you are unsure. If the crust is already brown, cover it loosely with foil and continue baking.
Cool the Loaf Completely
This cannot be emphasized enough.
Even a properly baked loaf can seem gummy if sliced while hot. Letting the bread cool fully helps stabilize the crumb and improves the texture of every slice.
Delicious Variations of This Gluten-Free Bread
Once you are comfortable with the basic recipe, you can adapt the flavor to suit different meals.
Soft Gluten-Free Sandwich Bread
For everyday sandwiches, keep the flavor simple.
Use a mild gluten-free flour blend and neutral oil. Avoid adding too many seeds or strongly flavored ingredients if you want the bread to pair with a wide range of fillings.
Slice the cooled loaf evenly and store it in a well-sealed container.
This version works well with cheese, egg, chicken, cucumber, tomato, or your favorite sandwich fillings.
Gluten-Free Milk Bread
For a richer loaf, replace some of the water with milk or an unsweetened dairy-free alternative that is suitable for baking.
Milk can contribute a softer crumb and a more rounded flavor.
Because different milk alternatives contain different amounts of protein, sugar, and fat, the results may vary. Start by replacing approximately ¼ cup of the water with milk and keep the rest of the recipe unchanged.
If you use dairy milk, the bread will no longer be dairy-free.
Gluten-Free Honey Bread
For a slightly sweet loaf, replace the granulated sugar with honey.
Honey contributes a delicate sweetness and may encourage faster browning. Watch the top during the final part of baking.
This variation is particularly pleasant for breakfast toast or sandwiches with peanut butter and banana.
Gluten-Free Seeded Bread
Add 1–2 tablespoons of sesame seeds, sunflower seeds, or pumpkin seeds to the dry ingredients.
For a softer loaf, avoid adding a very large quantity of seeds because they can interrupt the structure of the crumb.
If you want to use more seeds, soak them first and account for the additional moisture they absorb.
Gluten-Free Herb Bread
Add a small amount of dried rosemary, oregano, or mixed herbs to the flour mixture.
A teaspoon of dried herbs is a good starting point for one loaf.
This version pairs well with soups, salads, roasted vegetables, and savory meals.
Gluten-Free Garlic Bread Base
For a garlic-flavored loaf, add a little garlic powder to the dry ingredients.
Keep the amount modest so that the flavor does not overwhelm the bread.
Once baked and cooled, slices can be brushed with garlic-infused butter or olive oil and toasted in the oven.
Dairy-Free Gluten-Free Bread
The main recipe can be made dairy-free by using a gluten-free flour blend without milk ingredients and omitting the optional milk powder.
Choose a neutral plant-based oil and water as the liquid.
Check the labels on your yeast, flour blend, and other packaged ingredients if you need to avoid dairy strictly.
Egg-Free Gluten-Free Bread
Eggs help provide structure in this recipe, so simply removing them without changing anything else is unlikely to produce the same result.
For an egg-free loaf, use a specifically tested vegan gluten-free bread recipe or an egg-replacement formulation designed for yeast bread. Commercial egg replacers, additional psyllium, and other binders can behave differently, so random substitutions may lead to a dense or gummy loaf.
Common Gluten-Free Bread Problems and How to Fix Them
Why Did My Bread Turn Out Dense?
Dense bread can result from too much flour, insufficient hydration, inactive yeast, or inadequate rising.
First, check that your yeast is fresh and that the water was warm rather than hot.
Next, examine the dough consistency. If it was stiff and difficult to spread, it may have needed more water.
Finally, check whether the loaf had enough time to rise. In a cool kitchen, the process may take longer.
For your next attempt, change one factor at a time so that you can identify what improves the loaf.
Why Is My Bread Gummy Inside?
Gumminess can be caused by underbaking, slicing while the bread is hot, or using a flour blend that absorbs moisture differently from the one intended.
Allow the loaf to bake fully and cool completely before cutting it.
If the center remains gummy even after cooling, consider baking it a little longer or adjusting the water slightly on the next attempt.
A very high proportion of starch or psyllium may also affect the crumb, so avoid adding extra binders without a tested reason.
Why Did My Bread Collapse?
A loaf may collapse if it rises too much before baking, if the dough is excessively wet, or if its structure has not developed enough to support the air pockets.
Allow the dough to rise until visibly puffy but not fragile or sagging.
Make sure the oven is fully preheated before baking. Moving the loaf into a cool oven can delay the setting of its structure.
If the loaf collapses repeatedly, check your flour blend and measure the psyllium carefully.
Why Is the Crust Too Hard?
A thick, hard crust may develop if the bread is baked for too long, the oven temperature is too high, or the dough contains too little moisture.
Check your oven temperature if possible.
You can also brush the top lightly with oil before baking or cover it loosely with foil once it has developed enough color.
Allow the bread to cool on a rack. Once completely cool, store it in a sealed container to help retain moisture.
Why Does the Bread Crumble When Sliced?
Crumbly bread often needs better binding or a more suitable flour blend.
Psyllium helps hold the loaf together, but the quantity and type matter.
Make sure the psyllium is properly hydrated and evenly mixed into the dough. Also check that the flour blend is designed for yeast baking.
Use a serrated knife and wait until the loaf is fully cool before slicing.
Why Did the Bread Not Rise?
Possible reasons include expired yeast, water that was too hot, a cold room, or dough that was too dry.
Test your yeast if you are unsure whether it is active. Active dry yeast should become foamy when dissolved in warm water with a little sugar.
If the room is cool, place the covered loaf in a comfortably warm area.
Remember that gluten-free dough may not double as dramatically as conventional wheat dough, so look for a clear increase in volume rather than expecting an identical rise.
Why Is the Bread Too Chewy?
Excessive chewiness may come from too much tapioca starch, too much psyllium, or insufficient baking.
Check the flour blend before changing the recipe.
If the bread is fully baked but still rubbery, try a different gluten-free blend or reduce the amount of added binder only according to a tested formulation.
How to Store Homemade Gluten-Free Bread
Homemade gluten-free bread often dries out more quickly than commercial bread because it lacks some of the additives used to maintain softness.
Proper storage makes a substantial difference.
Storing at Room Temperature
Allow the loaf to cool completely before storing it.
Place it in an airtight container or a well-sealed food bag. Keep it away from direct sunlight, heat, and moisture.
For the best quality, use the bread within approximately 1–2 days at room temperature, depending on your kitchen conditions.
If your kitchen is hot or humid, refrigeration is not automatically the best option, because refrigeration can make bread stale more quickly. Freezing is usually a better choice for longer storage.
Discard the loaf if you notice mold or unusual odors. Do not eat bread that shows signs of spoilage.
Storing in the Refrigerator
Refrigeration may be useful in some circumstances, particularly when storage conditions are warm and humid, but it can make the bread firmer and less pleasant.
If you refrigerate it, seal the loaf carefully to reduce moisture loss.
Warm individual slices in a toaster or microwave before serving to improve their texture.
Freezing Gluten-Free Bread
Freezing is an excellent way to preserve homemade gluten-free bread.
First, let the loaf cool completely.
Slice it into portions using a serrated knife. Place baking paper between slices if you want to prevent them from sticking together.
Transfer the slices to a freezer-safe bag or airtight container, removing as much excess air as practical.
Label the container with the date.
For the best quality, use the bread within approximately 2–3 months.
When you want a slice, remove only what you need. Individual slices can usually be toasted directly from frozen, or they can be thawed at room temperature in a covered container.
Freezing bread in slices is particularly convenient because you do not need to thaw the entire loaf every time you want a sandwich.
How to Serve Soft Gluten-Free Bread
This bread is versatile enough for both sweet and savory meals.
For breakfast, toast a slice and spread it with butter, jam, honey, or peanut butter.
For a savory breakfast, serve it with scrambled eggs, an omelet, cheese, or sliced tomatoes.
For lunch, use the bread for chicken sandwiches, egg salad, tuna salad, cucumber sandwiches, or grilled cheese.
For dinner, serve warm slices alongside soup, lentils, vegetable stew, or a fresh salad.
You can also cut the bread into cubes and use them for homemade croutons. Toss the cubes with a little olive oil and seasoning, then bake until crisp.
Another option is to prepare garlic toast. Brush slices with olive oil or melted butter mixed with garlic and herbs, then bake until lightly crisp.
For a simple snack, toast a slice and add sliced banana with a small amount of peanut butter.
Because the bread has a mild flavor, it works well with many ingredients without overpowering them.
How to Make the Bread Even Better the Next Day
The flavor of homemade bread often develops slightly after baking.
Once the loaf has cooled and been stored properly, the slices can be used in several ways.
For soft sandwiches, use room-temperature slices and avoid leaving them exposed to air for long periods.
For toast, lightly toast each slice until the outside becomes crisp while the center remains tender.
For a grilled sandwich, brush the outer surfaces with a little butter or oil and cook over medium-low heat until golden.
If the bread has become a little firm, gentle reheating may help restore some of its softness. Cover a slice loosely and warm it briefly, checking frequently so that it does not become tough.
Do not expect reheating to reverse severe drying, but it can make properly stored bread more enjoyable.
Frequently Asked Questions
Can I Make This Bread Without a Stand Mixer?
Yes. A sturdy spoon, spatula, and mixing bowl are sufficient.
Gluten-free bread dough does not require the same prolonged kneading as wheat bread dough. The main goal is to distribute the ingredients evenly and hydrate the flour and psyllium thoroughly.
Mix until the dough is smooth enough to spread and contains no dry flour pockets.
Can I Use Active Dry Yeast Instead of Instant Yeast?
Yes. Use the same approximate quantity.
Dissolve the active dry yeast in some of the warm water with the sugar and let it stand for approximately 5–10 minutes, until it becomes foamy.
Then combine it with the remaining wet ingredients.
Do not use hot water, as high temperatures can damage the yeast.
Can I Make the Dough Ahead of Time?
This particular recipe is designed for a same-day rise and bake.
Gluten-free dough can behave differently during extended refrigeration, especially when it contains psyllium and eggs. The dough may thicken, ferment unevenly, or lose some of its ability to rise.
For predictable results, bake the loaf on the day you mix it. If you want to prepare bread in advance, baking and freezing the finished loaf is generally easier.
Can I Use Xanthan Gum Instead of Psyllium Husk?
Not as a direct one-for-one replacement.
Xanthan gum and psyllium perform different functions and absorb liquid differently. Psyllium contributes a gel-like structure and can help create a flexible crumb, while xanthan gum thickens and binds the mixture.
Some gluten-free bread recipes use xanthan gum successfully, but the flour and liquid proportions may need to be adjusted.
If your commercial flour blend already contains xanthan gum, check the instructions for the blend and use a bread formulation that is compatible with it.
Is Gluten-Free Bread Suitable for People With Celiac Disease?
It can be, provided that the ingredients and preparation are genuinely gluten-free.
Choose flour, yeast, psyllium, seeds, and other packaged ingredients labeled or certified gluten-free as appropriate for your needs.
Prevent cross-contact by cleaning work surfaces, utensils, baking pans, and storage containers. Avoid using a toaster that has been used for ordinary wheat bread unless it can be thoroughly cleaned or is dedicated to gluten-free use.
For people with celiac disease, even small amounts of gluten contamination can be harmful, so ingredient labels and kitchen practices matter.
Can I Make This Bread Without Sugar?
You can experiment with reducing or omitting the added sugar, but the rise and browning may differ.
Yeast can ferment carbohydrates present in the flour, so added sugar is not always essential. However, the exact result depends on the flour blend and yeast.
If you want the most reliable result on your first attempt, follow the recipe as written. Once you understand how your flour blend behaves, you can test a reduced-sugar version.
Can I Use Water Instead of Milk?
Yes. The main recipe already uses water.
Milk is an optional variation that can provide a richer flavor and may help with browning. It is not necessary for producing a soft loaf.
Can I Bake This Recipe in a Bread Machine?
Possibly, but it depends on the machine and its gluten-free program.
Gluten-free dough usually requires different mixing and rising behavior from traditional wheat dough. Some machines have a dedicated gluten-free cycle that works well, while others may overmix or overproof this type of dough.
For your first attempt, baking in a conventional loaf pan gives you more control over the texture and rise.
How Can I Make the Bread Taller?
Use a loaf pan that is appropriately sized for the quantity of dough.
A smaller pan may produce a taller loaf, but it should not be so small that the dough spills over as it rises.
Make sure the yeast is active, the dough is sufficiently hydrated, and the loaf is baked before it overproofs.
Adding more flour or yeast does not automatically create a taller loaf and can negatively affect the texture.
Can I Double the Recipe?
Yes, provided that you measure the ingredients carefully and divide the dough between two suitable loaf pans.
Dividing the dough is usually more reliable than attempting to bake one very large loaf, which may take much longer to cook through.
Allow each loaf enough space to rise, and check each one for doneness independently.
Nutritional Information
The following values are approximate estimates for one slice when the loaf is divided into 12 slices. Actual nutrition depends on the flour blend, egg size, oil, and any optional ingredients.
- Calories: approximately 160–190
- Carbohydrates: approximately 25–32 grams
- Protein: approximately 3–5 grams
- Fat: approximately 4–6 grams
- Fiber: varies considerably with the flour blend and psyllium content
- Sugar: varies depending on the ingredients and flour blend
These figures are estimates rather than laboratory-tested values. If you need precise nutritional information for a medical or dietary reason, calculate it using the nutrition labels of the specific ingredients you use.
Final Tips for Consistently Soft, Fluffy Gluten-Free Bread
The most reliable results come from controlling a few important details.
Use a gluten-free flour blend designed for yeast baking. Measure the flour and psyllium carefully. Hydrate the psyllium before combining it with the other ingredients. Keep the dough soft rather than adding flour until it resembles ordinary bread dough.
Make sure your yeast is active, and let the loaf rise until it looks puffy without allowing it to become fragile or collapse. Bake the bread thoroughly, protect the crust if it browns too quickly, and always allow the loaf to cool completely before slicing.
Most importantly, give yourself permission to make small adjustments after the first attempt. Gluten-free flour blends differ substantially, and a little variation in hydration or rising time can change the final texture.
Once you find the combination that works well in your kitchen, this recipe can become a dependable everyday loaf. It is suitable for toast, sandwiches, lunchboxes, and simple family meals, with a soft interior and a delicate crust that make homemade gluten-free bread worth the effort.