admin1
No-Bake Cherry Cheesecake Dessert Cups
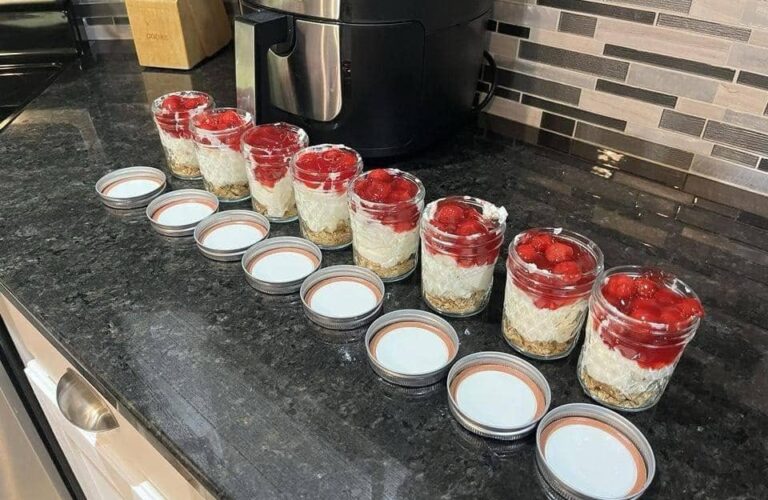
These No-Bake Cherry Cheesecake Dessert Cups are a beautiful, creamy, and delicious dessert made with a buttery graham cracker crust, a smooth cheesecake filling, and a glossy cherry topping. Served in individual jars or small dessert cups, they offer all the flavors of a traditional cherry cheesecake without requiring an oven, a springform pan, or complicated baking techniques.
Each cup has three delicious layers. The bottom layer is made with crushed graham crackers and melted butter, creating a lightly crunchy, buttery base. The middle layer is a rich and fluffy cheesecake filling made with cream cheese, powdered sugar, vanilla extract, and whipped cream. The top layer is finished with sweet cherry pie filling, giving the dessert its beautiful red color and fruity flavor.
These individual cheesecake cups are perfect for family gatherings, birthday parties, holiday celebrations, potlucks, dinner parties, and weekend desserts. They look elegant when arranged in clear jars because every layer is visible, making them just as attractive as they are delicious.
One of the best things about this recipe is how easy it is to prepare. You do not need to worry about baking a cheesecake, preventing cracks, preparing a water bath, or waiting for a cake to cool in the oven. Instead, you simply prepare the crust, mix the cheesecake filling, assemble the cups, add the cherry topping, and refrigerate everything until perfectly chilled.
The result is a refreshing dessert with a delightful combination of textures and flavors. The buttery crust provides a slightly crunchy foundation, the cheesecake layer melts smoothly in your mouth, and the cherries add a sweet, fruity finish that balances the richness of the cream cheese.
What Makes These Cherry Cheesecake Cups So Special
These dessert cups combine the classic taste of cherry cheesecake with the convenience of a make-ahead individual dessert. Because they are prepared in separate jars, there is no need to slice a large cheesecake or worry about serving neat portions.
Every jar contains its own generous layers of crust, creamy filling, and cherry topping. This makes portioning simple and allows you to prepare exactly the number of servings you need.
The cheesecake filling is soft, creamy, and light rather than dense like some traditional baked cheesecakes. Whipped cream adds airiness, while cream cheese provides the familiar tangy cheesecake flavor. Powdered sugar sweetens the filling without leaving the grainy texture that can sometimes occur when regular granulated sugar is used.
The graham cracker crust is equally important. It provides a pleasant contrast to the soft filling and juicy cherries. When the assembled cups rest in the refrigerator, the crust absorbs a little moisture from the surrounding layers and develops a tender, cheesecake-like texture while retaining some of its original crunch.
Cherry pie filling makes the topping especially convenient. It already contains sweet cherries suspended in a thick, glossy sauce, so there is no need to cook fresh fruit or prepare a separate cherry glaze. Simply spoon it over the chilled cheesecake filling for a classic finish.
You can also personalize the recipe by using homemade cherry topping, fresh cherries, blueberries, strawberries, raspberries, or another fruit filling you enjoy.
Preparation Time and Servings
Preparation time is approximately 25 to 35 minutes, depending on the size of your jars and how quickly you prepare the layers.
Chilling time is at least 4 hours, although overnight chilling is recommended for the best texture and flavor.
Total time is approximately 4 hours and 30 minutes when allowing for the minimum chilling period.
This recipe makes approximately 8 to 10 individual dessert cups, depending on the size of the containers and how generously you fill them.
Each serving contains a layer of buttery crumbs, a creamy cheesecake center, and a generous cherry topping.
Ingredients for the Graham Cracker Crust
2 cups graham cracker crumbs
Graham cracker crumbs create the classic cheesecake base. Their lightly sweet, toasted flavor works beautifully with the rich cheesecake filling and fruity cherry topping. You can purchase ready-made crumbs or make your own by crushing whole graham crackers in a food processor or placing them in a sealed bag and crushing them with a rolling pin.
The crumbs should be relatively fine so that the melted butter coats them evenly. A few slightly larger crumbs are perfectly acceptable, but very large pieces may make the crust difficult to spoon through.
6 tablespoons unsalted butter, melted
Butter binds the graham cracker crumbs together and gives the crust its rich flavor. Unsalted butter allows you to control the overall saltiness of the dessert.
Melt the butter gently and allow it to cool for a minute or two before mixing it with the crumbs. It should be liquid but not extremely hot.
2 tablespoons granulated sugar, optional
A small amount of sugar adds extra sweetness and helps bring out the toasted flavor of the crackers. If your graham crackers are already very sweet, you can reduce or omit the sugar.
A small pinch of salt, optional
A tiny pinch of salt can enhance the buttery flavor and balance the sweetness of the other ingredients.
Ingredients for the Creamy Cheesecake Filling
16 ounces cream cheese, softened
Cream cheese is the foundation of the cheesecake layer. It provides the smooth texture, rich taste, and slight tanginess that make cheesecake so recognizable.
Use full-fat block cream cheese for the thickest and creamiest filling. Allow it to soften at room temperature before mixing. Softened cream cheese blends more easily and is less likely to leave small lumps in the finished filling.
Avoid using cream cheese that is still cold and firm because it may be difficult to beat smoothly. Also avoid using a thin, spreadable cream cheese product if you want a filling that holds its shape well in the jars.
1 cup powdered sugar
Powdered sugar sweetens the cheesecake filling and dissolves easily into the cream cheese. It also helps create a smooth texture without the graininess that can occur with granulated sugar.
You can adjust the amount slightly depending on the sweetness of your cherry topping and your personal preference.
1 teaspoon pure vanilla extract
Vanilla adds warmth and depth to the cheesecake flavor. It complements the cream cheese and cherries without overpowering either ingredient.
Pure vanilla extract is ideal, but imitation vanilla can also be used.
1 cup cold heavy whipping cream
Cold heavy whipping cream makes the filling lighter and fluffier. When whipped, it incorporates air that gives the cheesecake layer a soft, mousse-like texture.
For the best results, use cream with enough milk fat to whip properly. Keep it refrigerated until you are ready to use it.
1 tablespoon lemon juice, optional
A small amount of fresh lemon juice enhances the natural tanginess of the cream cheese and helps balance the sweetness of the filling.
The lemon flavor should remain subtle. You want a fresh cheesecake taste rather than a strongly lemon-flavored dessert.
Ingredients for the Cherry Topping
1 can cherry pie filling, approximately 21 ounces
Cherry pie filling creates the beautiful red topping seen in classic cherry cheesecake. It contains cherries and a sweet, thickened sauce that settles neatly over the creamy cheesecake layer.
Choose a filling with plenty of whole or halved cherries for an attractive presentation. If the filling contains particularly large cherries, you can cut some into smaller pieces to make the cups easier to eat.
1 cup fresh cherries, optional
Fresh cherries can be added to the topping for extra fruitiness and texture. Wash them thoroughly, remove the stems and pits, and cut them into halves or quarters.
Fresh cherries are optional because the canned topping already provides plenty of cherry flavor.
1 teaspoon lemon juice, optional
A small amount of lemon juice can brighten the cherry topping, particularly if you are using fresh cherries or a very sweet pie filling.
If you prefer the traditional sweet cherry cheesecake flavor, you can leave it out.
Equipment You Will Need
You will need eight to ten small dessert jars or cups, depending on their capacity. Clear glass jars are especially attractive because they show the contrasting layers.
Small mason jars work well, but ordinary dessert glasses or food-safe plastic cups can also be used.
You will also need a medium mixing bowl for the crust, a large mixing bowl for the cheesecake filling, an electric hand mixer or stand mixer, a flexible spatula, a spoon, and measuring cups and spoons.
A food processor is useful for crushing the graham crackers, although a sealed bag and rolling pin work just as well.
If you want to create especially neat layers, you can transfer the cheesecake filling to a piping bag. A large resealable food bag with one corner snipped off can also work as a simple alternative.
Step 1: Prepare the Dessert Jars
Begin by arranging your clean, dry jars or dessert cups on a baking tray or flat serving surface.
Choose containers that are large enough to hold the three layers comfortably. Small jars with a capacity of approximately 6 to 8 ounces are a practical choice for individual servings.
If your jars have lids, keep the lids nearby so that you can cover the desserts after assembly.
Make sure the jars are completely dry. Water droplets inside the containers can make the bottom crust damp before the cheesecake filling is added.
Arrange the jars close together to make filling them easier. If you are preparing a large batch, working with all the containers at once helps you divide the ingredients evenly.
For a particularly attractive presentation, choose clear jars with straight sides. This allows the golden crust, pale cheesecake filling, and glossy red cherry topping to remain clearly visible.
Step 2: Crush the Graham Crackers
Place the graham crackers in a food processor and pulse until they form fine crumbs.
If you do not have a food processor, put the crackers inside a sturdy resealable bag. Press out the excess air, seal the bag, and crush the crackers with a rolling pin.
Continue crushing until the pieces are small and relatively uniform.
Avoid leaving too many large pieces because they may create an uneven crust. At the same time, there is no need to turn the crackers into an extremely fine powder. A slightly textured crumb mixture gives the finished dessert a pleasant bite.
Measure 2 cups of crumbs and transfer them to a medium mixing bowl.
Add the optional granulated sugar and pinch of salt, if using. Stir until the dry ingredients are evenly distributed.
Step 3: Mix the Buttery Crust
Pour the melted butter over the graham cracker crumbs.
Use a fork or spoon to mix everything together until the crumbs are evenly moistened. The mixture should resemble damp sand and should hold together when gently pressed between your fingers.
If the crumbs remain very dry, add a little more melted butter, approximately 1 teaspoon at a time. Avoid adding too much butter because an overly greasy crust may become heavy and unpleasant.
If the mixture looks wet or forms a paste, you may have added too much butter. Stir in a small amount of additional graham cracker crumbs to correct the consistency.
The ideal crust mixture should be moist enough to hold together but still loose enough to spoon easily into the jars.
Once the mixture is ready, divide it among the prepared containers.
Step 4: Build the Crust Layer
Add approximately 2 to 3 tablespoons of the graham cracker mixture to the bottom of each jar, adjusting the quantity to suit the size of your containers.
Use the back of a small spoon to press the crumbs into an even layer.
Press firmly enough to create a stable base, but do not compact the crumbs so aggressively that the crust becomes excessively hard.
Try to distribute the crust evenly among all the jars. Similar crust thicknesses make the finished desserts look more professional and ensure that each serving has a balanced ratio of crumbs to cheesecake filling.
If you prefer a softer, more loosely textured crust, press the crumbs only lightly. For a firmer base, apply slightly more pressure with the spoon.
Once all the jars have their crust layers, place them in the refrigerator while you prepare the filling.
Chilling the crust for 10 to 15 minutes helps the butter firm up and gives the base a little more structure.
Step 5: Soften the Cream Cheese Properly
Remove the cream cheese from the refrigerator ahead of time so that it can soften.
The cream cheese should feel pliable when pressed gently, but it should not be warm or melted.
Cutting the cream cheese into smaller cubes helps it soften more evenly. Place the cubes in a large mixing bowl and allow them to stand at room temperature until they are easy to beat.
This step is important because cold cream cheese can produce small lumps that remain visible even after the other ingredients have been added.
If you are short on time, you can cut the cream cheese into cubes and let them rest for a little while in a single layer. Avoid heating the cream cheese excessively, as overly warm cream cheese can make the filling too loose.
A smooth filling begins with properly softened cream cheese.
Step 6: Beat the Cream Cheese Until Smooth
Using an electric hand mixer or stand mixer, beat the softened cream cheese on medium speed until it becomes smooth and creamy.
Stop occasionally to scrape down the sides and bottom of the bowl with a spatula. This ensures that no firm pieces remain hidden around the edges.
Continue mixing until the cream cheese has a uniform consistency.
At this stage, the mixture should be thick but spreadable. It should not contain visible lumps.
Avoid beating at an unnecessarily high speed for too long. The goal is to make the cream cheese smooth, not to warm it excessively or incorporate too much air before the remaining ingredients are added.
If you notice small lumps, stop and scrape the bowl again, then continue beating briefly until the mixture is smooth.
Step 7: Add the Powdered Sugar
Add the powdered sugar gradually to the softened cream cheese.
Begin mixing at a low speed to prevent the sugar from scattering out of the bowl. Once it has been incorporated, increase the speed slightly and beat until the mixture becomes creamy.
Scrape down the sides of the bowl as needed.
The powdered sugar should blend into the cream cheese without leaving visible dry patches.
Taste a small amount of the mixture if desired. It should be pleasantly sweet while retaining the mild tang of the cream cheese.
Remember that the cherry topping will add additional sweetness, so the filling does not need to taste as sweet as frosting.
If you prefer a less sweet cheesecake, you can reduce the powdered sugar slightly. If your cherry topping is especially tart, you may prefer to keep the full amount.
Step 8: Add the Vanilla and Lemon Juice
Add the vanilla extract to the cream cheese mixture.
If you are using lemon juice, add it at this stage as well.
Mix briefly until the ingredients are evenly distributed.
Vanilla creates a warm, familiar cheesecake flavor, while lemon juice adds freshness and enhances the tangy taste of the cream cheese.
Do not add too much lemon juice. A small quantity is sufficient to brighten the filling without making it noticeably sour.
Once everything is combined, scrape the bowl again and make sure the mixture has a consistent color and texture.
Set the bowl aside while you prepare the whipped cream.
Step 9: Whip the Heavy Cream
Pour the cold heavy whipping cream into a separate clean mixing bowl.
Using a mixer with clean beaters, begin whipping at medium speed. As the cream starts to thicken, increase the speed slightly.
Continue whipping until the cream forms medium to stiff peaks.
Medium peaks mean that the cream holds its shape but the tips bend slightly when the beaters are lifted. Stiff peaks hold their shape more firmly.
For these cheesecake cups, medium-stiff to stiff peaks work well because they help the filling remain thick enough to pipe or spoon neatly into the jars.
Watch the cream carefully as it thickens. Overwhipping can cause the cream to become grainy and eventually separate into butter-like clumps.
If the cream looks smooth, fluffy, and holds its shape when lifted, it is ready.
Keep the whipped cream chilled until you are ready to fold it into the cream cheese mixture.
Step 10: Fold the Whipped Cream Into the Cheesecake Mixture
Add approximately one-third of the whipped cream to the cream cheese mixture.
Using a flexible spatula, gently fold the cream into the cream cheese. Move the spatula down through the center of the bowl, sweep along the bottom, and bring the mixture up and over itself.
Repeat this motion until the first portion is mostly incorporated.
Add the remaining whipped cream in two batches, continuing to fold gently after each addition.
Folding is important because it preserves much of the air incorporated during whipping. This creates a lighter cheesecake filling rather than a dense mixture.
Avoid vigorous stirring, which can deflate the whipped cream and make the filling looser.
Continue folding until the filling has a uniform pale color with no obvious streaks of whipped cream.
The finished mixture should be thick, smooth, fluffy, and creamy. It should hold soft peaks when lifted with a spatula and should not run like a liquid.
If the filling seems slightly soft, refrigerate it for 15 to 20 minutes before assembling the cups.
Step 11: Taste and Adjust the Filling
Before filling the jars, taste a small spoonful of the cheesecake mixture.
It should have a balanced combination of sweetness, vanilla flavor, and cream cheese tang.
If you prefer a sweeter filling, you can carefully fold in a small amount of additional powdered sugar. If you want a slightly brighter flavor, a few drops of lemon juice may help.
Make any adjustments gradually because adding too much liquid can loosen the mixture.
Remember that the cherry topping will provide a sweet, fruity contrast, so a mildly tangy cheesecake filling often creates the most balanced dessert.
Once you are satisfied with the flavor, prepare to assemble the cups.
Step 12: Fill the Jars With Cheesecake Cream
Remove the jars containing the chilled crust from the refrigerator.
Spoon the cheesecake filling into each jar, placing it directly over the graham cracker base.
For the neatest results, transfer the filling to a piping bag fitted with a large round opening. Pipe the mixture in a circular motion, beginning near the center and working outward.
This method helps prevent smears along the inside of the jars and creates an even layer.
If you do not have a piping bag, use two spoons. One spoon can transfer the filling while the other helps guide it into the container.
Fill each jar until the cheesecake layer occupies approximately half to two-thirds of the available space, leaving enough room for the cherry topping.
The exact proportions depend on the height and width of your jars. A generous cheesecake layer is especially appealing because it balances the sweetness of the cherries.
Gently tap each jar against a folded kitchen towel on the counter to help settle the filling. Do not tap too forcefully, as this can disturb the crust.
Use the back of a small spoon to smooth the surface of each cheesecake layer.
Wipe any filling from the inside edges of the jars with a clean paper towel for a polished appearance.
Step 13: Prepare the Cherry Topping
Open the can of cherry pie filling and transfer it to a bowl.
Stir gently with a spoon to distribute the cherries throughout the thick sauce.
If the filling contains large cherries, you can cut a few into smaller pieces. This makes it easier to spoon the topping onto the cheesecake and helps each serving contain a good mixture of fruit and sauce.
If you are adding fresh cherries, wash them thoroughly, remove the stems and pits, and cut them into halves or quarters.
Fold the fresh cherries gently into the pie filling if you want additional fruit texture.
Taste the topping. If it is very sweet, a small amount of lemon juice can brighten the flavor. If it is already pleasantly balanced, there is no need to change it.
The cherry topping should be thick enough to sit on the cheesecake layer without immediately running down through the filling.
If the topping seems unusually thin, use a slotted spoon to place more of the cherries on the desserts and add only enough sauce to create a glossy finish.
For the most attractive presentation, make sure each portion contains visible cherries rather than only red sauce.
Step 14: Add the Cherry Layer
Spoon the cherry pie filling over the cheesecake layer in each jar.
Begin with a small amount in the center and gently spread it outward, leaving a narrow border of cheesecake visible around the edges if you like the layered appearance.
Add more cherries to each cup until the topping forms a generous red layer.
Try to divide the cherries evenly among the jars. If you are preparing eight servings, distribute the filling across all eight cups first, then add any remaining cherries to ensure that every dessert receives a similar portion.
For a neat finish, avoid overfilling the jars. Leave a little space near the top so that the lids can be placed on without pressing into the topping.
If the cherries slide down the sides of the cheesecake layer, gently reposition them with a small spoon.
The contrasting colors of the golden crust, white cheesecake filling, and red cherry topping make these dessert cups especially attractive.
Step 15: Clean the Jar Edges
Before chilling the desserts, inspect the inside edges of each jar.
If any cheesecake filling or cherry sauce has smeared onto the glass, wipe it away carefully with a clean paper towel.
This small step makes a significant difference in presentation. Clear glass allows the layers to remain visible, so clean edges give the cups a tidy, professional appearance.
If you want to serve the desserts at a gathering, you can place a few whole cherries on top of each portion just before serving.
You can also add a small amount of finely crushed graham cracker crumbs to the center of the cherry topping for extra texture.
Keep the decoration simple so that the cherry layer remains the main visual feature.
Step 16: Chill Until Firm
Cover the jars with their lids or another suitable covering.
Place the dessert cups in the refrigerator for at least 4 hours.
For the best flavor and texture, refrigerate them overnight.
During chilling, the cheesecake filling becomes firmer, the flavors blend together, and the crust develops a more cohesive texture.
The filling should be cool, creamy, and stable enough to hold its shape when you scoop into it with a spoon.
Although the cups may look ready immediately after assembly, do not skip the chilling stage. The filling benefits from time in the refrigerator, and serving it too early may result in a softer, less structured dessert.
Keep the jars upright and place them on a level shelf so that the cherry topping stays evenly distributed.
Avoid placing warm foods directly beside the desserts, as maintaining a consistently cold refrigerator helps them set properly.
Step 17: Serve the Cherry Cheesecake Cups
Once the desserts are fully chilled, remove them from the refrigerator when you are ready to serve.
If desired, garnish each cup with a fresh cherry, a small sprinkle of graham cracker crumbs, or a little whipped cream.
Serve the cups cold with small dessert spoons.
Each spoonful should bring together the buttery crust, smooth cheesecake filling, and sweet cherry topping.
The contrast between the rich cream cheese and fruity cherries creates a classic dessert flavor that is satisfying without requiring a large slice of cake.
These cups are especially enjoyable after a family dinner, but they are also suitable for picnics and parties when kept properly chilled.
If you are serving them at an event, keep the jars refrigerated until shortly before dessert time.
Tips for Perfect No-Bake Cherry Cheesecake Cups
Use full-fat block cream cheese
Full-fat block cream cheese generally produces a thicker and more stable filling than low-fat or spreadable alternatives.
Because this is a no-bake dessert, the structure depends on the consistency of the cream cheese and whipped cream rather than the setting process that occurs in a baked cheesecake.
Using the appropriate cream cheese helps the filling remain creamy without becoming watery.
Make sure the cream cheese is softened
Softened cream cheese blends more easily and produces a smoother filling.
If the cream cheese is too cold, you may notice lumps even after mixing. Taking a little extra time to soften it is one of the easiest ways to improve the finished texture.
Keep the whipping cream cold
Cold heavy cream whips more effectively than warm cream.
For especially warm kitchens, you can chill the mixing bowl and beaters briefly before whipping. This is helpful when the kitchen temperature makes the cream soften quickly.
Do not overwhip the cream
Whipped cream should be fluffy and hold its shape, but it should not become grainy.
Stop mixing once the cream reaches the desired peaks. Overwhipped cream can be difficult to fold smoothly into the cream cheese and may create a less pleasant texture.
Fold gently
Use a spatula and a gentle folding motion when combining the whipped cream with the cheesecake mixture.
The goal is to preserve the air in the whipped cream while ensuring that the filling is evenly blended.
Avoid a soggy crust
A properly balanced crumb mixture should be moist but not greasy.
If the crust contains too much butter, it can feel heavy. If it contains too little, it may remain dry and loose.
Chilling the crust before adding the filling helps it become more stable.
Use thick cherry topping
A thick cherry topping stays on the surface of the cheesecake and creates a clear separation between the layers.
If your topping contains excessive liquid, use a spoon to add the cherries first and then add the sauce gradually.
Chill long enough
Four hours is a useful minimum chilling period, but overnight chilling generally provides an even better texture.
This is especially helpful when preparing the cups for a party because the filling has plenty of time to firm up before serving.
Assemble the cups evenly
Try to distribute the crust, cheesecake filling, and cherry topping consistently among the jars.
Even layers improve the appearance and ensure that every serving has a balanced combination of flavors.
Keep the jars covered
Covering the jars protects the desserts from absorbing refrigerator odors and prevents the exposed surfaces from drying out.
If you are using jars with lids, make sure the lids fit without touching the cherry topping.
Make-Ahead Instructions
One of the biggest advantages of these cherry cheesecake dessert cups is that they can be prepared ahead of time.
You can assemble them the day before serving and keep them covered in the refrigerator overnight.
This makes them particularly useful for holidays, family celebrations, and dinner parties when you want dessert ready before guests arrive.
For the best presentation, add optional fresh cherry garnishes shortly before serving.
The main cherry topping can be added during assembly, but delicate decorations such as fresh whipped cream are often best added closer to serving time.
If you are preparing several batches, label the containers with the preparation date and keep them refrigerated until needed.
Because this dessert contains dairy, it should not be left at room temperature for extended periods.
Storage Instructions
Store leftover cheesecake cups in the refrigerator in tightly covered containers.
For the best quality, enjoy them within 3 to 4 days, provided the ingredients were fresh and the desserts have been handled and refrigerated properly.
The crust may gradually soften as it absorbs moisture from the cheesecake filling. This is normal and does not necessarily mean that the dessert has spoiled.
Keep the jars refrigerated at 40°F (4°C) or below.
Do not leave the cups unrefrigerated for more than 2 hours, or more than 1 hour when the surrounding temperature is above 90°F (32°C).
Discard any dessert that has been left out beyond safe limits or that shows signs of spoilage.
Freezing is possible, but it may change the texture of the whipped cream filling and cherry topping. For the best creamy consistency and freshest flavor, refrigeration is recommended.
Variations to Try
Strawberry Cheesecake Cups
Replace the cherry pie filling with strawberry pie filling or a homemade strawberry topping.
Fresh strawberries can also be chopped and gently combined with a little sugar to create a simple fruit layer. Allow the mixture to rest briefly, then spoon the strawberries over the cheesecake filling.
For an especially fresh flavor, garnish each cup with a thin strawberry slice just before serving.
Blueberry Cheesecake Cups
Use blueberry pie filling instead of cherry pie filling.
Blueberries pair beautifully with vanilla cheesecake and graham cracker crumbs. Their deep purple-blue color creates a lovely contrast with the pale filling.
You can also prepare a homemade blueberry topping by gently cooking blueberries with sugar and a little lemon juice until the fruit releases its juices and the mixture thickens. Cool it completely before adding it to the dessert cups.
Raspberry Cheesecake Cups
Raspberry topping provides a slightly tart flavor that balances the richness of the cream cheese.
Use raspberry pie filling or a cooled homemade raspberry sauce. If you prefer a smoother topping, strain the seeds from the sauce before allowing it to cool.
Fresh raspberries can be added just before serving.
Mixed Berry Cheesecake Cups
Combine strawberries, blueberries, raspberries, and blackberries for a colorful mixed berry topping.
You can use a prepared mixed berry filling or make your own by gently cooking the fruit with sugar until it becomes thick and glossy.
Allow the topping to cool completely before assembling the cups.
Chocolate Cherry Cheesecake Cups
For a chocolate variation, mix 1 to 2 tablespoons of unsweetened cocoa powder into a small portion of the cream cheese mixture, adjusting the powdered sugar if necessary.
Alternatively, replace part of the graham cracker crumbs with finely crushed chocolate cookies.
Top the chocolate cheesecake filling with cherry pie filling for a dessert inspired by the familiar combination of chocolate and cherries.
Oreo Cheesecake Cups
Replace the graham cracker crumbs with finely crushed chocolate sandwich cookies.
You can use the whole cookies, including their filling, and mix the crumbs with a smaller quantity of melted butter as needed.
Fill the jars with the regular cheesecake mixture and finish with cherry topping or chocolate cookie crumbs.
Lemon Cheesecake Cups
Add a little finely grated lemon zest and a small amount of lemon juice to the cream cheese mixture.
Top the dessert with fresh berries or a cooled lemon sauce.
Keep the lemon additions moderate so that the cheesecake filling remains thick and creamy.
Caramel Cheesecake Cups
Replace the cherry topping with a layer of thick caramel sauce.
For extra texture, add a small quantity of chopped toasted pecans immediately before serving.
You can also make a combination of caramel and cherry topping if you enjoy sweet fruit desserts.
Peach Cheesecake Cups
Use peach pie filling or chopped peaches in a thickened peach sauce.
A small amount of cinnamon can complement the peaches, while vanilla in the cheesecake filling ties everything together.
Allow homemade peach topping to cool completely before spooning it onto the cheesecake.
Nutty Cheesecake Cups
Add finely chopped toasted almonds, pecans, or walnuts to the graham cracker crust.
Use a modest amount so that the crumbs remain easy to press into the jars.
You can also sprinkle a few chopped nuts over the topping immediately before serving for additional crunch.
Frequently Asked Questions
Can I make these cherry cheesecake cups without an oven?
Yes. This recipe is completely no-bake. The crust is made from crushed graham crackers and melted butter, and the cheesecake filling sets in the refrigerator.
There is no need to preheat an oven or bake the crust.
Can I use homemade whipped cream?
Yes. Heavy whipping cream whipped at home works very well in this recipe.
Whip the cream until it holds medium-stiff to stiff peaks, then fold it gently into the cream cheese mixture.
Avoid using liquid cream without whipping it first because the filling may become too loose.
Can I use store-bought whipped topping?
A prepared whipped topping may be used as an alternative, provided it is suitable for mixing into desserts and is prepared according to its package instructions.
The sweetness and consistency may differ from homemade whipped cream, so adjust the powdered sugar according to taste and follow the product’s storage instructions.
Can I use low-fat cream cheese?
You can, but the filling may be softer or less rich.
For the most dependable texture, full-fat block cream cheese is recommended. If using a lower-fat product, make sure the finished filling is sufficiently thick before assembling the cups.
Can I use regular sugar instead of powdered sugar?
Powdered sugar is preferred because it dissolves more easily and produces a smooth filling.
Regular granulated sugar may leave a slightly grainy texture unless it dissolves thoroughly. If powdered sugar is unavailable, superfine sugar is generally a better alternative than coarse granulated sugar, but the texture may still differ.
Why is my cheesecake filling too runny?
A runny filling can result from cream cheese that is too warm, cream that has not been whipped sufficiently, or whipped cream that was deflated during mixing.
Using thin spreadable cream cheese can also affect the consistency.
For the best result, soften the cream cheese without warming it excessively, whip the cream until it holds its shape, and fold the two mixtures together gently.
If the filling is already prepared and seems slightly loose, refrigerate it before assembling the cups. Allow it to chill until it becomes easier to spoon or pipe.
Why does my cheesecake filling have lumps?
Lumps usually occur when the cream cheese is too cold or has not been beaten until smooth before the other ingredients are added.
Allow the cream cheese to soften properly, then beat it thoroughly before adding powdered sugar and flavorings.
Can I use fresh cherries instead of canned cherry pie filling?
Yes. Fresh cherries can be used to prepare a homemade topping.
Remove the pits, cut the cherries into smaller pieces, and cook them gently with sugar and a small amount of lemon juice. If necessary, thicken the mixture using a suitable starch slurry according to your preferred recipe.
Allow the topping to cool completely before using it.
Simply adding fresh cherries without thickening them will produce a different texture from the glossy topping shown in the photograph.
Can I prepare these cups the night before?
Yes. Overnight chilling is an excellent option.
Prepare the cups, cover them, and refrigerate until serving time. The filling becomes firmer, and the flavors have more time to blend.
Can I make these desserts in one large dish?
Yes. Instead of individual jars, you can assemble the crust, cheesecake filling, and cherry topping in a medium serving dish.
Press the crust into the bottom, spread the cheesecake filling evenly over it, and spoon the cherry topping across the surface.
Refrigerate until set, then scoop portions into bowls when serving.
The individual cups are more convenient for parties, while a large dish works well for casual family desserts.
Can I make the recipe gluten-free?
Yes. Use certified gluten-free graham-style crackers or gluten-free digestive biscuits for the crust.
Check the labels of all other ingredients to make sure they meet your dietary requirements.
The cream cheese filling and cherry topping should also be checked for any relevant ingredient or cross-contact concerns.
How do I keep the layers neat?
Chill the crust before adding the filling, pipe the cheesecake mixture into the jars if possible, and spoon the cherry topping gently over the surface.
Wipe the inside edges of the jars before chilling.
Using a thick topping and filling the jars without overfilling them also helps maintain a clean appearance.
Serving Ideas for Different Occasions
These cherry cheesecake cups are versatile enough for many different occasions.
For a family dinner, serve them directly from the refrigerator after the main meal. Their cool, creamy texture makes them a refreshing ending to a satisfying dinner.
For a birthday celebration, arrange the jars on a serving tray and garnish each one with a fresh cherry or a small swirl of whipped cream.
For a holiday dessert table, place the cups beside cookies, brownies, fruit salad, or other small desserts. Their red and white layers look particularly attractive when arranged in rows.
For a picnic or outdoor gathering, transport the cups in a cooler with ice packs and keep them chilled until serving.
For a dinner party, prepare the cups the previous evening and keep them covered in the refrigerator. This leaves more time to prepare the rest of the meal.
For a dessert buffet, use smaller jars so that guests can enjoy a portion without committing to a large serving.
Final Recipe Notes
The secret to excellent No-Bake Cherry Cheesecake Dessert Cups is the balance between the three layers.
The crust should be buttery and compact enough to form a stable base without becoming hard. The cheesecake filling should be smooth, fluffy, and rich, with enough structure to hold its shape. The cherry topping should be fruity and glossy, adding sweetness and a little acidity to balance the creamy center.
Use softened cream cheese, cold heavy whipping cream, and a thick cherry topping for the most consistent results. Fold the whipped cream gently into the cream cheese mixture, assemble the jars carefully, and allow enough time for everything to chill.
You can make the recipe your own by changing the fruit topping, using chocolate cookie crumbs, adding fresh fruit, or preparing a homemade cherry sauce.
Whether you prepare these dessert cups for a special celebration or simply want a delicious homemade treat, they offer an easy way to enjoy the classic flavors of cherry cheesecake without the work involved in baking a traditional cheesecake.
The combination of buttery crumbs, creamy vanilla cheesecake, and sweet red cherries makes every spoonful satisfying. Best of all, each jar is already portioned, easy to serve, and attractive enough to place directly on the dessert table.
Once you have tried the basic recipe, you can experiment with different flavors and toppings to create a collection of no-bake cheesecake cups for every season and occasion.