 admin1
Homemade Dessert Recipe
Raspberry Ripple Ice Cream: A Rich, Creamy Homemade Recipe with Beautiful Raspberry Swirls
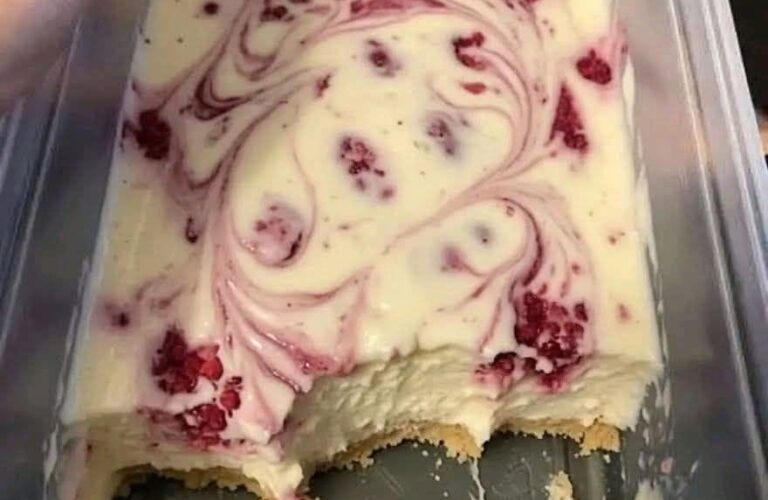
Raspberry ripple ice cream is a delicious homemade frozen dessert that combines smooth, creamy vanilla ice cream with a sweet, tangy raspberry sauce. Every spoonful offers a wonderful balance of rich creaminess and bright raspberry flavor, with beautiful ribbons of ruby-red fruit running throughout the ice cream.
This classic dessert is loved for its simple ingredients, elegant appearance, and refreshing taste. The creamy vanilla base provides a soft, sweet flavor, while the raspberry ripple adds a fruity contrast that makes every bite exciting. Unlike ordinary fruit ice cream, where the fruit is blended completely into the mixture, raspberry ripple ice cream features distinct swirls of raspberry sauce that remain visible after freezing.
The best part about making raspberry ripple ice cream at home is that you can control the sweetness, adjust the intensity of the fruit flavor, and create as many raspberry ribbons as you like. You can use fresh or frozen raspberries, prepare the ice cream with an ice cream machine, or make a no-churn version without any special equipment.
This recipe focuses on a rich, smooth vanilla ice cream base and a homemade raspberry ripple sauce that stays flavorful and beautifully swirled throughout the finished dessert.
Recipe Overview
Preparation time: 25–30 minutes
Raspberry sauce cooking time: 8–12 minutes
Chilling time: 4 hours or longer
Freezing time: 6–8 hours, preferably overnight
Total time: Approximately 11–16 hours, including chilling and freezing
Servings: 8–10 servings
Difficulty level: Easy to moderate
Recipe type: Homemade frozen dessert
Main flavors: Vanilla, sweet cream, and fresh raspberries
Equipment needed: Mixing bowls, saucepan, whisk, electric mixer, spatula, freezer-safe container, and baking paper or a lid
Why You Will Love This Raspberry Ripple Ice Cream
There are many reasons to make raspberry ripple ice cream at home. It is a classic dessert that looks impressive but does not require complicated techniques or professional equipment.
The first reason is the creamy texture. A well-prepared ice cream base made with whipping cream and sweetened condensed milk creates a smooth, rich dessert without requiring an ice cream maker.
The second reason is the raspberry sauce. Cooking raspberries briefly with sugar and a little lemon juice concentrates their natural flavor and creates a delicious fruit ripple. The sauce adds a gentle tartness that balances the sweetness of the cream.
Another wonderful feature is the appearance. When the raspberry sauce is folded through the ice cream, it creates attractive red and pink ribbons against the pale vanilla background. Each scoop looks slightly different, making the dessert feel special.
This recipe is also easy to customize. You can make the raspberry flavor stronger, leave a few tiny pieces of fruit in the sauce, or add a little extra vanilla to the cream base.
Finally, raspberry ripple ice cream is suitable for many occasions. Serve it after a family dinner, at a birthday celebration, during summer gatherings, or whenever you want a refreshing homemade treat.
Ingredients for Raspberry Ripple Ice Cream
The ingredients are divided into two parts: the creamy vanilla ice cream base and the homemade raspberry ripple sauce.
Ingredients for the Vanilla Ice Cream Base
Heavy whipping cream: 2 cups (480 ml), cold
Sweetened condensed milk: 1 can, approximately 395–400 g
Vanilla extract: 2 teaspoons
Fine salt: A small pinch
These four ingredients create a rich, smooth ice cream base. The whipping cream provides the creamy texture, while the condensed milk adds sweetness and helps keep the mixture soft enough to scoop.
Vanilla extract gives the ice cream its classic flavor. The small pinch of salt enhances the sweetness and balances the richness of the cream.
For the best results, choose whipping cream with a fat content suitable for whipping, usually around 30–36% or higher, depending on the product available in your area.
Ingredients for the Raspberry Ripple Sauce
Fresh or frozen raspberries: 2 cups (approximately 250–300 g)
Granulated sugar: ¼–⅓ cup (50–65 g), adjusted to taste
Fresh lemon juice: 1 tablespoon
Water: 1 tablespoon, only if needed
Cornstarch: ½ teaspoon, optional
Cold water for cornstarch: 1 teaspoon, if using the cornstarch
Raspberries provide the distinctive flavor and color of this dessert. Fresh raspberries generally have a bright, delicate flavor, while frozen raspberries are convenient and work very well in cooked fruit sauces.
Sugar balances the natural tartness of the berries. Lemon juice adds freshness and helps the raspberry flavor stand out.
Cornstarch is optional. It can help thicken a sauce that is particularly watery, but it should be used sparingly. A thick, concentrated raspberry sauce is important because excess water can create icy patches in the finished ice cream.
Choosing the Best Raspberries
The quality of the raspberries has a noticeable effect on the finished dessert.
Fresh raspberries should be fragrant, colorful, and free from visible mold. Choose berries that are reasonably firm and deeply colored. Very soft berries can still be used in a cooked sauce as long as they are fresh and safe to eat.
Frozen raspberries are an excellent alternative. They are often picked when ripe, and their flavor works beautifully in sauces. There is no need to thaw them completely before cooking.
If your raspberries are especially tart, you may need a little more sugar. If they are naturally sweet, start with a smaller amount and adjust after cooking.
Avoid adding too much sugar at the beginning. The raspberry sauce should taste pleasantly fruity and slightly tangy because the vanilla ice cream base is already sweet.
Equipment You Will Need
A medium saucepan is needed to cook the raspberry sauce. A heavy-bottomed pan is helpful because it distributes heat more evenly and reduces the chance of the fruit sticking.
You will also need a spoon or spatula for stirring the berries, a small bowl for mixing cornstarch if necessary, and a fine-mesh sieve if you prefer a seedless sauce.
For the ice cream base, use a large mixing bowl and an electric hand mixer or stand mixer. A whisk can be used, but whipping cream by hand takes longer and requires more effort.
A flexible silicone spatula is useful for folding the ingredients together without removing too much air from the whipped cream.
Finally, prepare a freezer-safe container with enough room to hold the ice cream and its raspberry ribbons. A shallow container helps the ice cream freeze more evenly than a very deep one.
Step 1: Prepare the Raspberry Ripple Sauce
Begin by preparing the raspberry sauce because it must cool completely before being added to the ice cream.
Place the raspberries in a medium saucepan. Add the sugar and fresh lemon juice.
If you are using fresh raspberries that seem dry, add approximately one tablespoon of water. Frozen raspberries usually release enough liquid during cooking, so additional water may not be necessary.
Place the saucepan over medium-low heat.
Stir gently as the berries begin to soften. Fresh raspberries may take several minutes to release their juices, while frozen berries generally release liquid more quickly as they thaw.
As the mixture warms, the raspberries will begin to break down. Their juices will combine with the sugar to create a deep red sauce.
Continue cooking for approximately 8–12 minutes, stirring regularly. The fruit should become soft, and the liquid should gradually reduce.
Use the back of your spoon to crush some of the berries against the side of the pan. This releases more juice and helps create a consistent sauce.
However, you do not need to crush every berry completely. Leaving a few small pieces of fruit can create a more homemade texture.
The sauce should become glossy and slightly thickened. It will thicken further as it cools, so avoid reducing it until it becomes jam-like.
If the sauce is too watery, allow it to simmer for another minute or two. Keep the heat moderate to prevent the sugar from burning.
Once the sauce reaches the desired consistency, remove the saucepan from the heat.
How to Check the Sauce Consistency
The raspberry sauce should be thick enough to form ribbons through the ice cream rather than immediately spreading into a thin liquid.
To test it, place a small amount on a cool plate and let it sit for a minute. If it remains in a concentrated pool without producing a large amount of watery liquid, it is generally suitable.
Remember that the sauce will appear thinner while hot than when cold.
Do not add hot raspberry sauce to the ice cream mixture. Warm sauce can melt the whipped cream and cause the finished dessert to develop a less creamy texture.
Step 2: Make the Sauce Thicker if Necessary
Most raspberry sauces will thicken sufficiently through gentle cooking and reduction.
However, if your berries release a large amount of water, you can use a small amount of cornstarch.
In a separate bowl, combine ½ teaspoon of cornstarch with 1 teaspoon of cold water. Stir until the mixture is smooth and free from lumps.
Add this mixture gradually to the simmering raspberry sauce while stirring.
Cook for another 30–60 seconds, or until the sauce begins to thicken. Remove the pan from the heat once it reaches a suitable consistency.
Avoid adding too much cornstarch because it can make the sauce resemble fruit pudding rather than a natural raspberry ripple.
For the best flavor, allow the fruit to reduce naturally whenever possible.
Step 3: Strain the Raspberry Sauce if Desired
Raspberries contain small seeds that some people enjoy and others prefer to avoid.
If you want a smooth, seedless raspberry ripple, place a fine-mesh sieve over a clean bowl.
Pour the cooked raspberry mixture into the sieve in manageable portions. Use the back of a spoon to press the sauce gently through the mesh.
The smooth raspberry sauce will collect in the bowl, while most of the seeds remain in the sieve.
Do not force every seed through the mesh. Doing so may make the sauce grainy.
Straining is optional. Leaving the seeds in the sauce creates a more rustic texture and saves preparation time.
If you strain the sauce, the final quantity may be smaller because some fruit pulp remains behind. This is perfectly normal.
Taste the strained sauce and adjust the sweetness if necessary.
Step 4: Cool the Raspberry Sauce Completely
Transfer the finished sauce to a clean, shallow bowl.
Allow it to cool at room temperature until it is no longer warm. Then cover it and place it in the refrigerator until thoroughly chilled.
Cooling in a shallow container helps the sauce lose heat more quickly.
For the best results, prepare the raspberry sauce several hours before assembling the ice cream. You can also prepare it the day before and refrigerate it overnight.
The sauce should be cold, thick, and easy to spoon when you begin layering the ice cream.
If the sauce becomes extremely firm in the refrigerator, stir it gently until it is spreadable. It should not need reheating unless it has become unusually stiff.
Keep the sauce covered while it chills so that it does not absorb unwanted refrigerator odors.
Step 5: Prepare the Ice Cream Container
Choose a freezer-safe container that holds approximately 1.5–2 liters.
A shallow rectangular container is particularly convenient because it allows you to spread the ice cream in layers and distribute the raspberry sauce evenly.
Make sure the container is clean and completely dry.
If desired, line the base with a piece of baking paper suitable for freezer use, although this is not essential.
Place the container in the freezer for 15–20 minutes before assembling the ice cream. A cold container can help the mixture begin freezing more quickly.
Do not use a container that is too small. The mixture needs room for layering, and an overfilled container can make it difficult to create attractive raspberry ribbons.
Step 6: Chill the Mixing Equipment
For a creamier result, make sure the whipping cream is very cold before you begin.
If your kitchen is warm, place the mixing bowl and mixer beaters in the refrigerator for 10–15 minutes.
Cold equipment helps the cream whip more efficiently and retain its structure.
Take the whipping cream out of the refrigerator only when you are ready to use it.
If the cream has become warm or has been sitting at room temperature for an extended period, chill it again before whipping.
The cream should be cold but still liquid when you begin mixing.
Step 7: Whip the Heavy Cream
Pour the cold whipping cream into the chilled mixing bowl.
Begin beating at a low speed for approximately 30 seconds to prevent splashing.
Increase the speed to medium-high and continue whipping until the cream becomes thick and fluffy.
As the cream whips, it will gradually increase in volume. Soft waves will begin to form, and the beaters will leave visible trails on the surface.
Continue until the cream reaches medium-stiff peaks.
To check the consistency, lift the beaters out of the bowl. The cream should hold its shape, with the tip of the peak bending slightly or standing mostly upright.
Do not continue beating once the cream reaches this stage.
Overwhipped cream can become grainy and eventually separate into butter and liquid. This makes it harder to create a smooth ice cream base.
If you accidentally whip the cream a little too far and it still looks smooth, gently fold in a small spoonful of unwhipped cream to help loosen it. If it has separated significantly, it is better to start again for the best texture.
The goal is to create a light, stable whipped cream that can support the condensed milk without becoming heavy.
Step 8: Combine the Condensed Milk, Vanilla, and Salt
In a separate large bowl, add the sweetened condensed milk.
Add the vanilla extract and a small pinch of salt.
Whisk the mixture for approximately 20–30 seconds until the vanilla is evenly distributed.
Taste a tiny amount if desired. The mixture should be sweet and creamy, with a clear vanilla aroma.
Remember that the condensed milk is naturally very sweet. You generally do not need to add extra sugar to the ice cream base.
The salt should remain subtle. Its purpose is to balance the sweetness rather than make the mixture taste salty.
If you prefer a stronger vanilla flavor, you can increase the vanilla extract slightly, but avoid adding too much liquid flavoring because the proportions are important for a good frozen texture.
Step 9: Fold the Whipped Cream into the Condensed Milk
Add approximately one-third of the whipped cream to the condensed milk mixture.
Use a spatula to stir this first portion gently until combined. This lightens the condensed milk and makes it easier to incorporate the remaining cream.
Add the remaining whipped cream in two portions.
For each addition, slide the spatula down the side of the bowl, move it across the bottom, and lift the mixture over itself.
Rotate the bowl slightly and repeat.
This folding motion combines the ingredients while preserving much of the air incorporated during whipping.
Avoid vigorous stirring or beating at this stage. Excessive mixing can deflate the cream and produce a denser ice cream.
Continue folding until no large streaks of whipped cream remain.
The finished mixture should be thick, fluffy, pale, and smooth.
At this stage, the vanilla ice cream base is ready for layering with the raspberry sauce.
Step 10: Taste and Adjust the Vanilla Base
Before transferring the mixture to the container, taste a small spoonful.
The base should have a pleasant vanilla flavor and a rich, sweet creaminess.
Keep in mind that frozen desserts taste less sweet when very cold than they do at room temperature. Therefore, the unfrozen mixture may seem slightly sweeter than the finished ice cream.
If you want a more pronounced vanilla flavor, add a small amount of additional vanilla extract and fold gently.
Avoid adding extra liquid or large quantities of other ingredients because this can change the texture and freezing behavior.
Once you are happy with the flavor, proceed directly to layering.
Step 11: Create the First Layer of Ice Cream
Remove the chilled container from the freezer.
Spoon approximately one-third of the vanilla ice cream mixture into the bottom of the container.
Spread it gently into an even layer using a spatula.
There is no need to press down firmly. Simply smooth the surface enough to create a base for the raspberry sauce.
Try to distribute the mixture into the corners so that the finished ice cream has an even texture throughout.
The first layer provides a creamy foundation for the raspberry ripple.
Step 12: Add the First Raspberry Ripple
Take the chilled raspberry sauce out of the refrigerator.
Spoon a portion of the sauce over the first layer of ice cream. Use approximately one-third of the sauce, or enough to create several visible red ribbons.
Drizzle it in thin lines rather than pouring it into one large pool.
You can create zigzag patterns, loose spirals, or irregular lines across the surface.
The sauce does not need to cover the entire layer. Leaving areas of plain vanilla creates a more attractive contrast.
If you want a particularly defined ripple, avoid stirring the sauce deeply into the ice cream.
A few gentle strokes with a butter knife or skewer are enough to connect some of the lines.
Do not mix until the entire layer becomes pink. The purpose is to preserve distinct ribbons of raspberry.
Step 13: Add the Second Layer
Spoon another third of the vanilla ice cream mixture over the raspberry sauce.
Spread it gently with a spatula.
Work slowly so that you do not completely drag the raspberry sauce through the entire layer.
Some blending is natural, and small pink streaks are welcome. However, the goal is to maintain separate layers of vanilla ice cream and raspberry sauce.
Once the second layer is even, drizzle another portion of the chilled raspberry sauce across the surface.
Create a slightly different pattern from the first layer so that the final dessert has a natural, varied appearance.
The combination of red sauce and pale cream should be clearly visible.
Step 14: Finish with the Final Layer
Add the remaining vanilla ice cream mixture.
Spread it evenly, then spoon the remaining raspberry sauce over the top.
Create decorative ribbons by drizzling the sauce in parallel lines or loose curves.
Use a thin skewer or the tip of a butter knife to draw a few gentle lines through the sauce.
For a classic raspberry ripple, move the utensil in a loose S-shaped pattern.
Make only a few passes. Too much swirling will blend the fruit into the vanilla base and create a mostly pink dessert instead of distinct raspberry ribbons.
Leave some raspberry sauce visible on the surface.
This creates an attractive finish and makes it easy to identify the flavor when serving.
Step 15: Cover the Ice Cream Properly
Once the layering is complete, cover the container with a tight-fitting lid.
If your container does not have a lid, cover the surface carefully with freezer-safe wrapping, keeping it clean and secure.
Limiting air exposure helps prevent freezer odors and ice crystals from affecting the dessert.
Make sure the lid does not press into the raspberry pattern.
If the container is very full, leave a little space at the top to accommodate easy handling and prevent the cover from touching the ice cream.
Place the covered container on a level shelf in the freezer.
Avoid placing it directly beside warm food or opening the freezer repeatedly during the initial freezing period.
Step 16: Freeze Until Firm
Freeze the ice cream for at least 6–8 hours, although overnight freezing generally gives the best results.
The exact freezing time depends on the depth of the container, the temperature of the freezer, and the amount of mixture.
A shallow container may freeze more quickly than a deep one.
During freezing, the whipped cream and condensed milk mixture becomes firm while the raspberry sauce forms distinct ribbons.
Avoid stirring the ice cream during freezing. This is a no-churn method, and the whipped cream provides the air needed for a light texture.
Opening the container repeatedly allows warm air to enter and can slow the freezing process.
For the most reliable results, prepare the dessert the evening before you plan to serve it.
Step 17: Let the Ice Cream Soften Slightly Before Serving
Homemade ice cream can become quite firm when stored in a cold freezer.
Before serving, remove the container and let it stand at room temperature for approximately 5–10 minutes, depending on the firmness.
The surface should soften slightly, allowing a spoon to glide through the mixture more easily.
Do not leave the ice cream out for an extended period, especially in a warm kitchen.
Use a clean ice cream scoop or a sturdy spoon to serve it.
Dip the scoop into warm water and wipe it dry between servings if you want neat, rounded scoops.
The finished ice cream should be creamy, rich, and filled with distinct raspberry ribbons.
What the Finished Raspberry Ripple Ice Cream Should Taste Like
A successful batch should have a balanced combination of vanilla cream and fruity raspberry flavor.
The vanilla base should taste smooth and rich without being overwhelmingly sweet.
The raspberry ripple should have a more concentrated flavor, with a pleasant mixture of natural fruit sweetness and gentle tartness.
When you scoop the ice cream, the red sauce should appear in ribbons throughout the pale cream.
Some scoops may contain more raspberry than others, which is part of the appeal of ripple ice cream.
The texture should be smooth enough to scoop after a short resting period. It should not feel excessively icy, watery, or grainy.
Small fruit pieces are acceptable if you have chosen not to strain the sauce.
If the sauce has been prepared properly and cooled completely, it should remain visible rather than disappearing entirely into the vanilla base.
Important Tips for the Creamiest Homemade Ice Cream
Use Very Cold Whipping Cream
Cold cream whips more efficiently and holds its structure better.
Keep the cream refrigerated until you are ready to begin. If your kitchen is warm, chill the bowl and beaters as well.
Avoid Overwhipping
Whip the cream until it forms medium-stiff peaks, then stop.
Overwhipped cream can become grainy and difficult to fold smoothly into the condensed milk.
Cool the Raspberry Sauce Completely
This is one of the most important steps.
Warm sauce can melt the cream mixture and create uneven layers. Cold sauce is easier to drizzle and helps maintain the structure of the ice cream.
Keep the Sauce Thick
A watery sauce can introduce excess moisture, which may create icy patches.
Allow the raspberries to simmer long enough for their liquid to reduce. Add cornstarch only if necessary.
Fold Rather Than Beat
Once the whipped cream is ready, use a gentle folding motion.
This preserves the air that helps give no-churn ice cream its soft, creamy consistency.
Do Not Overmix the Ripple
The raspberry sauce should remain visible.
A few swirls are enough. Excessive stirring will blend the fruit into the entire mixture and reduce the characteristic ripple effect.
Freeze the Ice Cream Undisturbed
Place the covered container on a level shelf and leave it until firm.
Frequent temperature changes can encourage ice crystal formation and make the texture less pleasant.
Store It in an Airtight Container
An airtight container helps protect the ice cream from freezer odors and reduces moisture loss.
For the best flavor and texture, avoid leaving the container uncovered.
How to Make Raspberry Ripple Ice Cream with an Ice Cream Maker
If you own an ice cream machine, you can prepare a traditional churned version instead.
The flavor components remain the same, but the base is prepared differently.
For a churned version, use approximately 2 cups of heavy cream, 1 cup of whole milk, ¾ cup of sugar, 1 teaspoon of vanilla extract, and a small pinch of salt.
Whisk the milk, sugar, vanilla, and salt until the sugar has dissolved. Stir in the cream and refrigerate the mixture until thoroughly cold, preferably for at least 4 hours.
Prepare the raspberry sauce according to the earlier instructions and chill it completely.
Pour the cold ice cream base into your ice cream maker and churn according to the manufacturer’s instructions.
The mixture should gradually thicken into a soft-serve consistency.
Transfer approximately one-third of the churned ice cream to a freezer-safe container. Add a few ribbons of raspberry sauce, then repeat with the remaining ice cream and sauce.
Use a skewer to create a few gentle swirls.
Cover and freeze for approximately 3–4 hours, or until the ice cream reaches your preferred firmness.
The churned version may have a lighter texture because the machine continuously incorporates air while the mixture freezes.
Do not add the raspberry sauce directly to the machine too early unless your machine’s instructions specifically recommend it. Layering the sauce after churning generally produces a more distinct ripple.
How to Make Raspberry Ripple Ice Cream Without an Electric Mixer
An electric mixer makes whipping cream easier, but it is possible to prepare this recipe by hand.
Pour the cold whipping cream into a large chilled bowl.
Using a balloon whisk, whisk the cream with steady, circular movements. Lift the whisk slightly as you work to incorporate air.
This process can take several minutes and requires more effort than using an electric mixer.
As the cream thickens, move the whisk more gently and watch its consistency carefully.
Stop when the cream holds medium-stiff peaks.
Once the cream reaches the correct texture, prepare the condensed milk mixture and fold everything together as described earlier.
For easier preparation, work with a small batch if you find whipping a large quantity by hand difficult.
Do not attempt to replace the whipped cream with ordinary liquid milk in the no-churn recipe. Whipped cream provides the fat and air necessary for the intended texture.
How to Make a Less Sweet Raspberry Ripple
If you prefer a less sweet dessert, you can make a few adjustments.
The raspberry sauce is the easiest place to begin. Use approximately ¼ cup of sugar for the 2 cups of raspberries, then taste the sauce after it has reduced.
If your berries are naturally sweet, this may be sufficient.
The condensed milk base is more difficult to adjust because its sugar content contributes to the texture as well as the sweetness.
Simply removing a large amount of condensed milk sugar or replacing it with ordinary milk can make the ice cream harder and icier.
For a less sweet version with a traditional churned base, use whole milk, cream, sugar, vanilla, and salt in proportions designed for an ice cream maker. This gives you more direct control over the sweetness.
Regardless of the method, preserve enough sweetness to balance the natural tartness of the raspberries.
How to Make a Stronger Raspberry Ripple
For a more intense raspberry flavor, increase the quantity of fruit rather than simply adding more sauce liquid.
You can prepare the ripple with approximately 300–350 g of raspberries and adjust the sugar to taste.
Cook the fruit until the sauce is concentrated and thick.
If you want a particularly strong contrast between the vanilla and raspberry layers, use a slightly larger amount of sauce and create several narrow ribbons throughout the ice cream.
Another option is to reserve a spoonful of the thick raspberry reduction and add it in a few concentrated lines near the top.
Avoid making the sauce too watery or using excessive lemon juice, as these changes can make the flavor unbalanced.
Variations You Can Try
Raspberry Ripple and White Chocolate Ice Cream
White chocolate pairs beautifully with raspberries because its sweet, creamy flavor contrasts with the fruit’s tartness.
To make this variation, finely chop approximately 75 g of white chocolate.
Melt it gently and allow it to cool until just barely warm and still fluid. Mix a small amount of the melted chocolate with a little of the condensed milk base first, then combine it carefully with the remaining base before folding in the whipped cream.
Alternatively, use finely chopped white chocolate pieces folded into the completed vanilla base.
Add the raspberry sauce in the usual layers.
If you use chocolate pieces, distribute them evenly so that each serving contains a little chocolate and raspberry.
Avoid adding hot melted chocolate directly to cold whipped cream, as it may harden into lumps.
Raspberry Ripple and Chocolate Chip Ice Cream
Chocolate chips provide a pleasant contrast to the smooth cream and fruity sauce.
Add approximately ½ cup of small chocolate chips or finely chopped chocolate to the completed ice cream base.
Fold gently to distribute the pieces evenly.
Layer with the raspberry sauce and freeze as directed.
Dark chocolate offers a deeper flavor, while milk chocolate creates a sweeter dessert.
Raspberry Ripple and Lemon Ice Cream
Lemon adds freshness and complements the natural tartness of raspberries.
To create a lemon variation, add approximately ½–1 teaspoon of finely grated lemon zest to the condensed milk mixture.
Fold in the whipped cream and continue with the usual layering method.
Avoid adding a large amount of lemon juice directly to the cream base because the extra liquid and acidity may affect the texture.
Keep the raspberry sauce slightly sweeter if you want a balanced sweet-and-tart result.
Raspberry Ripple with Fresh Vanilla Bean
For a more pronounced vanilla flavor, use the seeds from approximately half a vanilla bean instead of, or alongside, vanilla extract.
Split the bean lengthwise and scrape out the seeds with the tip of a knife.
Stir the seeds into the condensed milk before folding in the whipped cream.
The tiny dark specks create an attractive appearance and give the dessert a more traditional vanilla-bean character.
Raspberry Ripple with Strawberry
For a mixed-berry variation, replace part of the raspberries with strawberries.
Use approximately 1 cup of raspberries and 1 cup of finely chopped strawberries.
Cook the fruit with sugar and lemon juice until soft and concentrated.
Strawberries generally release considerable moisture, so allow the sauce to reduce until thick.
Cool completely before layering.
The finished dessert will have a softer, sweeter berry flavor while retaining some of the characteristic tartness of raspberries.
Raspberry Ripple with Blackberries
Blackberries offer a deeper fruit flavor and can make the ripple taste slightly richer.
Replace up to half the raspberries with blackberries.
Cook the berries with sugar and lemon juice, then strain the sauce if you prefer a smoother texture.
Blackberries can have larger seeds than raspberries, making straining particularly useful for some people.
Raspberry Ripple Cheesecake Ice Cream
For a cheesecake-inspired version, add approximately 100–150 g of softened cream cheese to the condensed milk.
Beat the cream cheese until smooth before adding the condensed milk and vanilla.
Fold in the whipped cream as usual, then layer the mixture with the raspberry sauce.
You can also add small pieces of plain digestive biscuits or graham crackers between the layers.
This creates a dessert inspired by raspberry cheesecake, with creamy vanilla flavor, tangy fruit ribbons, and a slight biscuit crunch.
For the smoothest result, ensure that the cream cheese is soft and free of lumps before combining it with the other ingredients.
Raspberry Ripple with Toasted Almonds
Toasted almonds add a pleasant nutty flavor and a little crunch.
Toast approximately ¼ cup of sliced almonds in a dry pan over low heat, stirring frequently until lightly golden.
Allow them to cool completely.
Fold the almonds into the finished ice cream base before layering it with the raspberry sauce.
Do not add warm almonds because they can soften the mixture and affect the freezing process.
If serving guests, clearly identify the nuts because almonds are a common allergen.
Raspberry Ripple with Coconut
For a coconut variation, fold approximately ¼ cup of finely shredded coconut into the ice cream base.
Use unsweetened coconut if you want to keep the dessert from becoming overly sweet.
Layer with the raspberry sauce as usual.
The coconut adds a gentle texture and a subtle tropical note that pairs well with the bright berry flavor.
Common Mistakes and How to Avoid Them
Mistake 1: Adding Warm Raspberry Sauce
Warm sauce can melt the whipped cream and disturb the layers.
Solution: Cool the sauce completely before using it. Refrigerate it until thick and cold.
Mistake 2: Using Watery Raspberry Sauce
Excess moisture can create icy areas in the finished ice cream.
Solution: Simmer the berries until the sauce is concentrated. If needed, use a small amount of cornstarch.
Mistake 3: Overwhipping the Cream
Overwhipped cream can become grainy and difficult to combine smoothly.
Solution: Stop when the cream reaches medium-stiff peaks and holds its shape.
Mistake 4: Stirring the Sauce Too Much
Excessive stirring turns the entire mixture pink and eliminates the distinct ripple.
Solution: Layer the sauce in thin lines and use only a few gentle swirls.
Mistake 5: Freezing the Ice Cream for Too Little Time
The dessert may remain too soft to scoop neatly.
Solution: Freeze it for at least 6–8 hours, preferably overnight.
Mistake 6: Leaving the Container Uncovered
Air exposure can cause freezer odors, moisture loss, and ice crystals.
Solution: Use a tight-fitting lid or secure freezer-safe wrapping.
Mistake 7: Using Low-Fat Cream That Cannot Whip Properly
Some creams do not contain enough fat to whip into stable peaks.
Solution: Check the packaging and choose whipping cream designed for whipping.
Mistake 8: Adding Too Much Extra Liquid
Extra milk, juice, or flavoring can change the balance of the mixture.
Solution: Follow the stated proportions and use concentrated flavor ingredients whenever possible.
Mistake 9: Trying to Scoop the Ice Cream Immediately
Very cold homemade ice cream can be firm straight from the freezer.
Solution: Let it stand for a few minutes before scooping, checking its consistency as it softens.
How to Serve Raspberry Ripple Ice Cream
Raspberry ripple ice cream is delicious on its own, but it can also be served in several creative ways.
In a Classic Ice Cream Bowl
Scoop two or three portions into a chilled dessert bowl.
Arrange the scoops so that the raspberry ribbons are visible.
If desired, add a few fresh raspberries on the side.
In an Ice Cream Cone
Use a crisp waffle cone or a traditional wafer cone.
Add one generous scoop, allowing the raspberry ripple to remain visible.
This is a simple and attractive way to serve the dessert at family gatherings.
With Chocolate Cake
Serve a scoop beside a slice of chocolate cake.
The deep chocolate flavor contrasts beautifully with the creamy vanilla and fruity raspberry sauce.
A warm cake with a scoop of cold ice cream can create an especially pleasant contrast in temperature.
With Brownies
Raspberry ripple ice cream pairs well with brownies because the tart fruit cuts through the richness of the chocolate.
Serve one scoop beside a brownie or place the ice cream on top just before eating.
With Fresh Fruit
Serve the ice cream with sliced strawberries, fresh raspberries, blueberries, or pieces of peach.
Choose fruit that complements the raspberry flavor without overpowering it.
As an Ice Cream Sundae
Place two scoops in a glass or bowl.
Add a small amount of raspberry sauce, a few chocolate shavings, and a spoonful of chopped nuts if suitable.
Keep the toppings simple so that the raspberry ripple remains the main feature.
Between Cookies
Place a scoop of slightly softened ice cream between two sturdy cookies.
Press gently to create an ice cream sandwich.
Wrap each sandwich and freeze until firm before serving.
Chocolate cookies, vanilla cookies, and oatmeal cookies can all work well.
With Pancakes or Waffles
Serve a small scoop alongside warm pancakes or waffles as a dessert-style treat.
Fresh raspberries can be added for extra fruit flavor.
Because the ice cream melts quickly on warm food, add it just before serving.
How to Store Raspberry Ripple Ice Cream
Store the ice cream in a tightly sealed, freezer-safe container.
Keep it in the main freezer compartment rather than in the refrigerator door, where temperatures can fluctuate more frequently.
For the best quality, enjoy homemade no-churn ice cream within approximately 1–2 weeks. It may remain safe for longer if continuously frozen and handled properly, but its texture and flavor can gradually deteriorate.
Always use a clean scoop when serving.
Avoid allowing the entire container to soften repeatedly. Instead, remove only the amount you intend to serve and return the rest to the freezer promptly.
If you notice unusual odors, contamination, or evidence that the dessert has thawed significantly and been held at unsafe temperatures, discard it.
Do not refreeze ice cream that has been left out for an extended period and become fully melted.
Can You Prepare Raspberry Ripple Ice Cream Ahead of Time?
Yes. This recipe is especially convenient for advance preparation.
You can prepare the raspberry sauce a day ahead, allow it to cool, and store it in a covered container in the refrigerator.
The vanilla base is best assembled when you are ready to freeze the dessert so that the whipped cream retains its structure.
After layering the sauce and ice cream, freeze the container overnight.
For a gathering, prepare the dessert one day before serving. This allows enough time for the ice cream to freeze firmly and makes the serving process much easier.
If you want to prepare several batches, make sure each container is covered and has enough space in the freezer for air to circulate around it.
Avoid stacking warm containers together because this may slow down freezing.
Frequently Asked Questions
Can I use frozen raspberries?
Yes. Frozen raspberries work very well in this recipe.
Add them directly to the saucepan with the sugar and lemon juice. Cook until the berries soften and the sauce thickens.
Frozen berries often release more liquid as they thaw, so allow enough time for the liquid to reduce.
Can I make raspberry ripple ice cream without an ice cream maker?
Yes. This recipe is designed as a no-churn version.
Whip the cream, combine it with the condensed milk, layer it with the chilled raspberry sauce, and freeze until firm.
No ice cream machine is required.
Why does my homemade ice cream become hard?
Homemade ice cream can become firm because of freezer temperature, ingredient proportions, and the amount of air incorporated into the mixture.
The no-churn method helps create a soft texture through whipped cream and condensed milk.
Allow the ice cream to soften briefly at room temperature before scooping.
Why is my raspberry sauce too runny?
The berries may have released too much liquid, or the sauce may not have cooked long enough.
Continue simmering it gently until some of the moisture evaporates.
Remember to cool the sauce before judging its final thickness because it will become thicker as it chills.
Can I make the ripple completely seedless?
Yes. Strain the cooked raspberry sauce through a fine-mesh sieve while it is still warm enough to pass through easily.
Press gently with the back of a spoon to extract the juice and pulp.
Cool the strained sauce completely before using it.
Can I use raspberry jam instead of homemade sauce?
Yes. A good-quality raspberry jam can be used if you want a quicker version.
Choose a jam with a strong fruit flavor. If it is extremely thick, stir in a very small amount of water until it becomes easy to drizzle.
Chill it before layering.
Keep in mind that jam is often sweeter than homemade raspberry sauce, so the finished ice cream may taste sweeter.
Can I make the ice cream without condensed milk?
Yes, but you will need a different recipe rather than simply omitting the condensed milk.
A traditional custard-based ice cream uses milk, cream, sugar, and usually egg yolks. The mixture is heated carefully, cooled, and churned in an ice cream maker.
A churned cream-and-milk base can also be prepared without eggs, depending on the recipe.
The condensed milk in the no-churn method provides both sweetness and texture, so replacing it requires adjusting the proportions.
Can I use another type of berry?
Yes. Strawberries, blackberries, blueberries, and mixed berries can all be used.
Cook the chosen fruit with sugar and lemon juice until concentrated.
Different berries contain different amounts of water, so the cooking time may vary.
How can I make the raspberry ribbons more visible?
Use a thick, cold sauce and drizzle it in separate lines between layers of ice cream.
Avoid stirring too much.
A few gentle swirls are enough to create an attractive ripple without blending the fruit throughout the dessert.
How long does the ice cream need to freeze?
For this no-churn recipe, allow at least 6–8 hours, preferably overnight.
The exact time depends on your freezer and the depth of the container.
Can I double the recipe?
Yes. You can double the ingredients to make a larger batch.
Use a sufficiently large mixing bowl and divide the mixture between two freezer-safe containers if necessary.
Two shallower containers may freeze more evenly than one very deep container.
Is raspberry ripple ice cream suitable for a party?
Yes. It can be prepared the day before a party and stored in the freezer until serving.
For convenience, prepare the dessert in a container that is easy to open and scoop from.
You can also serve it in individual bowls or small dessert glasses.
Can I add fresh raspberries directly to the ice cream?
You can, but fresh berries contain water that may freeze into hard pieces.
For a more consistent texture, use the cooked raspberry sauce for the ripple.
If you want additional fruit, use small quantities of well-drained fruit and expect the texture to differ slightly.
Can I make it dairy-free?
Yes, but the ingredients and method need to change.
Use a dairy-free whipping alternative that is specifically suitable for whipping and a suitable plant-based condensed milk alternative. Check that both products are designed for frozen desserts.
The result will depend on the fat content and composition of the alternatives.
Final Recipe Checklist
Before placing your raspberry ripple ice cream in the freezer, check the following:
- The raspberry sauce has been cooked until thick and concentrated.
- The sauce has cooled completely.
- The whipping cream was cold before whipping.
- The cream has been whipped to medium-stiff peaks without becoming grainy.
- The condensed milk and vanilla have been combined smoothly.
- The whipped cream has been folded gently into the base.
- The raspberry sauce has been layered rather than completely mixed into the ice cream.
- The container has been covered securely.
- The ice cream has enough time to freeze until firm.
Following these steps will help you achieve a creamy dessert with a beautiful raspberry ripple.
Conclusion
Homemade raspberry ripple ice cream is a wonderful combination of rich vanilla cream and bright raspberry flavor. Its smooth texture, attractive red ribbons, and balanced sweet-and-tart taste make it a timeless dessert for both everyday enjoyment and special occasions.
The secret to making an excellent batch is to prepare a thick raspberry sauce, cool it thoroughly, whip the cream correctly, and preserve the raspberry ribbons during layering. With a little patience and the right technique, you can create a delicious frozen dessert without needing an ice cream machine.
Serve it in bowls, pair it with chocolate brownies, add it to an ice cream sundae, or enjoy a simple scoop on its own. However you serve it, this homemade raspberry ripple ice cream offers a delightful combination of creamy vanilla and fruity raspberry in every spoonful.

