 admin1
Homemade No-Churn Strawberry and Vanilla Ice Cream: A Very Detailed Recipe
Introduction
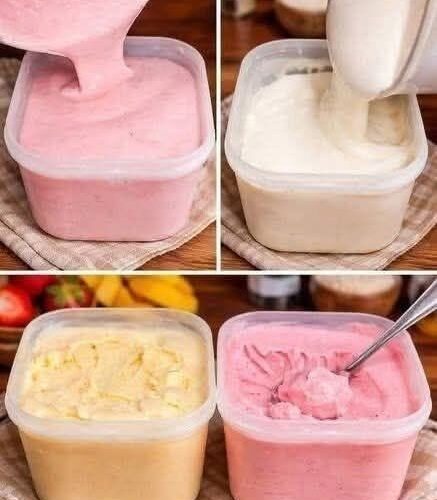
Homemade no-churn strawberry and vanilla ice cream is a creamy, smooth, delicious frozen dessert that you can prepare at home without an ice cream maker. Inspired by the two flavors shown in the picture, this recipe explains how to make beautiful pink strawberry ice cream and rich, creamy vanilla ice cream using simple ingredients and straightforward techniques.
The strawberry version has a lovely pink color, a refreshing fruity flavor, and a soft, creamy texture. The vanilla version is rich, sweet, and smooth, with a delicate vanilla aroma. Both varieties can be prepared in ordinary kitchen containers and frozen until firm enough to scoop.
The best part about this recipe is that you do not need special equipment. A hand mixer, an electric whisk, or a blender for preparing the fruit mixture can help you achieve excellent results. Sweetened condensed milk provides sweetness and a creamy consistency, while whipped heavy cream creates the light texture that makes this homemade ice cream so enjoyable.
You can make either flavor individually or prepare both flavors together to create a colorful dessert collection. Strawberry ice cream is especially delicious during warm weather, while vanilla ice cream is a timeless favorite that pairs beautifully with cakes, brownies, fresh fruit, cookies, and chocolate desserts.
This recipe includes detailed ingredient measurements, preparation instructions, freezing guidance, troubleshooting advice, serving suggestions, and variations so that you can make homemade ice cream successfully even if you have never prepared it before.
Recipe Overview
Preparation time: 25–35 minutes
Strawberry preparation time: 10–15 minutes
Freezing time: 6–8 hours, preferably overnight
Total time: Approximately 7–9 hours, including freezing
Difficulty level: Easy
Recipe type: Homemade frozen dessert
Equipment required: Mixing bowls, measuring cups or a kitchen scale, electric hand mixer or whisk, spatula, blender if desired, and freezer-safe containers.
Estimated yield: Approximately 1–1.2 liters of each flavor, depending on the ingredients and amount of air incorporated.
Ingredients for Homemade Vanilla Ice Cream

The vanilla ice cream is the foundation of this recipe. It uses only a few ingredients, but each ingredient plays an important role in creating the finished texture.
Main ingredients
Heavy whipping cream: 2 cups (480 ml)
Heavy whipping cream provides the rich, creamy structure of the ice cream. Choose cream containing approximately 35% fat or more when available. It should be cold before whipping because cold cream generally whips more effectively and holds its volume better.
Sweetened condensed milk: 1 can (approximately 395–400 g)
Sweetened condensed milk provides sweetness and contributes to a soft, creamy texture. It also helps reduce the formation of large ice crystals during freezing. Use sweetened condensed milk rather than evaporated milk, because the two products have different compositions and cannot be substituted directly in equal amounts.
Pure vanilla extract: 2 teaspoons
Vanilla extract provides the familiar vanilla aroma and flavor. You can use vanilla bean paste instead for a more pronounced vanilla flavor and visible vanilla specks.
Fine salt: A small pinch
A little salt balances the sweetness and enhances the vanilla flavor. It should not make the ice cream taste salty.
Optional ingredients
Whole milk: 1–2 tablespoons
A small amount of milk can be useful if you need to adjust the consistency of the condensed milk mixture, although it is usually unnecessary.
Vanilla bean seeds: From half a vanilla bean
These add a more intense vanilla fragrance and attractive dark specks throughout the ice cream.
White chocolate chips: 2–3 tablespoons
White chocolate chips provide occasional sweet, creamy bites. Fold them into the mixture shortly before freezing if you would like a slightly more textured dessert.
Ingredients for Homemade Strawberry Ice Cream

The strawberry version uses the same creamy base, with fresh strawberries added for a fruity flavor and naturally pink appearance.
Main ingredients
Heavy whipping cream: 2 cups (480 ml)
Use cold heavy whipping cream for the best whipping results. The cream creates a light texture that balances the strawberry puree.
Sweetened condensed milk: 1 can (approximately 395–400 g)
This provides sweetness and helps keep the ice cream creamy after freezing.
Fresh strawberries: 1½ cups (approximately 225 g), hulled and chopped
Choose ripe strawberries with a fragrant aroma and good flavor. Very watery or underripe strawberries can result in a less flavorful dessert.
Lemon juice: 1 teaspoon
A small amount of lemon juice brightens the strawberry flavor. It should not make the finished dessert taste noticeably sour.
Vanilla extract: ½ teaspoon
Vanilla complements the strawberry flavor and gives the dessert a rounded aroma.
Fine salt: A small pinch
Salt helps balance the sweetness and enhance the fruit flavor.
Optional pink food coloring: A tiny amount
Natural strawberries can produce different shades of pink depending on their ripeness. Food coloring is not necessary, but a small amount can create a more vivid pink color if desired.
Optional strawberry additions
You can add 2–3 tablespoons of finely chopped strawberries for extra fruit pieces. For a richer strawberry flavor, use 1–2 tablespoons of strawberry jam or a small quantity of concentrated strawberry puree.
Avoid adding large quantities of watery fruit puree because excess water can make the frozen dessert harder and icier.
Equipment You Will Need
Prepare the equipment before starting so that the ingredients can be mixed efficiently.
A large mixing bowl is useful for whipping the cream. A second bowl makes it easier to prepare the strawberry mixture separately.
An electric hand mixer is the most convenient tool for whipping cream. A stand mixer also works well. A hand whisk can be used, but it requires more effort and time.
A rubber spatula helps fold the whipped cream into the condensed milk mixture without removing too much air.
A blender or food processor is useful for pureeing strawberries. If you prefer small pieces of fruit, you can mash the strawberries with a fork instead.
You will also need clean, freezer-safe containers with lids. Shallow containers can help the ice cream freeze more evenly than very deep containers.
A kitchen scale is helpful for accurate measurements, especially when preparing the strawberry puree.
Part One: Preparing the Strawberry Mixture
Step 1: Wash and prepare the strawberries
Wash the strawberries under cool running water before removing their green tops. Pat them dry with a clean kitchen towel or paper towels.
Removing excess surface water is important because additional water can dilute the strawberry flavor.
Hull the strawberries by removing the green leaves and the firm central portion if necessary. Cut the fruit into small pieces so that it blends easily.
Inspect the strawberries and remove any damaged or spoiled sections. Fresh, ripe fruit will generally provide the sweetest and most aromatic flavor.
Step 2: Make the strawberry puree
Place the chopped strawberries in a blender or food processor. Add the lemon juice and blend until the fruit becomes a smooth puree.
If you prefer strawberry ice cream with tiny fruit pieces, reserve a few tablespoons of finely chopped strawberries before blending.
Taste the puree before adding it to the ice cream base. If the strawberries are naturally sweet, you may not need any additional sugar. If they are slightly tart, the sweetened condensed milk should provide most of the sweetness needed.
The puree should be flavorful and relatively thick rather than watery.
Step 3: Reduce excess moisture if necessary
Fresh strawberries contain a substantial amount of water, which can freeze into ice crystals if too much puree is added.
If your puree looks particularly thin, pour it into a small saucepan and cook it over low to medium-low heat for approximately 5–10 minutes, stirring frequently.
Allow some of the moisture to evaporate until the puree becomes thicker and more concentrated. Do not cook it so aggressively that it burns or sticks to the bottom of the pan.
Transfer the puree to a clean bowl and allow it to cool completely before using it.
Never mix warm strawberry puree directly into whipped cream. Warm fruit can melt the cream and cause the mixture to lose its light consistency.
For the best results, refrigerate the puree until it is cold.
Step 4: Combine the strawberry puree with condensed milk
Place the sweetened condensed milk in a large bowl.
Add the cooled strawberry puree, vanilla extract, and a small pinch of salt.
Stir slowly until the mixture becomes evenly colored. Scrape the sides and bottom of the bowl so that the ingredients are fully combined.
The mixture should look smooth and have a consistent pink color.
If you want a stronger strawberry flavor, you can add a little more concentrated puree, but avoid adding too much liquid.
Set the bowl aside in the refrigerator while you prepare the whipped cream.
Part Two: Preparing the Vanilla Mixture
Step 1: Combine the condensed milk and vanilla
Pour the sweetened condensed milk into a clean mixing bowl.
Add the vanilla extract and a small pinch of salt.
Whisk until the mixture is smooth and the vanilla is evenly distributed.
If you are using vanilla bean paste, stir it in thoroughly so that the dark vanilla specks are spread throughout the mixture.
The condensed milk mixture should be smooth, thick, and easy to fold into the whipped cream.
Step 2: Prepare the vanilla base
Taste a small amount of the condensed milk mixture.
Remember that the mixture will taste sweeter before freezing than the finished frozen dessert may seem to taste. Cold temperatures reduce the perception of sweetness and aroma.
If you prefer a pronounced vanilla flavor, add another small amount of vanilla extract or vanilla bean paste.
Avoid adding too much liquid flavoring because excessive liquid can affect the final consistency.
Set the vanilla mixture aside while you whip the cream.
Part Three: Whipping the Cream Correctly
This is one of the most important stages of the entire recipe. Properly whipped cream helps produce a light and creamy texture without an ice cream machine.
Step 1: Chill the cream and mixing bowl
Make sure the heavy cream is cold. If your kitchen is warm, you can chill the mixing bowl and beaters in the refrigerator for 10–15 minutes before starting.
Cold cream usually whips faster and holds its structure better.
Pour the cream into the bowl, leaving enough room for it to expand as air is incorporated.
Step 2: Begin whipping slowly
Start the mixer on a low speed.
Whip for approximately 30–60 seconds, until the cream begins to thicken slightly.
Starting slowly helps reduce splashing and allows the cream to begin incorporating air evenly.
Increase the speed to medium or medium-high as the cream becomes thicker.
Step 3: Watch for soft peaks
Continue whipping until the cream becomes fluffy and the beaters leave visible trails.
Lift the beaters out of the bowl. If the cream forms peaks that bend over gently, it has reached the soft-peak stage.
At this stage, the cream should look smooth, thick, and airy.
Step 4: Continue to medium-stiff peaks
For this recipe, continue whipping until the peaks hold their shape while the cream still looks smooth.
When you lift the beaters, the tips should remain mostly upright, with perhaps a slight bend at the end.
Avoid whipping until the cream looks grainy, clumpy, or separated. Overwhipped cream can develop a buttery texture and become difficult to incorporate smoothly.
If the cream becomes slightly too firm but has not separated, gently fold it with a spatula before continuing. If it has already separated into butter-like clumps and liquid, it is better to prepare a fresh batch for the smoothest result.
Step 5: Divide the cream if preparing both flavors
If you want to make both strawberry and vanilla ice cream, whip 4 cups (960 ml) of heavy cream in a sufficiently large bowl.
Once whipped, divide the cream approximately equally between the strawberry and vanilla mixtures.
If your bowl is too small, whip the cream in two batches.
Preparing the two flavors separately makes it easier to control the color, taste, and texture of each mixture.
Part Four: Making the Vanilla Ice Cream
Step 1: Add a small amount of whipped cream
Take approximately one-quarter of the whipped cream and add it to the vanilla condensed milk mixture.
Stir gently until the mixture becomes lighter and easier to combine.
This first addition helps loosen the thick condensed milk so that the remaining cream can be folded in more easily.
Step 2: Fold in the remaining cream
Add the remaining whipped cream in two or three portions.
Using a rubber spatula, scoop from the bottom of the bowl, bring the mixture upward, and fold it over the top.
Turn the bowl slightly after each fold.
Continue until the mixture is mostly uniform in color and texture.
Do not stir vigorously or beat the mixture at this stage. Excessive mixing can remove the air that was incorporated during whipping.
A few gentle folding movements are usually enough once the condensed milk has been loosened.
Step 3: Check the consistency
The finished mixture should be thick, fluffy, and creamy.
It should fall slowly from the spatula rather than pour like ordinary milk.
If you are adding white chocolate chips, chopped cookies, or another dry inclusion, fold it in gently now.
Avoid adding warm sauces or liquids because they may loosen the mixture.
Step 4: Transfer to a container
Spoon the vanilla mixture into a clean freezer-safe container.
Spread it evenly with the spatula, making sure the mixture reaches the corners.
Smooth the surface to reduce large air pockets.
A shallow container is ideal because it allows the ice cream to freeze more evenly.
Step 5: Cover the surface
Place a piece of food-safe freezer wrap or baking parchment directly against the surface if suitable for your container and intended food use.
Then secure the lid.
Limiting exposure to air helps prevent freezer odors and reduces the development of an icy surface.
Step 6: Freeze until firm
Place the container on a level shelf in the freezer.
Allow the ice cream to freeze for at least 6–8 hours, although overnight freezing is often more convenient.
Try not to open the freezer repeatedly during the initial freezing period.
The ice cream is ready when it has a firm, scoopable consistency.
Part Five: Making the Strawberry Ice Cream
Step 1: Check the strawberry base
Remove the strawberry and condensed milk mixture from the refrigerator.
Stir it gently to make sure that the puree has not settled at the bottom.
It should be cold, smooth, and evenly pink.
If you notice a small amount of liquid separation, stir gently until the mixture becomes uniform again.
Step 2: Lighten the strawberry mixture
Add approximately one-quarter of the whipped cream to the strawberry mixture.
Fold or stir gently until the thick fruit mixture becomes lighter.
This helps the remaining whipped cream blend evenly without requiring excessive mixing.
Step 3: Fold in the remaining whipped cream
Add the rest of the whipped cream in two or three portions.
Use a spatula to fold the cream gently into the strawberry base.
Move the spatula around the edge of the bowl, scoop underneath the mixture, and bring it over the top.
Rotate the bowl as you work.
Continue until the strawberry mixture becomes evenly pink and fluffy.
The finished mixture should have a light texture and a consistent color.
If you reserved finely chopped strawberries, fold them in at the end.
Step 4: Adjust the strawberry flavor
Taste a small spoonful of the mixture.
If the strawberry flavor seems mild, a little concentrated strawberry puree or strawberry jam can provide additional fruitiness.
Add any extra puree in small quantities. Too much can make the mixture watery and increase the chance of ice crystals forming.
If you want a brighter pink color, you can add a tiny amount of food coloring, but it is entirely optional.
The natural color of the fruit is sufficient for a homemade dessert.
Step 5: Transfer the mixture to a container
Spoon the strawberry ice cream mixture into a freezer-safe container.
Spread it into an even layer with a spatula.
Tap the container gently on the counter if needed to help remove large air pockets, taking care not to spill the mixture.
Smooth the surface.
Step 6: Cover and freeze
Cover the surface and secure the container lid.
Place it on a level shelf in the freezer.
Freeze for 6–8 hours or until firm. For the most convenient serving texture, allow it to freeze overnight.
Avoid placing warm foods beside the container during the initial freezing period.
The strawberry ice cream should become firm enough to scoop while retaining its creamy texture.
Part Six: How to Make the Ice Cream Look Like the Picture

The picture shows two different flavors of creamy ice cream, with a pink strawberry version and a pale cream-colored version. To achieve a similar result, prepare each flavor separately and use clean, transparent or lightly colored freezer containers.
For the pink version, blend the strawberries thoroughly and make sure the puree is cold before folding it into the whipped cream. This produces a more uniform pink color.
For the vanilla version, use a good-quality vanilla extract or vanilla bean paste. The finished color should be naturally creamy rather than bright white.
When filling the containers, spread the mixture carefully into the corners. A smooth surface helps the finished ice cream look neat.
For a homemade presentation similar to the image, use square or rectangular food-safe freezer tubs with lids.
You can also prepare two flavors from one large batch of whipped cream. Mix one half with the strawberry base and the other half with the vanilla base, then freeze them in separate containers.
For a two-color ice cream container, spoon alternating layers of pink strawberry and vanilla mixture into a single container. Gently draw a butter knife through the layers once or twice to create a simple swirl.
Avoid mixing the colors too much, or the finished dessert may become one uniform pale pink rather than showing distinct swirls.
Part Seven: How to Achieve Extra-Creamy Ice Cream
Use the right cream
Heavy whipping cream with a sufficiently high fat content is important for a rich texture. Lower-fat cream may not whip as well and can produce a less creamy dessert.
Check the label and choose cream suitable for whipping.
Keep the cream cold
Warm cream takes longer to whip and may struggle to hold its shape.
Keep it refrigerated until you are ready to use it.
If your kitchen is hot, work in short stages and return the cream to the refrigerator if it becomes too warm.
Do not overwhip the cream
The ideal whipped cream should hold soft-to-medium-stiff peaks while remaining smooth.
Overwhipped cream can create a heavier texture and may leave small lumps in the finished ice cream.
Stop mixing as soon as the cream has enough structure.
Fold instead of beating
Once you combine the whipped cream with the condensed milk mixture, use gentle folding movements.
Beating at high speed can remove air and make the mixture less fluffy.
The goal is to distribute the ingredients evenly while preserving as much of the incorporated air as possible.
Avoid excessive fruit liquid
Strawberries contain considerable water. If you add too much watery puree, the ice cream may become icy after freezing.
Concentrating the puree before cooling it is a useful way to preserve fruit flavor without adding unnecessary moisture.
Use an airtight container
An airtight container helps protect the ice cream from freezer odors and reduces surface drying.
Choose a container that fits the quantity reasonably well, rather than one that leaves a large amount of empty space above the ice cream.
Allow sufficient freezing time
Ice cream that has been frozen for only a short period may still be soft in the middle.
Allow enough time for the entire container to become firm.
Overnight freezing generally provides a reliable result.
Part Eight: How to Make the Ice Cream Softer for Scooping
Homemade ice cream can become quite firm in a cold freezer. This does not necessarily mean the recipe has failed.
When you are ready to serve it, remove the container from the freezer and allow it to stand in the refrigerator for approximately 10–15 minutes, or let it soften briefly at room temperature.
The exact time depends on the container size, freezer temperature, and consistency of the mixture.
Use a clean ice cream scoop or a sturdy spoon to serve it.
If the ice cream is still too firm, wait a few more minutes rather than forcing the scoop through it.
Only soften the amount you intend to serve, and return the remaining ice cream to the freezer promptly.
Repeated melting and refreezing can cause larger ice crystals to develop, making the texture less pleasant.
Part Nine: Delicious Variations
Strawberry cheesecake ice cream
To make strawberry cheesecake ice cream, prepare the strawberry base as described above.
Add approximately 100 g of softened cream cheese to the condensed milk mixture and beat until smooth before folding in the whipped cream.
You can add a few tablespoons of crushed graham crackers or digestive biscuits for a cheesecake-inspired flavor.
Make sure the cream cheese is fully softened before mixing so that it does not leave lumps.
Strawberry chocolate chip ice cream
Prepare the strawberry ice cream mixture and fold in 2–4 tablespoons of mini chocolate chips.
Milk chocolate, dark chocolate, or white chocolate can all work well.
Add the chocolate chips at the end so that they remain evenly distributed throughout the mixture.
Strawberry ripple ice cream
Prepare the strawberry ice cream base and transfer half of it into a container.
Add small spoonfuls of thick strawberry jam, followed by the remaining ice cream mixture.
Add a little more jam on top and gently swirl it with a knife.
Do not stir too much, because the contrast between the pink ice cream and darker fruit ripple creates an attractive appearance.
Classic French vanilla-style ice cream
For a deeper vanilla flavor, use vanilla bean paste or scrape the seeds from a vanilla bean.
Add a tiny pinch of salt to balance the sweetness.
This no-churn version will not have exactly the same texture as traditional custard-based French vanilla ice cream, but it can still deliver a rich vanilla flavor.
Chocolate vanilla ice cream
Add 2–3 tablespoons of sifted cocoa powder to the condensed milk mixture before folding in the whipped cream.
For a sweeter chocolate flavor, use a little melted chocolate that has cooled to room temperature.
Fold carefully and avoid adding warm chocolate directly to the whipped cream.
Cookies and cream ice cream
Prepare the vanilla base and fold in approximately 8–10 crushed chocolate sandwich cookies.
Crush the cookies into a mixture of small pieces and fine crumbs.
Reserve a few pieces for the surface if you like.
This variation is particularly easy because the vanilla base already provides the creamy background flavor.
Mango ice cream
Replace the strawberry puree with approximately ¾–1 cup of thick mango puree.
Choose ripe, sweet mangoes and strain the puree if it contains noticeable fibers.
If the puree is watery, reduce it gently in a saucepan and cool it completely before combining it with the condensed milk.
Mango varies in sweetness, so taste the puree before mixing.
Coffee ice cream
Dissolve 1–2 teaspoons of instant coffee in a very small amount of hot water.
Allow it to cool completely before stirring it into the condensed milk.
Fold in the whipped cream and freeze as directed.
Using a concentrated coffee mixture prevents unnecessary liquid from entering the base.
Peanut butter ice cream
Add approximately 3–4 tablespoons of smooth peanut butter to the condensed milk mixture and whisk until evenly combined.
Fold in the whipped cream and freeze.
You can add a small amount of chocolate chips or a peanut butter swirl if desired.
Lemon ice cream
For a lemon-flavored variation, use finely grated lemon zest and a small amount of lemon juice.
Because citrus juice is acidic and contains water, add it cautiously and avoid using excessive quantities.
For a more reliable texture, flavor the condensed milk with lemon zest and use a small quantity of concentrated lemon curd as a ripple.
Part Ten: Common Problems and How to Solve Them
Problem: The ice cream becomes icy
This can happen when the strawberry puree contains too much water, the mixture is not sufficiently creamy, or the dessert is repeatedly allowed to melt and refreeze.
To improve the texture, use concentrated fruit puree, measure the ingredients carefully, and keep the container tightly covered.
Allow the ice cream to freeze undisturbed until firm.
Problem: The mixture becomes runny before freezing
The cream may have been underwhipped, the strawberry puree may have been warm, or the ingredients may have been mixed too aggressively.
Next time, make sure the cream is cold and properly whipped before folding it into the condensed milk mixture.
Always cool cooked fruit puree completely.
If the mixture is already runny, place it in a covered container and freeze it. It may still set, although the final texture could be denser than intended.
Problem: The whipped cream will not thicken
The cream may be too warm or may not contain enough fat for whipping.
Return it to the refrigerator until thoroughly chilled and try again.
Check that you are using heavy whipping cream rather than ordinary low-fat cream or a product that is not designed to whip.
Problem: The strawberry flavor is weak
The strawberries may have been underripe or the puree may have been diluted with too much water.
Choose fragrant, ripe strawberries and concentrate the puree gently before cooling.
You can also incorporate a small quantity of strawberry jam to deepen the flavor.
Problem: The ice cream is too sweet
Sweetened condensed milk is naturally very sweet, so it is important to balance it with flavorful ingredients.
For the strawberry version, use ripe, flavorful fruit and a small amount of lemon juice.
For the vanilla version, use a pronounced vanilla flavor and a small pinch of salt.
Do not remove large amounts of condensed milk without adjusting the recipe, because it contributes to the texture as well as the sweetness.
Problem: The ice cream is too hard
Homemade ice cream without commercial stabilizers may freeze more firmly than some packaged products.
Allow it to soften briefly before scooping.
Avoid adding large quantities of milk or water to soften the mixture, because doing so can change its texture and increase ice formation.
Problem: The ice cream tastes bland after freezing
Cold temperatures reduce the perception of sweetness and aroma.
Before freezing, make sure the strawberry puree has a strong fruit flavor and the vanilla mixture has enough vanilla extract.
A small pinch of salt can also improve the overall flavor balance.
Part Eleven: Storage and Food Safety
Store both flavors in clean, airtight, freezer-safe containers at 0°F (-18°C) or below.
For the best texture and flavor, enjoy the ice cream within approximately 2–3 weeks. It may remain frozen for longer, but its quality can gradually decline.
Always use clean utensils when serving the ice cream.
Do not leave the container at room temperature for extended periods. Return it to the freezer promptly after serving.
Avoid repeatedly thawing and refreezing the entire batch, because temperature changes encourage ice crystal formation and can affect food quality.
If the ice cream has been left out for an extended period, especially in warm conditions, do not rely on refreezing to make it safe. Follow food-safety guidance for frozen dairy desserts.
Part Twelve: Serving Suggestions
Homemade strawberry ice cream tastes wonderful served in a chilled bowl with a few fresh strawberry slices.
For a simple dessert, place one or two scoops in a small dish and add a little strawberry puree or jam.
Vanilla ice cream is excellent with warm brownies, apple pie, chocolate cake, pancakes, waffles, and fruit crumble.
You can also serve both flavors together to create a two-scoop dessert with contrasting colors and flavors.
For a milkshake, blend a scoop or two with a small amount of cold milk until smooth.
For an ice cream sandwich, place a scoop of slightly softened ice cream between two cookies and freeze the sandwich until firm.
For a party, arrange scoops of strawberry and vanilla ice cream in separate chilled bowls and offer toppings such as crushed cookies, chopped nuts, chocolate chips, fruit pieces, and chocolate sauce.
Add toppings just before serving so that they retain their texture and appearance.
Part Thirteen: Frequently Asked Questions
Can I make this ice cream without an ice cream maker?
Yes. This is a no-churn recipe, so an ice cream maker is not required. Whipped cream supplies air, while sweetened condensed milk contributes sweetness and a smooth texture.
Can I use frozen strawberries?
Yes. Thaw frozen strawberries in the refrigerator and drain any excess liquid before blending.
If the puree is watery, cook it gently to concentrate it and allow it to cool completely before adding it to the condensed milk mixture.
Frozen strawberries may produce a slightly different flavor and color, but they can still make a delicious dessert.
Can I use ordinary milk instead of heavy cream?
Ordinary milk does not whip into the same stable, airy structure as heavy whipping cream.
Replacing all the heavy cream with ordinary milk will change the recipe substantially and is likely to produce a harder, icier result.
For this particular no-churn method, heavy whipping cream is the preferred ingredient.
Can I make this recipe without condensed milk?
You can make homemade ice cream using other methods, such as a cooked custard base, but simply removing the condensed milk from this recipe will change its sweetness, water content, and freezing texture.
If you want to avoid condensed milk, use a recipe developed specifically for an alternative base rather than substituting ordinary milk in equal quantities.
Why does the strawberry version sometimes become harder than the vanilla version?
Strawberries contain water, which can increase ice crystal formation. The vanilla mixture contains less fruit moisture and may therefore have a smoother consistency.
Concentrating the strawberry puree and measuring it carefully can help reduce this difference.
Can I make the ice cream pink without food coloring?
Yes. Ripe strawberries naturally provide a pink color.
The exact shade depends on the strawberries, their ripeness, and the quantity of puree used.
How long does the ice cream need to freeze?
Allow approximately 6–8 hours for a typical container, although freezing overnight is often best.
Larger or deeper containers may require additional time.
Can I make the recipe ahead of time?
Yes. Prepare the ice cream the day before you plan to serve it.
This gives it enough time to freeze completely and makes serving easier.
Can I add fruit pieces?
Yes. Add small pieces of strawberry after the puree and whipped cream have been combined.
Use a moderate quantity and pat the fruit dry before adding it. Excess water from fruit pieces may create icy spots.
Final Recipe Summary
This homemade strawberry and vanilla ice cream recipe is an easy way to create two delicious frozen desserts with a creamy texture and simple ingredients.
The strawberry version combines whipped cream, sweetened condensed milk, strawberry puree, vanilla, and a little lemon juice. The vanilla version uses whipped cream, sweetened condensed milk, vanilla extract, and a small pinch of salt.
The most important techniques are to keep the cream cold, whip it to the correct consistency, cool the strawberry puree completely, fold gently, and freeze the mixture in covered containers until firm.
With these steps, you can make a beautiful pink strawberry ice cream and a rich vanilla ice cream that look attractive in containers like those shown in the picture.
Serve them in bowls, cones, milkshakes, sundaes, or alongside your favorite homemade desserts for a simple and satisfying treat.

