admin1
Easy Fluffy Microwave Mug Bread Recipe
This easy fluffy microwave mug bread is a wonderful homemade bread recipe for anyone who wants fresh, warm bread without using an oven, kneading dough for a long time, or waiting for yeast to rise. Made with simple pantry ingredients, this quick bread has a soft, tender texture, a lightly golden top, and a delicious homemade flavor. It is prepared directly in a microwave-safe mug, making it a convenient choice for breakfast, lunch, a quick snack, or whenever you want a small serving of freshly made bread.
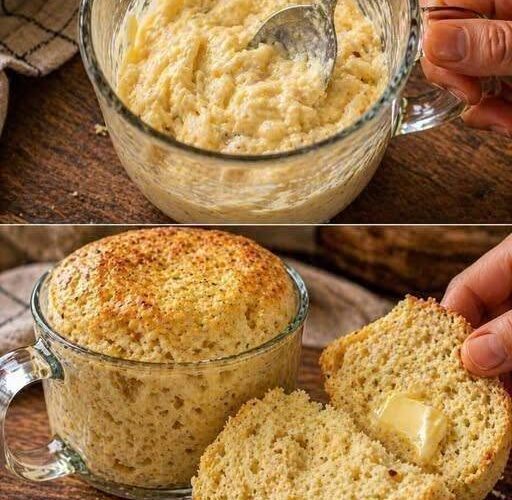
The bread shown in the picture has a lovely soft interior with a slightly toasted-looking surface. When sliced and served warm with a little butter, it becomes a comforting treat that pairs beautifully with tea, coffee, eggs, cheese, soups, and many other foods. The recipe is especially useful when you want bread for one or two people without making a whole loaf.
Unlike traditional yeast bread, this microwave mug bread does not require hours of rising time. Baking powder helps the mixture rise quickly as it cooks, creating a light and airy texture. The ingredients are mixed in a mug or small bowl, transferred to a suitable container if necessary, and cooked in the microwave until the center is set.
Recipe Overview
Preparation time: 5 minutes
Cooking time: 2–3 minutes, depending on your microwave
Additional resting time: 1–2 minutes
Total time: Approximately 8–10 minutes
Servings: 1 large mug bread or 2 small portions
Difficulty level: Easy
Cooking method: Microwave
Texture: Soft, fluffy, tender, and slightly crumbly
Flavor: Mild, buttery, and pleasantly savory
Best served: Warm, with butter, cheese, eggs, jam, or your favorite spread
Ingredients for Fluffy Microwave Mug Bread
The following quantities make one generous serving. For the best results, measure the ingredients carefully and use a microwave-safe mug or bowl with enough room for the mixture to rise.
Dry Ingredients
4 tablespoons all-purpose flour
All-purpose flour forms the base of the bread and gives it structure. It absorbs the liquid ingredients and creates a soft crumb when cooked. Spoon the flour into your measuring spoon and level the top rather than packing it tightly. Too much flour can make the bread dense, dry, and heavy.
1/2 teaspoon baking powder
Baking powder is the main rising agent in this quick recipe. It produces gas when activated by moisture and heat, helping the bread become fluffy without requiring yeast. Make sure your baking powder is fresh for the best rise.
1 small pinch of salt
Salt enhances the flavor of the bread and balances the mild taste of the flour. Even a small pinch makes a noticeable difference. If you plan to serve the bread with salted butter or cheese, you can reduce the amount slightly.
1 tablespoon grated cheese, optional
Grated cheddar, mozzarella, or another cheese that melts well can add richness and savory flavor. Cheese is optional, but it makes the bread especially delicious when served warm. If you use cheese, remember that it can make the texture slightly moister.
1/4 teaspoon garlic powder, optional
Garlic powder adds a gentle savory flavor and works particularly well if you plan to serve the bread alongside soup, pasta, or eggs. You can leave it out for a more neutral bread.
1/4 teaspoon dried herbs, optional
Dried oregano, parsley, or mixed herbs can give the bread a pleasant aroma. Use a small quantity so the herbs do not overpower the mild flavor of the bread.
Wet Ingredients
1 large egg
The egg helps bind the ingredients together and contributes to the bread’s structure. It also adds moisture and richness. Beat the egg before adding it to the dry ingredients so that it combines evenly with the flour.
2 tablespoons milk
Milk adds moisture and helps create a tender texture. Regular dairy milk works well, but unsweetened soy milk can also be used. Other plant-based milks may work, although the final texture can vary slightly.
1 tablespoon melted butter or neutral oil
Butter adds a rich, homemade flavor, while vegetable oil produces a moist texture. Melt the butter and allow it to cool slightly before mixing it with the egg. If you prefer a lighter flavor, use a neutral oil.
1 tablespoon plain yogurt, optional
Yogurt can make the bread more tender and moist. If you add it, the mixture may become thicker, so you may need an extra teaspoon of milk to achieve a smooth, spoonable consistency.
For a simple version, you can omit the optional cheese, garlic powder, herbs, and yogurt. The essential ingredients are flour, baking powder, salt, egg, milk, and butter or oil.
Equipment Needed
You will need a microwave-safe mug or small bowl, measuring spoons, a fork or small whisk, and a spoon for mixing. A mug with a capacity of approximately 350–450 milliliters is a useful starting point for this quantity, but a wider microwave-safe bowl can make the bread easier to remove and slice.
Choose a container that allows the batter to rise without overflowing. The batter should generally fill no more than about half the container before cooking. A wide bowl may produce a shorter bread, while a narrower mug may create a taller shape.
Never use a metal mug or container in the microwave. Make sure the container is specifically labeled as microwave-safe, and use an oven mitt or thick kitchen towel when removing it because the mug and bread can become very hot.
How to Make Fluffy Microwave Mug Bread
Step 1: Prepare the Mug
Begin by choosing a clean microwave-safe mug or small bowl. Lightly grease the inside with a little butter or oil, making sure to cover the bottom and sides.
Greasing the container helps prevent the bread from sticking and makes it easier to remove after cooking. If you want to serve the bread directly in the mug, greasing is still useful because it makes the edges easier to loosen with a spoon.
Check that the mug is large enough to hold the batter as it rises. The bread should have room to expand during cooking, so avoid filling the mug too close to the rim.
Step 2: Mix the Dry Ingredients
Add the all-purpose flour, baking powder, and salt to a small mixing bowl or directly to the mug if there is enough room to mix comfortably.
Stir the ingredients together with a fork until the baking powder and salt are evenly distributed throughout the flour. This step is important because it helps the bread rise more evenly.
If you are making a savory version, add the garlic powder and dried herbs at this stage. Stir again so the seasonings are spread throughout the mixture.
If you are using grated cheese, you can add it now and mix it lightly with the flour. Coating the cheese with a little flour helps distribute it through the batter.
Step 3: Prepare the Wet Ingredients
In a separate small bowl, crack the egg and beat it with a fork until the yolk and white are completely combined.
Add the milk and melted butter or oil. Mix until the ingredients form a smooth liquid mixture.
If you are using yogurt, stir it in at this stage. Make sure the melted butter is not extremely hot, as very hot butter can partially cook the egg before the bread reaches the microwave.
Combining the wet ingredients separately helps you avoid pockets of unmixed egg in the finished bread.
Step 4: Combine the Wet and Dry Ingredients
Pour the wet mixture into the dry ingredients. Stir gently with a fork or spoon until the flour is moistened and the batter looks evenly combined.
Scrape the sides and bottom of the bowl so that no dry flour remains hidden underneath the mixture. The batter should be thick but spoonable.
Avoid stirring for too long. Unlike yeast dough, this quick bread does not need kneading. Excessive mixing can develop more gluten in the flour and contribute to a tougher texture.
A few small lumps are acceptable, but there should not be large pockets of dry flour. If the mixture seems unusually stiff, add milk a teaspoon at a time. If it appears extremely thin, add a little flour.
The ideal batter should hold its shape slightly while still falling from the spoon with gentle encouragement.
Step 5: Transfer the Batter to the Mug
If you mixed the ingredients in a separate bowl, spoon the batter into the greased mug.
Smooth the top lightly with the back of the spoon. There is no need to press the mixture down firmly because doing so can interfere with the light texture.
Tap the mug gently against the counter once or twice to help settle any large air pockets. Do not overdo this step, as the batter should remain light.
If desired, sprinkle a tiny amount of dried herbs or grated cheese over the top. These additions can give the finished bread extra flavor.
Step 6: Cook the Bread in the Microwave
Place the mug in the center of the microwave turntable.
Microwave the mixture on high power for approximately 60 seconds to begin with. Cooking times vary considerably between microwave models, so it is better to start with a shorter cooking time than to overcook the bread.
Check the center of the bread. If the batter still looks wet or unset, continue cooking in 15–20 second intervals.
Depending on the microwave’s power, mug size, and batter depth, the bread may require approximately 90 seconds to 3 minutes in total. A particularly tall or dense portion may need longer, but avoid adding excessive cooking time all at once.
The bread should rise noticeably, and the surface should look set rather than wet. The edges may pull slightly away from the sides of the mug.
Because this recipe contains egg and flour, the center must be fully cooked. Do not eat it if the middle is still wet or the egg appears undercooked. If you have a food thermometer, the center should reach 74°C (165°F).
Step 7: Allow the Bread to Rest
When the bread is cooked, carefully remove the mug from the microwave using an oven mitt or thick towel.
Place it on a heat-safe surface and let the bread rest for 1–2 minutes. The mug will be hot, and the steam escaping from the bread can burn your fingers, so avoid touching the inside of the container.
Resting gives the structure a little time to settle and makes the bread easier to remove. The crumb may initially seem soft or slightly moist, but it should become more stable as it cools briefly.
Do not leave the bread in the hot mug for too long if you prefer a soft texture, because continued heat can make it firmer.
Step 8: Remove the Bread from the Mug
Run a small, blunt knife or silicone spatula carefully around the edge of the bread.
Place a small plate over the top of the mug, then carefully invert the mug while holding the plate securely. If the bread does not release immediately, gently tap the bottom of the mug.
If you greased the mug properly, the bread should come out fairly easily. Alternatively, leave it in the mug and eat it with a spoon.
For a bread-like presentation similar to the picture, allow it to cool for another minute before slicing it with a serrated knife.
Step 9: Slice and Serve
Place the bread on a small cutting board and slice it horizontally or into wedges, depending on its shape.
Spread a little butter over the warm surface and allow it to melt into the soft crumb. You can also add cheese, cream cheese, jam, honey, or another favorite topping.
The bread is best eaten fresh, shortly after cooking. Its soft center and warm aroma make it a satisfying addition to a quick breakfast or afternoon snack.
How to Get a Soft and Fluffy Texture
The most important factor in making good microwave bread is achieving the right balance of flour, liquid, and cooking time. Since microwave cooking heats the batter quickly, a small difference in cooking time can noticeably affect the result.
Measure the flour carefully. Too much flour absorbs too much moisture and creates a dense bread. Use level measuring spoons rather than estimating the quantity.
Use fresh baking powder. Old or poorly stored baking powder may lose its effectiveness, resulting in bread that rises very little.
Mix the batter until just combined. There is no need to knead it or beat it vigorously. Gentle mixing helps preserve a tender texture.
Do not overcook the bread. Microwave bread can become dry and rubbery when heated for too long. Begin with a short cooking period and continue in small intervals until the center is fully cooked.
Choose the correct mug size. If the mug is too narrow, the center may take longer to cook than the edges. A wider microwave-safe bowl can help the bread cook more evenly.
Allow a short resting period. A minute or two of resting helps the bread settle before slicing, making it less likely to break apart.
Serve it warm. Microwave mug bread is generally most enjoyable shortly after preparation, when the crumb is soft and the butter melts easily over the surface.
Delicious Variations of Microwave Mug Bread
1. Cheesy Microwave Mug Bread
For a rich and savory version, add 2 tablespoons of grated cheddar or mozzarella to the basic batter. A small pinch of black pepper and a little dried oregano make the flavor more interesting.
Mix the cheese evenly through the batter before transferring it to the mug. You can sprinkle a little extra cheese on top, but do not add so much that the surface becomes excessively oily.
After cooking, let the bread rest briefly before serving. The melted cheese gives the crumb a rich flavor and pairs beautifully with tomato soup, scrambled eggs, or a fresh salad.
2. Garlic Butter Mug Bread
To make garlic-flavored bread, add 1/4 teaspoon of garlic powder and a pinch of dried parsley to the mixture.
Once the bread has cooked, brush the top with a small amount of melted butter mixed with a little garlic powder. This creates a pleasant garlic-butter aroma without requiring an oven.
Serve it with pasta, soup, roasted vegetables, or a simple chicken dish. You can also slice the bread into small pieces and toast them in a skillet for a firmer surface.
3. Herb Mug Bread
Add a small amount of dried oregano, thyme, parsley, or Italian seasoning to the dry ingredients.
Herbs give the bread a more complex aroma while keeping the basic recipe simple. A little grated cheese can complement the herbs, although the bread is also delicious without it.
This variation is particularly suitable for serving alongside vegetable soup, lentils, grilled chicken, or a cheese omelet.
4. Whole-Wheat Microwave Mug Bread
Replace half of the all-purpose flour with whole-wheat flour. Whole-wheat flour absorbs liquid differently and may produce a slightly denser texture, so you may need to add another teaspoon of milk.
Stir the batter gently and check its consistency before cooking. The finished bread should be moist but not runny.
Whole-wheat flour gives the bread a more pronounced grain flavor and a slightly heartier texture. Allow it to rest briefly before slicing, as whole-wheat versions may be more delicate when very hot.
5. Sweet Cinnamon Mug Bread
For a lightly sweet version, omit the garlic powder, herbs, and cheese. Add 1–2 teaspoons of sugar and a small pinch of cinnamon to the dry ingredients.
Prepare the batter as usual and cook it in the microwave until the center is fully set. Serve with a little butter, fruit, or yogurt.
This variation has a gentle cinnamon flavor and works well as a quick breakfast or afternoon snack. It is not a traditional yeast-raised sweet bread, but it provides a convenient alternative when you want something warm and homemade.
6. Honey Mug Bread
For a mild sweetness, add 1 teaspoon of honey to the wet ingredients. Reduce the milk very slightly if the batter becomes too thin.
Honey gives the bread a delicate sweetness that pairs well with butter or plain yogurt. If you add too much honey, the texture may become sticky, so begin with a small quantity.
This version is best served warm and can be accompanied by sliced fruit or a glass of milk.
7. Seeded Mug Bread
Add 1 teaspoon of sesame seeds, sunflower seeds, or pumpkin seeds to the batter. You can also sprinkle a few seeds over the surface before cooking.
Seeds contribute a pleasant texture and a slightly nutty flavor. Keep the quantity modest so that the bread remains light and holds together.
Serve seeded mug bread with cream cheese, eggs, hummus, or soup.
8. Black Pepper and Cheese Bread
Add a small pinch of freshly ground black pepper and 1–2 tablespoons of grated cheese to the mixture.
The pepper provides gentle warmth, while the cheese adds savory richness. This combination is especially delicious when served with scrambled eggs or a bowl of tomato soup.
For a milder version, use mozzarella. For a stronger flavor, use cheddar or another flavorful cheese.
9. Dairy-Free Mug Bread
Use an unsweetened plant-based milk and replace the butter with a neutral vegetable oil. Soy milk is a practical option because its protein content can help support the texture.
Check that any additional ingredients, such as cheese or yogurt, are also dairy-free if you need to avoid dairy completely.
The finished bread may taste slightly different depending on the milk substitute, but it can still be soft and flavorful.
10. Gluten-Free Mug Bread
Use a gluten-free all-purpose flour blend that is designed for baking. If the blend does not contain a suitable binder, the bread may be more fragile and crumbly.
Follow the flour blend’s instructions when possible, and add liquid gradually because different gluten-free blends absorb moisture differently.
Make sure the baking powder and other ingredients are labeled gluten-free if cross-contact is a concern. The texture may differ from ordinary wheat-flour bread, but the microwave method can still provide a convenient single-serving option.
What to Serve with Microwave Mug Bread
Microwave mug bread is versatile enough to accompany both sweet and savory foods. Since it has a mild flavor, you can adapt it to your meal without changing the basic recipe.
Butter and salt: Spread a little butter over the warm bread and add a tiny pinch of salt if needed. The butter melts into the crumb and makes the bread taste richer.
Scrambled eggs: Serve slices alongside scrambled eggs or an omelet for a simple breakfast. The bread is useful for scooping up soft eggs.
Cheese: Add a slice of cheese while the bread is still warm. The residual heat softens the cheese, creating a simple and satisfying snack.
Jam or fruit preserves: A lightly sweet topping works particularly well with the plain version or cinnamon variation.
Honey: Drizzle a small amount over the bread for a gentle sweetness.
Cream cheese: Spread cream cheese over a cooled slice for a creamy contrast to the soft bread.
Tomato soup: The savory version pairs beautifully with tomato soup. You can use the bread to soak up the soup or serve it on the side.
Vegetable soup: A warm mug bread can turn a simple bowl of vegetable soup into a more substantial meal.
Chicken dishes: Garlic or herb bread works well alongside cooked chicken and vegetables.
Hummus: Spread hummus over the slices for a savory snack with a creamy texture.
Peanut butter: A small amount of peanut butter makes the plain or lightly sweet version suitable for breakfast or an afternoon snack.
Fresh fruit: Serve the cinnamon variation with banana slices, strawberries, or other fruit for a simple sweet plate.
Troubleshooting Common Problems
Why Did My Mug Bread Not Rise?
There are several possible reasons. Your baking powder may be old, the batter may have been mixed unevenly, or the quantity of flour may have been too high.
Check the expiry date of the baking powder and make sure it is distributed throughout the flour before adding the wet ingredients.
Also check the container size. A very wide bowl may make the bread appear shorter even when it has risen properly.
Why Is My Bread Dense?
Dense bread often results from too much flour, insufficient baking powder, or an overly thick batter.
Measure the flour accurately and add milk gradually until the mixture becomes thick but spoonable.
Avoid kneading or mixing the batter for an extended period. A quick stir is sufficient to combine the ingredients.
Why Is the Center Still Wet?
The center may need more cooking time, especially if the mug is narrow or the batter is deep.
Return the mug to the microwave and cook in 15–20 second intervals. Check the center after each interval until it is fully set.
Do not rely only on the surface appearance because the top can look cooked while the middle remains underdone. The egg-containing batter must reach a safe internal temperature of 74°C (165°F).
Why Is the Bread Rubbery?
Rubbery texture is commonly caused by overcooking. Microwaves can remove moisture from a small portion of bread very quickly.
Use a shorter initial cooking time and increase it gradually. The bread should be cooked through but not heated for much longer than necessary.
Overmixing may also contribute to a tougher texture, so stir the batter only until the ingredients are combined.
Why Is the Bread Dry?
Too much flour or too little liquid can make the bread dry. Overcooking is another common cause.
Check your measurements and avoid packing the flour into the spoon. If the batter is extremely stiff before cooking, add milk a teaspoon at a time.
A small amount of butter, oil, or yogurt can also improve tenderness.
Why Did the Bread Overflow?
The mug may be too small, or the batter may have filled too much of the container.
Use a larger microwave-safe mug or bowl and leave enough room for the mixture to rise. If necessary, divide the batter between two smaller containers.
Do not fill the mug to the top before cooking.
Why Did the Bread Stick to the Mug?
The container may not have been greased sufficiently, or the bread may have been removed before it had a chance to rest.
Lightly grease the inside of the mug before adding the batter. Once the bread has finished cooking, allow it to rest for a minute or two before loosening the edges with a small spatula.
Why Does the Bread Taste Like Flour?
The batter may not have been mixed thoroughly, or the bread may be undercooked.
Scrape the bottom and sides of the bowl while mixing so no dry flour remains. Then cook the bread until the center is fully set.
If the bread is properly cooked but still tastes floury, check your measurements and try adding a small amount of salt, butter, cheese, or herbs to improve the flavor.
Why Is the Top Pale?
Microwave cooking heats food differently from an oven or grill. It cooks the interior efficiently but usually does not produce the same browned crust as conventional baking.
A pale top is normal for microwave mug bread. The bread in the picture has a more golden appearance, which can be difficult to reproduce with a microwave alone.
For a more toasted finish, carefully slice the cooked bread and brown the cut surfaces in a lightly greased skillet. Alternatively, use a suitable oven or grill to finish it, following the appliance manufacturer’s safety instructions.
Can You Make Mug Bread Without an Egg?
Yes, but the texture will be different because the egg contributes moisture, binding, and structure.
You can experiment with 1 tablespoon of plain yogurt and a little additional milk as a substitute. Another option is a commercial egg replacer intended for baking, used according to its instructions.
Because different substitutes behave differently in microwave recipes, the cooking time and liquid quantity may need adjustment. The finished bread may be slightly more fragile or less airy than the egg version.
Can You Make Microwave Mug Bread Without Milk?
Yes. You can replace the milk with water or an unsweetened plant-based milk.
Water produces a simpler flavor, while soy milk or another suitable plant-based milk may provide a richer result. Start with the same quantity and add more only if the batter appears too thick.
The bread may be slightly less rich without dairy milk, but butter or oil can help maintain a tender texture.
Can You Make It Without Butter?
Yes. Replace the butter with the same quantity of neutral vegetable oil.
Oil contributes moisture without adding a strong flavor. If you prefer a buttery taste but do not have butter available, a small amount of olive oil can work in the savory variation, although it may give the bread a more noticeable flavor.
Avoid adding too much fat because an oily batter can interfere with the final texture.
Can You Prepare the Batter in Advance?
For the best rise, mix and cook the batter immediately after combining the wet and dry ingredients.
Once the baking powder becomes wet, its rising action begins. Leaving the batter for a long time before cooking can reduce the amount of rise.
If you want to save time, measure the dry ingredients into a clean container in advance and keep the wet ingredients separate. When you are ready to eat, combine everything and cook it immediately.
Do not leave batter containing raw egg at room temperature for an extended period.
Can You Store Leftover Mug Bread?
This recipe is designed to make a small portion, so it is best enjoyed fresh. If you have leftovers, allow them to cool and place them in a clean, airtight container in the refrigerator within two hours of cooking.
For best quality, eat refrigerated leftovers within 2–3 days. Reheat them until thoroughly hot, adding a small amount of butter if the bread has become dry.
You can reheat a slice in the microwave for approximately 10–20 seconds to begin with, adjusting the time according to its thickness and your microwave’s power. Avoid overheating it, as repeated microwave heating can make the texture tough.
Do not leave cooked bread containing egg at room temperature for more than two hours, or more than one hour when the surrounding temperature is above 32°C (90°F).
Can You Freeze Microwave Mug Bread?
You can freeze the cooked bread if you want to prepare a portion ahead of time, although its texture may change slightly after thawing.
Allow the bread to cool completely, then wrap it securely or place it in a freezer-safe container. If slicing it before freezing, separate the slices with small pieces of baking paper so they are easier to remove individually.
For the best quality, use the frozen bread within about one month. Thaw it in the refrigerator or reheat it carefully from frozen until thoroughly hot.
A freshly cooked portion will generally have a softer texture, so freezing is best treated as a convenient storage option rather than the preferred method.
Tips for Making the Recipe Even Better
Use a kitchen scale if you have one. Weighing the flour can improve consistency because tablespoon measurements vary according to how the flour is scooped.
Use room-temperature milk and egg when convenient. They combine easily with the other ingredients, although it is not necessary to wait for them to reach room temperature if you are preparing a quick snack.
Avoid adding too many heavy ingredients. Large quantities of cheese, seeds, vegetables, or other additions can make the bread dense and affect its cooking time.
If you want to add vegetables, use small quantities of finely chopped, cooked vegetables that have been drained of excess moisture. Raw vegetables containing a lot of water can change the batter’s consistency.
For a more even shape, use a wider microwave-safe bowl instead of a very narrow mug. A wider container makes it easier to mix the batter and can reduce the difference between the cooking time at the edges and the center.
Let the bread cool slightly before cutting. Cutting it immediately while it is extremely hot can cause the soft crumb to tear or compress.
If you want a golden finish, use a skillet or suitable oven or grill after the bread has cooked through. A microwave by itself usually cannot brown the surface in the same way as an oven.
A Simple Breakfast Using Microwave Mug Bread
This bread can form the base of a quick breakfast when you want something warm but do not have time to prepare a full loaf.
Begin by preparing the savory version with a little cheese and dried herbs. While the bread rests, cook an egg in a separate pan or prepare scrambled eggs.
Slice the bread and spread a little butter over the warm surface. Serve it with the eggs and a piece of fruit or some sliced vegetables.
If you prefer a sweeter breakfast, prepare the cinnamon variation and serve it with yogurt and fruit. You can also add a little peanut butter or cream cheese for a different flavor.
The main advantage of this recipe is its flexibility. You can keep the basic mixture simple and change the toppings according to what you already have in the kitchen.
Frequently Asked Questions
Is microwave mug bread the same as regular bread?
No. Traditional bread is commonly made with yeast or other leavening methods and may require kneading, proofing, and baking. Microwave mug bread is a quick bread with a softer, more cake-like crumb. It is intended for convenience rather than as an exact replacement for a conventional loaf.
Does this recipe need yeast?
No. Baking powder provides the rise, so yeast is unnecessary.
How long does microwave mug bread take to make?
Preparation generally takes about five minutes, and cooking takes approximately 1–3 minutes, depending on the microwave and container. Allow another minute or two for resting.
Can I make two servings at once?
Yes, but it is usually more reliable to divide the batter between two microwave-safe mugs. Doubling the batter in one deep container can increase the cooking time and make it harder to cook the center evenly.
Can I use self-rising flour?
Yes, but self-rising flour already contains a raising agent. Omit the additional baking powder initially and check the flour packaging. The result may vary according to the flour’s formulation.
Can I make this bread without salt?
Yes. You can omit the salt, although the bread may taste less flavorful. Herbs, cheese, or other seasonings can help add flavor if desired.
Can I make it in a bowl instead of a mug?
Yes. Use a microwave-safe bowl of suitable size. A wider bowl produces a flatter bread, which may cook more evenly and be easier to slice.
Can I toast microwave mug bread?
Yes. Once the bread is fully cooked, slice it and brown the surfaces in a lightly greased skillet. Watch it carefully because thin slices can brown quickly.
Can I make the bread sweeter?
Yes. Add a small amount of sugar, honey, or cinnamon and omit the savory seasonings. Adjust the liquid slightly if necessary to maintain a thick, spoonable batter.
Why does the bread look different from oven-baked bread?
Microwave mug bread cooks through steam and rapid heating rather than the dry heat used in conventional baking. As a result, its surface is usually paler and its texture more tender than a traditional loaf.
Is it possible to make the bread fluffier?
Use fresh baking powder, measure the flour carefully, avoid overmixing, and cook only until the center is set. These steps help create a lighter texture.
Can I eat the bread straight from the mug?
Yes. Let it rest briefly so it is not excessively hot, then eat it with a spoon or carefully remove it onto a plate.
Final Thoughts
Fluffy microwave mug bread is a practical recipe for anyone who wants warm homemade bread without the time and effort involved in making a full loaf. With a handful of everyday ingredients, a few minutes of preparation, and a microwave, you can create a soft, tender portion that is easy to customize.
The secret is to measure the flour accurately, distribute the baking powder evenly, mix the batter gently, and check the center carefully while cooking. Because every microwave is different, short cooking intervals are more reliable than using one long cooking time.
Enjoy the bread with melted butter, cheese, eggs, jam, honey, soup, or your favorite spread. Once you are comfortable with the basic recipe, experiment with garlic, herbs, whole-wheat flour, cinnamon, or other additions to suit your taste.
For the closest result to the bread pictured, use a generous microwave-safe mug, keep the batter moist but thick, cook it until fully set, and slice it after a brief rest. The result is a convenient, freshly made bread that can turn an ordinary breakfast or snack into something warm and comforting.