admin1
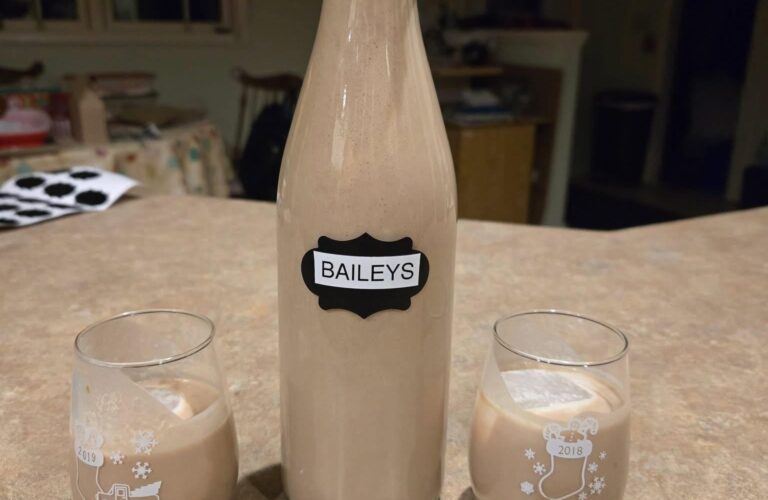
Homemade Nonalcoholic Irish Cream
Introduction
Homemade Irish cream is known for its luxurious, creamy texture and its delicious combination of chocolate, coffee, vanilla, and caramel flavors. This nonalcoholic version captures that familiar dessert-like taste using simple ingredients that are easy to find in most grocery stores.
The recipe combines creaminess from milk and cream, sweetness from condensed milk, and depth from cocoa powder, coffee, and vanilla extract. A little caramel flavor adds warmth and richness, while the balanced combination of ingredients creates a smooth mixture that can be served chilled, stirred into coffee, or used to make desserts.
One of the best things about preparing a homemade cream mixture is that you can adjust the sweetness, chocolate flavor, and consistency according to your preferences. You can make it lighter for coffee, thicker for dessert toppings, or more intensely flavored with cocoa and vanilla.
Preparation Time
Preparation time: 10 minutes
Chilling time: 2 hours
Total time: Approximately 2 hours and 10 minutes
Yield: Approximately 3 cups
Difficulty: Easy
Ingredients
Main Ingredients
1 cup heavy cream or whipping cream
1 cup whole milk
1 can sweetened condensed milk, approximately 300–395 grams depending on the product size
2 tablespoons unsweetened cocoa powder
1 teaspoon instant coffee granules
2 teaspoons pure vanilla extract
1 tablespoon caramel sauce
A small pinch of salt
Optional Ingredients
1 tablespoon chocolate syrup for a stronger chocolate flavor
1 teaspoon maple syrup for additional sweetness and warmth
1–2 tablespoons additional milk if you prefer a thinner consistency
A little extra vanilla extract for a more pronounced vanilla aroma
Equipment Needed
A medium-sized mixing bowl
A whisk or electric hand mixer
A small bowl for mixing cocoa powder
Measuring cups and spoons
A clean bottle or airtight container
A refrigerator
Instructions
Step 1: Prepare the Cocoa Mixture
Begin by placing the cocoa powder in a small bowl. Add approximately two tablespoons of the measured milk and mix thoroughly until the cocoa dissolves into a smooth paste.
This step is important because cocoa powder can form lumps when added directly to a large quantity of cold liquid. Creating a smooth paste first helps distribute the chocolate flavor evenly throughout the finished mixture.
If the cocoa powder seems particularly dry, add another teaspoon of milk and continue mixing until the paste becomes smooth.
Set the cocoa mixture aside while you prepare the remaining ingredients.
Step 2: Dissolve the Coffee
Place the instant coffee granules in a small cup and add one tablespoon of warm water. Stir until the granules dissolve completely.
Allow the coffee mixture to cool before adding it to the cream mixture.
Coffee adds depth to the chocolate flavor without necessarily making the finished drink taste strongly of coffee. If you prefer a milder flavor, use half a teaspoon of instant coffee instead.
Avoid adding a large amount of hot liquid because it can unnecessarily thin the finished mixture.
Step 3: Combine the Milk and Cream
Pour the heavy cream and the remaining milk into a medium-sized mixing bowl.
Whisk gently until the two ingredients are evenly combined.
There is no need to whip the cream into stiff peaks. The goal is to create a smooth liquid mixture rather than whipped cream.
Heavy cream produces a richer result, while a combination of whole milk and light cream creates a lighter consistency.
Step 4: Add the Condensed Milk
Pour the sweetened condensed milk into the bowl containing the milk and cream.
Whisk slowly until the condensed milk is completely incorporated.
Sweetened condensed milk provides sweetness and a silky texture. It also helps give the mixture its characteristic dessert-like richness.
Taste a small amount and consider whether you prefer the final result to be sweeter. Remember that the cocoa and coffee will add bitterness that balances the sweetness.
Step 5: Add the Chocolate
Add the prepared cocoa paste to the cream mixture.
Whisk thoroughly, making sure that the chocolate is evenly distributed throughout the liquid.
Scrape the sides and bottom of the bowl to incorporate any cocoa mixture that may have collected there.
If you prefer a stronger chocolate flavor, add a tablespoon of chocolate syrup and mix again.
The mixture should look uniform, with no visible cocoa lumps.
Step 6: Add the Coffee
Pour the cooled coffee mixture into the bowl.
Whisk gently until the coffee is completely incorporated.
Coffee and chocolate complement each other particularly well. The coffee adds complexity and helps balance the sweetness of the condensed milk.
For a more subtle flavor, use less coffee. For a mocha-inspired version, increase the coffee slightly while keeping the overall liquid quantity balanced.
Step 7: Add the Vanilla and Caramel
Add the vanilla extract, caramel sauce, and a small pinch of salt.
Whisk until everything is thoroughly combined.
Vanilla provides a warm, sweet aroma, while caramel adds a deeper flavor that makes the mixture taste more like a luxurious dessert.
The pinch of salt is optional, but it can help balance the sweetness and bring out the chocolate flavor.
Avoid adding too much salt, as a small amount is sufficient.
Step 8: Blend for a Silky Texture
For the smoothest consistency, transfer the mixture to a blender.
Blend on low speed for approximately 15–20 seconds, just until the ingredients are fully combined.
Do not blend for too long, particularly if you are using heavy cream, because excessive blending can begin to thicken the cream.
If you do not have a blender, a whisk works perfectly well. Simply whisk until the mixture looks smooth and uniform.
Step 9: Adjust the Consistency
Check the consistency of your homemade cream mixture.
If it is too thick for drinking or stirring into coffee, add one tablespoon of milk at a time until it reaches the desired texture.
If you want a thicker dessert topping, use a little less milk in the original mixture.
Keep in mind that the mixture may become slightly thicker after chilling.
Step 10: Chill the Mixture
Pour the finished mixture into a clean, airtight container or bottle.
Place it in the refrigerator for at least two hours before serving.
Chilling allows the flavors to blend together and helps the mixture develop a more balanced taste.
Once chilled, gently shake or stir the mixture before serving if any ingredients have settled.
Step 11: Serve and Enjoy
Serve the homemade cream chilled in a small glass, or add a little to a cup of coffee, hot chocolate, or a milkshake.
You can also drizzle it over vanilla ice cream, chocolate cake, brownies, or other desserts.
For an attractive presentation, dust the top of a dessert with a little cocoa powder or add a small amount of chocolate syrup.
Tips for the Best Results
Use fresh dairy ingredients. Fresh cream and milk provide the best flavor and texture.
Choose unsweetened cocoa powder. Sweetened cocoa mixes can make the finished recipe excessively sweet.
Dissolve the coffee before adding it. This helps prevent granules from remaining in the mixture.
Add flavorings gradually. Vanilla, coffee, caramel, and cocoa can all become overpowering if used excessively.
Chill before serving. The flavor is generally more balanced after the ingredients have had time to blend.
Use a clean container. This helps maintain the quality of the mixture during refrigerated storage.
Shake gently before serving. A little separation can occur naturally in a homemade dairy mixture.
Serving Suggestions
With Coffee
Add one or two tablespoons to a cup of coffee for a creamy, chocolate-vanilla flavor.
With Hot Chocolate
Stir a small amount into prepared hot chocolate for a richer, more dessert-like drink.
With Milkshakes
Blend with cold milk and vanilla ice cream to create a creamy chocolate-coffee milkshake.
With Desserts
Drizzle over brownies, chocolate cake, pancakes, waffles, or vanilla ice cream.
With Overnight Oats
Add a spoonful to a bowl of overnight oats for a sweet vanilla and cocoa flavor.
Flavor Variations
Chocolate Version
Add another tablespoon of cocoa powder dissolved in a little milk. This produces a more pronounced chocolate flavor.
Vanilla Version
Increase the vanilla extract slightly and reduce the coffee to create a softer, more vanilla-forward flavor.
Caramel Version
Add an extra teaspoon of caramel sauce and a small pinch of salt for a caramel-inspired variation.
Mocha Version
Increase the instant coffee slightly and add a little extra cocoa powder for a stronger mocha flavor.
Lighter Version
Replace some of the heavy cream with additional whole milk. The result will be less rich but still creamy.
Storage Instructions
Keep the mixture refrigerated in a clean, airtight container.
Because this recipe contains dairy and has not been commercially processed, it should be treated as a perishable homemade food. Use it within approximately 3–4 days, provided it has been kept continuously refrigerated at 4°C or below, and discard it sooner if its appearance, smell, or texture changes.
Do not leave it at room temperature for extended periods. Avoid returning a serving glass or used spoon to the storage container.
Freezing is not recommended because dairy mixtures can separate or become grainy after thawing.
Frequently Asked Questions
Can I make this recipe without a blender?
Yes. A whisk is sufficient as long as you dissolve the cocoa powder and coffee separately before combining them with the dairy ingredients.
Can I make it less sweet?
You can reduce the quantity of condensed milk, but doing so will also make the mixture less thick. Add milk or cream gradually until the texture is suitable.
Can I use low-fat milk?
Yes. Low-fat milk works, although the finished mixture will be less rich than one prepared with whole milk and heavy cream.
Why is my mixture too thick?
The cream may be particularly rich, or the mixture may have thickened during chilling. Stir in a little milk until the consistency is right.
Why does the mixture taste bitter?
Too much coffee or cocoa can create bitterness. Add a little more milk or condensed milk to balance the flavor.
Can I use it in baking?
Yes. Small amounts can be added to cake batters, brownie mixtures, frosting, or dessert sauces. Adjust other liquid and sugar quantities in the recipe accordingly.
Is this the same as commercial Baileys Irish Cream?
No. This is a nonalcoholic, Irish cream-inspired recipe. Commercial Baileys Original Irish Cream contains alcohol and has a different ingredient composition and production process.
Final Notes
This homemade nonalcoholic Irish cream-inspired mixture is easy to prepare, requires no cooking, and uses familiar ingredients. Its combination of cream, condensed milk, cocoa, coffee, vanilla, and caramel creates a smooth, sweet flavor that works especially well in coffee and desserts.
For the best result, mix the ingredients thoroughly, chill the finished mixture, and serve it cold. Keep it refrigerated and enjoy it within the recommended storage period.
Add a clear ingredient weight conversionClarify the condensed milk quantity