admin1
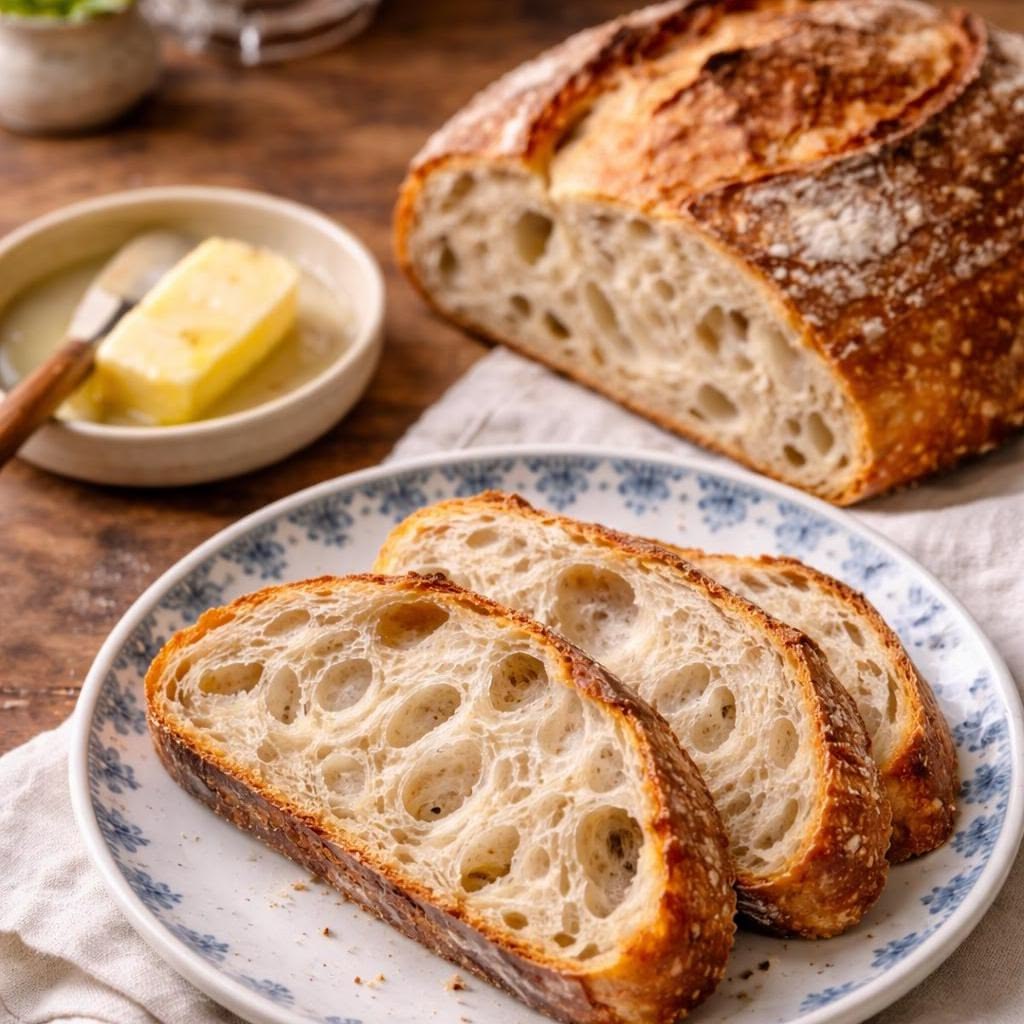
Classic artisan sourdough bread is one of the most rewarding and deeply satisfying homemade breads enjoyed across many parts of the world. Its popularity comes from its thick, shattering crust, open, irregular crumb, complex tangy flavor, beautiful scored surface, and the way it fills the kitchen with an incomparable aroma that no other bread can quite match. A freshly baked sourdough loaf can be enjoyed sliced alongside butter and cheese, as the base for an exceptional sandwich, served with soups and stews, toasted with avocado and eggs, gifted to friends and family, or simply whenever a deeply flavorful, handcrafted bread is desired.
Unlike commercially yeasted bread that rises quickly and bakes in under an hour, classic artisan sourdough relies on the slow, patient process of wild yeast fermentation, which develops a depth of flavor, a uniquely chewy texture, and a crust that crackles dramatically when first sliced. This comprehensive recipe explains every stage of preparation in detail, from building an active sourdough starter to mixing, fermenting, shaping, scoring, and baking the final loaf.
Introduction
Sourdough bread has been made for thousands of years, long before commercial yeast was ever developed, using only flour, water, and the wild yeasts and bacteria naturally present in the environment. The result of this ancient process is a bread with a flavor profile impossible to replicate with commercial yeast, characterized by a gentle tang, a complex wheaty sweetness, and a texture that ranges from silky and open to dense and hearty depending on the flour and technique used. The artisan sourdough revival of recent years has brought this craft back into countless home kitchens, with bakers discovering the meditative, deeply satisfying experience of nurturing a starter and developing the intuitive feel for the dough that comes with practice.
The bread relies on maintaining an active, healthy sourdough starter, mixing the dough at the right hydration level, developing the gluten through a series of stretch and fold cycles during bulk fermentation, and then baking in a covered Dutch oven that traps steam and creates the dramatic oven spring and crust that defines a truly great sourdough loaf. This characteristic makes classic artisan sourdough bread especially rewarding to prepare at home because every loaf reflects the baker’s growing skill and intuition, and every bake teaches something new. The resulting bread is naturally tangy, complex, and deeply satisfying.
Homemade classic artisan sourdough bread requires flour, water, salt, an active sourdough starter, and time above all else. Even beginners can successfully prepare it with patience and attention to a few key principles.
Yield
This recipe produces one round or oval sourdough loaf weighing approximately 900 grams to 1 kilogram.
Preparation Time
- Levain Build: 4 to 6 hours
- Autolyse: 1 hour
- Bulk Fermentation: 4 to 6 hours
- Shaping and Cold Proof: 8 to 16 hours (overnight)
- Baking: 45 to 50 minutes
- Cooling: 1 hour minimum
- Total Active Time: Approximately 2 hours
- Total Elapsed Time: Approximately 18 to 24 hours
Main Ingredients
- 450 grams bread flour or all-purpose flour
- 325 grams room temperature water (approximately 72 to 75 percent hydration)
- 9 grams fine sea salt
- 100 grams active sourdough starter (at peak activity)
Additional Optional Ingredients
- 50 grams whole wheat flour, substituted for part of the bread flour for extra depth
- 50 grams rye flour, substituted for extra fermentation activity and nuttiness
- A handful of seeds such as sesame, poppy, or sunflower, pressed onto the outside of the loaf
- A sprinkle of dried rosemary or other herbs, incorporated into the dough
- Roasted garlic cloves, gently folded in during shaping
- Olives, roughly chopped and folded into the dough
- Walnuts and dried cranberries, folded in for a sweet-savory loaf
- Caraway seeds, folded in for a rye-inspired flavor
- Cooked, cooled grains such as oats or millet, folded in for extra nutrition and texture
Equipment Required
- Kitchen scale (essential for precise measurement)
- Large mixing bowl
- Bench scraper
- Banneton proofing basket (or a bowl lined with a floured towel)
- Dutch oven with a lid (a 4 to 5 quart size is ideal)
- Sharp bread lame or razor blade, for scoring
- Parchment paper
- Clean kitchen towels
- Oven thermometer (optional but helpful)
- Spray bottle with water (optional)
Choosing the Perfect Flour and Maintaining an Active Starter
The quality of the flour and the activity of the starter directly affect the final rise, flavor, and texture of the loaf. Selecting the right ingredients is therefore extremely important.
Choose a strong bread flour with a high protein content, ideally between 11 and 13 percent, which provides the strong gluten network needed to trap the gases produced during fermentation and support a good oven spring.
Check that the sourdough starter is at its absolute peak activity before using it, with visible bubbles throughout, a domed surface, and a pleasant, mildly tangy aroma, since this is when the wild yeast is most vigorous.
Avoid using freshly milled flour without any prior experience of its behavior, and avoid a starter that has not been fed recently or shows signs of separation or discoloration.
Building the Levain (Optional but Recommended)
- Several hours before mixing the dough, prepare a levain by combining a small amount of your starter with fresh flour and water.
- Mix together 20 grams of starter, 40 grams of flour, and 40 grams of water in a small jar.
- Allow this to ferment for four to six hours until it doubles in size and shows abundant bubbles.
- Using a fresh levain at its peak gives the bread a more consistent and reliable rise.
Autolyse: Mixing Flour and Water First
- In a large mixing bowl, combine the flour and most of the water, holding back about 25 grams of water for later.
- Mix until no dry flour remains and a rough, shaggy dough forms.
- Cover and allow the mixture to rest undisturbed for thirty minutes to one hour.
The autolyse rest allows the flour to fully hydrate and begins gluten development naturally, making the dough easier to work with and contributing to a more open final crumb.
Adding the Starter and Salt
- After the autolyse, add the active starter to the dough.
- Use your fingers to incorporate it, working it through the dough using pinching and folding motions.
- Dissolve the salt in the reserved water and add it to the dough.
- Continue working the dough until the starter, salt, and water are fully incorporated and the dough feels cohesive and tacky but not sticky.
Primary Bulk Fermentation Process
- Cover the bowl and begin the bulk fermentation at room temperature, ideally between 75 and 78°F (24 to 26°C).
- During the first two hours, perform a set of stretch and folds every thirty minutes for a total of four sets.
- For each stretch and fold, wet your hand slightly, grasp one side of the dough, stretch it upward firmly until it resists, then fold it over to the opposite side of the bowl.
- Rotate the bowl ninety degrees and repeat, completing all four sides of the dough in one set.
- After completing the four sets of stretch and folds, allow the dough to ferment undisturbed for the remaining time.
- Bulk fermentation is complete when the dough has increased in volume by approximately fifty to seventy-five percent, feels airy and domed, and small bubbles are visible on the surface and sides.
Understanding Fermentation and Flavor Levels
Every kitchen environment and sourdough starter behaves slightly differently.
- A warmer kitchen accelerates fermentation; a cooler kitchen slows it dramatically.
- A longer, slower bulk fermentation at a cooler temperature develops a more pronounced, complex sour flavor.
- Learning to read the dough by feel and appearance, rather than relying solely on timing, is the most important skill in sourdough baking.
- Over-fermented dough loses its structure and cannot hold its shape during scoring or baking.
Pre-Shaping the Dough
- Gently turn the bulk-fermented dough out onto a clean, unfloured work surface.
- Using a bench scraper and your free hand, fold the edges of the dough toward the center to create surface tension.
- Flip the dough smooth-side up and use the bench scraper to drag it gently toward you a few times, building a tight, rounded surface.
- Leave the pre-shaped round uncovered on the bench for twenty to thirty minutes to rest.
Final Shaping
- After the bench rest, gently flip the dough over onto a lightly floured surface, rough side up.
- Pull the top of the dough up and fold it toward the center.
- Fold the sides in, then roll the dough toward you from the bottom to create a tight, smooth ball (for a round boule) or an oval (for a batard).
- Flip the shaped loaf smooth-side down into a well-floured banneton or a bowl lined with a generously floured towel.
- Dust the exposed dough surface generously with flour.
Optional Topping and Add-In Techniques
Some people prefer a classic plain sourdough while others enjoy extra texture or flavor embedded in the loaf.
For a simple finish:
- Bake the shaped loaf plain, with only the scored pattern on top.
For a seeded finish:
- Before placing the dough smooth-side down in the banneton, press the smooth side into a plate of seeds to coat the outer surface.
For a filled loaf:
- During final shaping, scatter additions such as roasted garlic, olives, or walnuts across the surface of the dough and roll them in as the loaf is shaped.
Cold Proofing Overnight
- Cover the banneton loosely with a large plastic bag or plastic wrap.
- Place the dough in the refrigerator to proof overnight, for a minimum of eight hours and up to sixteen hours.
- The cold proof slows fermentation dramatically, develops flavor, and makes the dough easier to handle and score.
Primary Baking Process
- At least one hour before baking, preheat the oven to 500°F (260°C) with the Dutch oven and its lid inside.
- Remove the chilled dough from the refrigerator.
- Cut a piece of parchment paper to fit inside the Dutch oven.
- Gently flip the cold dough out of the banneton onto the parchment paper, smooth-side up.
- Using a sharp bread lame or razor blade, score the top of the dough quickly and decisively with one or more cuts.
- Carefully lower the dough into the preheated Dutch oven using the parchment paper as a sling.
- Replace the lid and bake covered for 20 minutes.
- Remove the lid and continue baking for 20 to 25 more minutes until the crust is deeply golden brown.
- Remove the loaf from the Dutch oven and place it directly on the oven rack for the final five minutes of baking for maximum crust crispness.
Cooling the Finished Loaf
- Transfer the baked loaf to a wire rack.
- Do not slice the bread for at least one hour, and ideally two hours, after baking.
- The internal structure of the bread continues to set during cooling, and cutting too early results in a gummy, underdeveloped crumb.
Traditional Serving Method
- Slice the fully cooled loaf using a sharp serrated knife.
- Serve alongside good quality butter and sea salt.
- Enjoy at room temperature for the best flavor.
Elegant Presentation Method
- Present the whole scored loaf on a wooden cutting board, highlighting the beautiful crust pattern.
- Slice a few pieces and fan them out beside the loaf.
- Offer a small dish of cultured butter, olive oil for dipping, and a selection of accompaniments such as cheese and jam.
This presentation works beautifully for casual dinner parties and shared meals.
Whole Wheat Sourdough Bread
Ingredients: Bread base, whole wheat flour
Method:
- Replace 100 grams of the bread flour with whole wheat flour for a heartier, nuttier flavor and a slightly denser crumb.
Rye Sourdough Bread
Ingredients: Bread base, rye flour
Method:
- Replace 50 to 100 grams of the bread flour with dark rye flour for a deeply earthy, aromatic variation.
Seeded Sourdough Bread
Ingredients: Bread base, mixed seeds
Method:
- Press the shaped dough into a mixture of sesame, poppy, and sunflower seeds before placing in the banneton.
Rosemary Garlic Sourdough Bread
Ingredients: Bread base, roasted garlic, fresh rosemary
Method:
- Fold roasted garlic cloves and freshly chopped rosemary into the dough during the final shaping.
Olive Sourdough Bread
Ingredients: Bread base, pitted olives
Method:
- Roughly chop pitted olives and fold them into the dough during the final set of stretch and folds.
Walnut and Cranberry Sourdough
Ingredients: Bread base, walnuts, dried cranberries
Method:
- Fold toasted walnuts and dried cranberries into the dough during the final shaping for a sweet-savory, festive loaf.
High Hydration Open Crumb Sourdough
Ingredients: Bread base, increased water
Method:
- Increase the water to 340 to 360 grams for a wetter, more challenging dough that produces a more open, airy crumb structure.
Overnight Country Sourdough
Ingredients: Bread base, mixed flour blend
Method:
- Use a blend of bread flour, whole wheat, and rye for a deeply complex, country-style loaf with exceptional flavor.
Discard Sourdough Bread
Ingredients: Bread base, a small amount of commercial yeast, sourdough discard
Method:
- Use sourdough discard rather than an active starter and add a small pinch of instant yeast to ensure adequate rise for a quicker bake with sourdough flavor.
Sourdough Focaccia Style Bake
Ingredients: Bread base, high hydration, olive oil
Method:
- Use the same dough at a higher hydration and bake it in a well-oiled baking pan instead of a Dutch oven, dimpling generously with your fingers before baking, for a sourdough focaccia variation.
Nutritional Information
Classic artisan sourdough bread naturally contains:
- Carbohydrates
- Protein
- Iron
- B vitamins
- Dietary fiber (higher when whole grain flours are included)
The exact nutritional content varies depending on the specific flour blend and fermentation time used.
Common Mistakes
- Using an inactive or under-fed starter with insufficient bubbling activity.
- Skipping the autolyse rest, missing an important step in gluten development.
- Over-fermenting the bulk dough, causing it to lose structure and become difficult to shape.
- Under-fermenting the dough, resulting in a dense loaf with insufficient oven spring.
- Not building enough surface tension during shaping, causing the loaf to spread flat during baking.
- Scoring too shallowly or too hesitantly, limiting oven spring.
- Not preheating the Dutch oven long enough, resulting in insufficient steam and poor crust development.
- Slicing the loaf before it has cooled fully, causing a gummy interior.
- Using too little flour in the banneton, causing the dough to stick when turned out.
- Ignoring the feel and appearance of the dough in favor of following a strict timetable.
Storage Guidelines
- Store the fully cooled loaf at room temperature, cut-side down on a wooden board or in a paper bag.
- Avoid storing in a plastic bag, which can soften the crust quickly.
- Consume within three to four days for best quality.
- As the loaf stales, it becomes excellent for toast or for making homemade croutons.
Freezing Instructions
Classic artisan sourdough bread freezes very well.
- Allow the loaf to cool completely before freezing.
- Slice the loaf before freezing if individual slices will be needed.
- Wrap tightly in plastic wrap, then in foil or a freezer bag.
- Freeze for up to three months.
- Thaw at room temperature, then warm briefly in the oven at 350°F for ten to fifteen minutes to refresh the crust.
Creative Uses for Leftover Bread
- Slice thickly and make exceptional toast with butter and jam.
- Use as the base for a bruschetta with fresh tomatoes and olive oil.
- Cut into cubes and bake into croutons for salads and soups.
- Use thick slices to make a deeply flavorful grilled cheese.
- Tear into pieces and serve alongside soups and stews for dipping.
Party Serving Suggestions
Offer flavored butters such as honey butter, herb butter, or sea salt butter alongside for guests to enjoy.
Bake the bread one to two days ahead and allow the flavor to continue developing.
Present the whole loaf on a wooden board as a dramatic table centerpiece.
Slice at the table for a satisfying shared experience.
Pair with a selection of artisan cheeses, olive oil, and charcuterie for a complete sharing board.