admin1
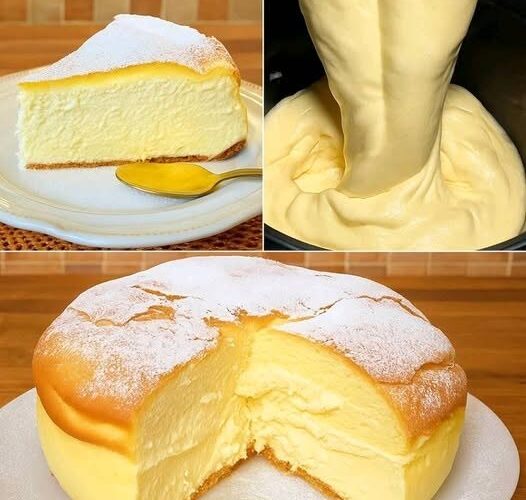
Easy cloud cake is one of the lightest and most delicate desserts enjoyed across many parts of the world. Its popularity comes from its incredibly airy, pillowy texture, subtle sweetness, melt-in-the-mouth quality, and the way it manages to feel like eating a soft, sweet cloud. A slice of fresh cloud cake can be enjoyed during afternoon tea, light dessert moments after dinner, birthday celebrations, springtime gatherings, or simply whenever a delicate, low-fuss homemade treat is desired.
Unlike denser butter cakes, cloud cake relies almost entirely on whipped eggs to create its signature lightness, resulting in a dessert that feels remarkably soft and airy with very few ingredients. The technique may look delicate at first, but with a few simple tips, it becomes an easy and reliable bake. This comprehensive recipe explains every stage of preparation in detail, from selecting the right eggs to serving the final cake.
Introduction
Cloud cake belongs to a family of light, whipped-egg desserts often referred to as foam cakes, where the structure comes primarily from air trapped in beaten eggs rather than from butter or heavy leavening agents. This style of baking has remained beloved across generations because it produces a uniquely soft, almost weightless texture that pairs beautifully with fruit, cream, or a simple dusting of sugar. The cake’s signature lightness comes from carefully whipping eggs to maximum volume and gently folding in the remaining ingredients.
The cake relies on a careful balance of whipped egg whites and yolks, combined with a small amount of flour and sugar, to create a structure that rises high and stays remarkably soft. This characteristic makes cloud cake especially rewarding to bake at home because it requires no special equipment beyond a mixer and a few careful folding techniques. The resulting dessert is naturally airy, delicate, and satisfying.
Homemade easy cloud cake requires only a handful of simple ingredients, basic kitchen equipment, and careful attention to folding technique. Even beginners can successfully prepare it with a little patience.
Choosing the Perfect Eggs
The quality and freshness of the eggs directly affects how well the cake rises and holds its airy structure. Selecting the right eggs is therefore extremely important.
Choose the freshest eggs available, since fresher eggs tend to whip to a more stable, voluminous foam. Look for eggs with clean, uncracked shells and a recent purchase date.
Eggs at room temperature whip more easily and to a greater volume than cold eggs straight from the refrigerator.
Avoid eggs with cracked shells or an unusual smell, and avoid using eggs that have just come out of the refrigerator without allowing them time to warm slightly.
Separating and Preparing the Eggs
- Carefully separate each egg, placing the whites in a large, completely grease-free mixing bowl and the yolks in a separate medium bowl.
- Take extra care to avoid any yolk getting into the whites, as even a small amount of fat can prevent the whites from whipping properly.
- Let the separated eggs sit at room temperature for about fifteen minutes before beginning to whip.
Sifting the Dry Ingredients
- Sift the flour into a small bowl to remove any lumps and aerate it slightly.
- If using cocoa powder for a variation, sift it together with the flour at this stage.
- Set the sifted flour aside, ready for folding into the batter later.
Letting the Eggs Reach Room Temperature
Allowing the eggs to warm slightly before whipping helps achieve maximum volume.
- If the eggs were refrigerated, let the separated whites and yolks sit covered at room temperature for ten to fifteen minutes.
- This small step makes a noticeable difference in how easily the whites whip to stiff peaks.
Primary Baking Process
- Preheat the oven to 325°F (163°C). Do not grease the cake pan, as the batter needs to cling to the sides to rise properly.
- In the bowl of egg yolks, whisk together half of the sugar, vanilla extract, and a pinch of salt until pale and slightly thickened.
- Gently fold the sifted flour into the yolk mixture until just combined.
- In the large bowl of egg whites, add the cream of tartar and beat on medium speed until foamy.
- Gradually add the remaining sugar while continuing to beat, increasing to high speed, until stiff, glossy peaks form.
- Gently fold one-third of the whipped egg whites into the yolk mixture to lighten it.
- Carefully fold in the remaining egg whites in two more additions, taking care not to deflate the batter.
- Pour the batter into the ungreased cake pan and smooth the top gently.
- Bake for 35 minutes, or until the top springs back lightly when touched and a toothpick inserted comes out clean.
Understanding Whipping and Folding Levels
Every batch of eggs and personal technique can vary slightly.
- Slightly under-whipped whites can result in a denser, less airy cake.
- Over-whipped whites can become dry and difficult to fold in smoothly.
- Always check for glossy, stiff peaks that hold their shape without becoming clumpy or dry-looking.
- Folding too vigorously can deflate the batter, resulting in a flatter finished cake.
Optional Cooling and Inversion Techniques
Some bakers use a simple cooling method while others prefer the traditional inverted cooling approach used for very light, airy cakes.
For a simple approach:
- Let the cake cool directly in the pan on a wire rack.
For the traditional inverted approach:
- Immediately after baking, invert the cake pan over a wire rack or bottle neck, allowing the cake to cool upside down.
For the most stable rise:
- Use the inverted cooling method, which helps prevent the delicate structure from collapsing as it cools.
Making a Light Whipped Cream Topping
Many people enjoy finishing the cake with a simple whipped cream topping.
- In a chilled bowl, whip fresh cream with a touch of sugar and vanilla extract until soft peaks form.
- Spread or pipe the whipped cream over the cooled cake just before serving.
- Garnish with fresh berries, if desired.
Simple Plain Version
Many people enjoy the cloud cake in its plain, unadorned form.
The naturally light, delicate texture and subtle sweetness already create a satisfying dessert on its own.
Simply skip the whipped cream topping and dust the cooled cake lightly with powdered sugar before serving.
Cooling the Finished Cake
- If using the inverted method, let the cake cool completely upside down for at least thirty minutes before removing it from the pan.
- If cooling directly in the pan, allow it to cool fully on a wire rack before attempting to remove it.
- Once cooled, run a thin knife gently around the edges to loosen the cake before turning it out.
Traditional Serving Method
- Slice the cooled cake into even wedges using a sharp knife.
- Plate each slice individually.
- Serve at room temperature, plain or with a light topping.
Elegant Presentation Method
- Place a slice at the center of a decorative plate.
- Add a dollop of freshly whipped cream beside the slice.
- Garnish with fresh berries and a sprig of mint.
- Dust lightly with powdered sugar just before serving.
This presentation works well for tea parties and light, elegant gatherings.
Lemon Cloud Cake Variation
Ingredients: Cake base, lemon zest
Method:
- Fold lemon zest into the yolk mixture before combining with the egg whites.
This version adds a bright, citrusy note throughout the cake.
Chocolate Cloud Cake
Ingredients: Cake base, cocoa powder
Method:
- Replace a small portion of the flour with sifted cocoa powder.
- Fold gently into the yolk mixture as directed.
This variation creates a light, airy chocolate version of the classic cake.
Almond Cloud Cake
Ingredients: Cake base, almond extract
Method:
- Replace the vanilla extract with almond extract for a subtly nutty flavor.
Berry-Filled Cloud Cake
Ingredients: Cake base, fresh berries
Method:
- Once the cake has cooled and been sliced in half horizontally, spread a layer of fresh berries and a little whipped cream in the center before reassembling.
Honey Drizzled Cloud Cake
Ingredients: Cake base, honey
Method:
- Drizzle a thin layer of honey over the cooled cake before serving.
This adds a subtle, natural sweetness.
Cinnamon Spiced Cloud Cake
Ingredients: Cake base, ground cinnamon
Method:
- Fold a small pinch of ground cinnamon into the flour before sifting it into the yolk mixture.
Mini Cloud Cakes
Ingredients: Cake base, muffin tin
Method:
- Divide the batter among an ungreased muffin tin instead of a single cake pan.
- Reduce baking time to fifteen to eighteen minutes.
This version is perfect for individual servings.
Fruit Preserve Filled Cloud Cake
Ingredients: Cake base, fruit preserves
Method:
- Slice the cooled cake in half horizontally.
- Spread a thin layer of fruit preserves between the layers before reassembling.
Coconut Cloud Cake
Ingredients: Cake base, shredded coconut
Method:
- Sprinkle shredded coconut over the top of the whipped cream topping for a light, tropical finish.
Layered Cloud Cake Trifle
Ingredients: Cake base, whipped cream, fresh fruit
Method:
- Cube the cooled cake and layer it in a trifle dish with whipped cream and fresh fruit, similar to a classic trifle assembly.
Yield
This recipe produces one 9-inch round cake, yielding approximately eight to ten slices.
Preparation Time
- Preparation: 20 minutes
- Baking: 35 minutes
- Cooling: 30 minutes
- Total Time: Approximately 1 hour 25 minutes
Main Ingredients
- 6 large eggs, separated
- ½ cup granulated sugar, divided
- ½ cup all-purpose flour
- ¼ teaspoon cream of tartar
- ½ teaspoon vanilla extract
- A pinch of salt
Additional Optional Ingredients
- Zest of 1 lemon
- ½ teaspoon almond extract
- 1 cup fresh whipped cream, for topping
- Fresh berries, for garnish
- A light dusting of powdered sugar
- ¼ cup unsweetened cocoa powder (for a chocolate variation, reducing flour slightly)
- A drizzle of honey
- A few mint leaves, for garnish
- A spoonful of fruit preserves, for filling
- A pinch of cinnamon
Equipment Required
- 9-inch round cake pan, ungreased
- Large mixing bowl
- Medium mixing bowl
- Hand mixer or stand mixer
- Rubber spatula
- Fine mesh sieve, for sifting flour
- Measuring cups
- Measuring spoons
- Wire cooling rack
- Sharp knife for slicing
Nutritional Information
Easy cloud cake naturally contains:
- Protein
- Carbohydrates
- Riboflavin
- Selenium
- Vitamin B12
The exact nutritional content varies depending on the specific ingredients and toppings used.
Common Mistakes
- Allowing any yolk to get into the egg whites, preventing them from whipping properly.
- Using a greased cake pan, which can prevent the batter from climbing the sides as it rises.
- Overmixing the batter after folding in the egg whites, deflating the structure.
- Underwhipping the egg whites, resulting in a denser cake.
- Overwhipping the egg whites until they become dry and clumpy.
- Opening the oven door too early during baking.
- Skipping the inverted cooling method when a very stable rise is desired.
- Slicing the cake before it has fully cooled.
- Folding too roughly instead of gently incorporating the egg whites.
- Measuring the flour inaccurately, which can affect the cake’s structure.
Storage Guidelines
- Store the cake in an airtight container at room temperature.
- Keep away from direct sunlight or heat sources.
- Consume within two to three days for best texture, as the airy structure is most delicate when fresh.
- Refrigerate if topped with whipped cream, and consume within one to two days.
Freezing Instructions
Easy cloud cake can be frozen for future enjoyment, though it is best without any cream topping.
- Allow the plain cake to cool completely before freezing.
- Wrap individual slices or the whole cake tightly in plastic wrap, then in foil.
- Place in a freezer-safe container or bag.
- Freeze for up to one month.
- Thaw at room temperature for a couple of hours before serving.
- Add any whipped cream or fresh topping after thawing rather than before freezing.
Creative Uses for Leftover Cake
- Cube the cake and layer it into a quick trifle with fruit and cream.
- Use as a light base for a berry shortcake.
- Toast lightly and serve with a drizzle of honey.
- Crumble over a bowl of fresh fruit for added texture.
- Use as a base for individual dessert cups with whipped cream and fruit.
Party Serving Suggestions
- Prepare the cake a few hours ahead, adding toppings just before serving for the freshest presentation.
- Slice into smaller wedges for easy sharing at gatherings.
- Offer a side of fresh berries and whipped cream for guests to add as they like.
- Use a decorative cake stand for an elegant table presentation.
- Garnish the serving platter with fresh mint and a few extra berries for a polished look.