admin1
Restaurant-Style Tandoori Chicken Tikka Recipe
Introduction
Tandoori Chicken Tikka is a popular South Asian dish known for its bright red color, smoky aroma, juicy chicken, and rich combination of spices. It is commonly served in Pakistani and Indian restaurants alongside fragrant basmati rice, fresh naan, mint chutney, sliced onions, and lemon wedges. The chicken is marinated in yogurt, ginger, garlic, lemon juice, and a carefully balanced mixture of traditional spices before being grilled until the outside develops a beautifully charred coating while the inside remains tender and flavorful.
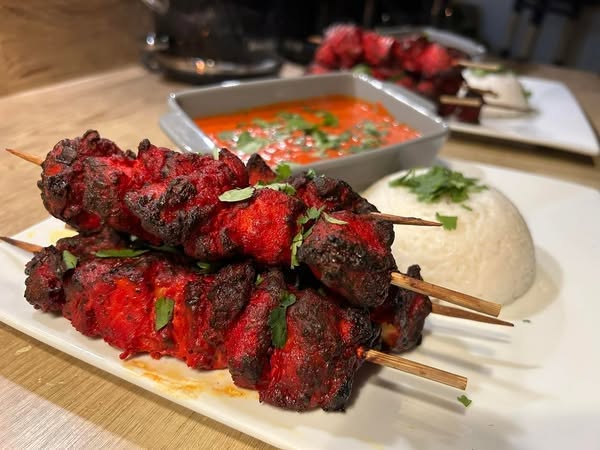
The dish shown in the picture features large pieces of red-marinated chicken threaded onto wooden skewers and grilled until they develop dark, smoky edges. Fresh coriander leaves provide a burst of color and freshness, while the accompanying white rice and creamy orange curry make the meal look like a restaurant-style feast.
The wonderful thing about homemade chicken tikka is that you do not need a traditional clay tandoor to achieve excellent results. You can prepare it in an oven, on a barbecue grill, in an air fryer, or on a stovetop grill pan. The secret lies in the marinade, the quality of the chicken, the marinating time, and the cooking technique.
This recipe explains everything in detail, including the ingredients, preparation, marination, cooking methods, serving suggestions, storage instructions, and professional tips for achieving delicious, restaurant-style chicken tikka at home.
Recipe Overview
Preparation time: 30 minutes
Marination time: 4–12 hours for the best flavor
Cooking time: 20–30 minutes, depending on the cooking method and size of the chicken pieces
Total time: Approximately 5–13 hours, including marination
Servings: 4–6 people
Cuisine: Pakistani and Indian
Main ingredient: Boneless chicken
Cooking methods: Oven, barbecue grill, air fryer, or stovetop grill pan
Flavor profile: Smoky, savory, mildly tangy, aromatic, and richly spiced
Texture: Tender and juicy inside with lightly charred edges
Difficulty level: Moderate, with simple preparation steps
Ingredients for Tandoori Chicken Tikka
For the Chicken
You will need approximately 1 kilogram of boneless chicken, preferably boneless chicken thighs if you want particularly juicy and tender results. Chicken breast can also be used when you prefer leaner meat, but it requires careful cooking because it can become dry if left on the heat for too long.
Cut the chicken into medium-sized cubes, approximately 4–5 centimeters wide. Try to keep the pieces reasonably similar in size so they cook evenly. Pieces that are too small can dry out quickly, while excessively large pieces may take longer to cook in the center.
If you prefer a traditional restaurant presentation, you can use larger chunks of chicken threaded closely together on skewers, similar to the chicken pieces shown in the picture.
For the First Marinade
Use 2 tablespoons of fresh lemon juice. Lemon juice adds brightness, balances the richness of the yogurt, and helps the spices taste fresher.
Add 1 tablespoon of ginger-garlic paste. This is one of the most important ingredients in the marinade because ginger provides warmth and garlic adds a savory aroma.
Add 1 teaspoon of salt, adjusting the amount according to your taste and the saltiness of the other ingredients.
Mix these ingredients with the chicken and allow them to rest for approximately 15–20 minutes while you prepare the second marinade.
For the Yogurt Marinade
Add 1 cup of thick, plain yogurt. Greek yogurt or strained homemade yogurt works particularly well because it clings to the chicken instead of running off.
If your yogurt contains a lot of water, place it in a fine strainer lined with clean muslin cloth for 20–30 minutes. Removing excess moisture helps create a thicker marinade and encourages better browning during cooking.
Add 2 tablespoons of neutral cooking oil or mustard oil. Mustard oil gives the chicken a distinctive traditional aroma, while sunflower or canola oil provides a milder flavor.
Add 1 tablespoon of lemon juice if you prefer a tangier taste.
Add 1 tablespoon of ginger-garlic paste if you have not already included enough in the first marinade.
Add 1 teaspoon of Kashmiri red chili powder for a deep red color and gentle warmth. Kashmiri chili powder is generally milder than many hotter chili powders, making it useful when you want an attractive red coating without excessive heat.
Add ½ teaspoon of hot red chili powder if you enjoy a spicier version. Reduce or omit it if you prefer a mild dish.
Add 1 teaspoon of ground coriander for a fresh, earthy flavor.
Add 1 teaspoon of ground cumin for warmth and depth.
Add 1 teaspoon of garam masala for a fragrant blend of spices.
Add ½ teaspoon of turmeric powder for an earthy background flavor and a warm golden undertone.
Add 1 teaspoon of paprika if you want a richer red color and a mild pepper flavor.
Add 1 teaspoon of crushed dried fenugreek leaves, commonly known as kasuri methi. Rub the leaves gently between your palms before adding them to release their aroma.
Add ½ teaspoon of black pepper for a subtle peppery finish.
Add ½ teaspoon of chaat masala for a tangy, restaurant-style flavor. You can also reserve it for sprinkling over the cooked chicken.
Add 1 teaspoon of cornstarch or chickpea flour if your yogurt marinade is too loose. This is optional, but a small amount can help the coating cling to the chicken and reduce excess moisture.
For a richer restaurant-style version, you can add 1 tablespoon of cream. This produces a slightly smoother marinade, although it is not necessary for excellent chicken tikka.
For the Smoky Restaurant-Style Finish
Prepare 1 tablespoon of melted butter or ghee for brushing the chicken during the final minutes of cooking.
Keep 1 fresh lemon ready for serving.
Chop 2 tablespoons of fresh coriander leaves.
Prepare a little additional chaat masala for finishing.
If you enjoy a smoky flavor, cook the chicken over charcoal or use a barbecue grill. An optional traditional smoke-infusion technique can also be used, but it must be performed carefully with a food-safe, heat-resistant setup.
Equipment You Will Need
You will need a large mixing bowl, a sharp kitchen knife, a cutting board, measuring spoons, and a refrigerator-safe container for marinating the chicken.
For skewered chicken tikka, use metal skewers or wooden skewers. If you use wooden skewers, soak them in water for approximately 30 minutes before cooking to reduce the risk of scorching. Keep in mind that soaking does not make wooden skewers completely fireproof.
An oven-safe tray with a wire rack is useful for oven cooking because the hot air can circulate around the chicken.
A barbecue grill is ideal for achieving a smoky flavor, while an air fryer is convenient for smaller batches. A heavy grill pan also works well when cooking indoors.
Always use separate plates and utensils for raw chicken and cooked food to prevent cross-contamination.
Step-by-Step Preparation
Step 1: Select and Prepare the Chicken
Begin by selecting fresh chicken from a reliable source. Boneless thighs are an excellent choice because their slightly higher fat content helps them remain juicy during grilling. Chicken breast is also suitable, especially when cut into evenly sized cubes and cooked carefully.
Trim away any unwanted pieces of fat, cartilage, or connective tissue. Cut the chicken into medium-sized chunks using a clean cutting board and sharp knife.
Do not cut the chicken into extremely tiny pieces. Larger chunks are more likely to retain moisture and create the substantial, satisfying appearance seen in restaurant-style tikka.
Avoid washing raw chicken in the sink because splashing water can spread bacteria onto nearby surfaces. If the chicken is particularly wet, pat it dry with disposable paper towels before adding the marinade.
Place the prepared chicken in a large bowl.
Step 2: Apply the First Marinade
Add the lemon juice, salt, and ginger-garlic paste to the chicken.
Use clean hands or a spoon to mix everything thoroughly. Make sure the seasoning touches all the pieces.
Allow the chicken to rest for 15–20 minutes in the refrigerator while you prepare the yogurt marinade.
This first stage introduces a simple layer of seasoning before the richer mixture is added. It also gives the ginger, garlic, and lemon time to begin flavoring the surface of the meat.
Avoid leaving the chicken at room temperature for an extended period. Raw chicken should be kept refrigerated during marination.
Step 3: Prepare the Yogurt and Spice Mixture
In a separate bowl, add the thick yogurt, oil, Kashmiri chili powder, paprika, ground coriander, ground cumin, garam masala, turmeric, black pepper, dried fenugreek leaves, and optional hot chili powder.
Add the remaining ginger-garlic paste if desired.
Stir until the mixture becomes smooth and evenly colored. The yogurt should turn a rich reddish-orange shade, with the spices distributed throughout.
Taste a tiny amount of the marinade before it touches the raw chicken and adjust the salt, acidity, or spice level as needed.
If you want a brighter red color, increase the Kashmiri chili powder slightly rather than relying entirely on food coloring. The final color will depend on the spices used, the cooking temperature, and the amount of browning.
Add the optional cream if you want a smoother, richer coating.
The marinade should be thick enough to cling to the back of a spoon. If it looks watery, strain the yogurt more thoroughly or add a small amount of chickpea flour or cornstarch.
Step 4: Combine the Chicken with the Marinade
Transfer the yogurt mixture into the bowl containing the chicken.
Mix carefully until every piece is coated. Pay attention to the sides and undersides of the chunks, where the marinade can sometimes collect unevenly.
The chicken should be covered in a generous layer of red marinade, similar to the vivid coating visible in the picture.
Cover the bowl or transfer everything to a sealed food-safe container.
Place it in the refrigerator for at least 4 hours. If possible, marinate it for 8–12 hours to develop a deeper flavor.
Overnight marination can work well, but avoid unnecessarily prolonged marination in a highly acidic mixture because the surface texture may become soft or mealy.
Do not reuse marinade that has been in contact with raw chicken as a finishing sauce unless it is thoroughly cooked. The easiest approach is to prepare a separate portion of sauce for serving.
Step 5: Prepare the Skewers
Remove the marinated chicken from the refrigerator shortly before cooking, keeping the total time outside refrigeration brief.
Thread the chicken pieces onto the skewers.
Leave a small amount of space between pieces so heat can reach the surfaces. Pressing the pieces too tightly together may cause them to steam rather than brown.
If you are using metal skewers, make sure the handles are positioned safely away from direct heat where possible.
If you are using wooden skewers, soak them in water for approximately 30 minutes and use them according to the manufacturer’s guidance.
Brush the chicken lightly with a little oil if the marinade appears dry on the surface.
At this stage, the skewers should look richly coated in red marinade and be ready for grilling.
Cooking Method 1: Oven-Baked Tandoori Chicken Tikka
Oven cooking is one of the easiest ways to prepare this recipe at home, especially when a barbecue is unavailable.
Step 1: Preheat the Oven
Preheat the oven to 220°C, or approximately 425°F.
If your oven has a convection setting, you can use it to encourage more even browning. Keep in mind that convection ovens may cook slightly faster, so begin checking the chicken earlier.
Place a wire rack over a baking tray and lightly grease the rack. The tray will catch drippings, while the rack allows hot air to circulate around the chicken.
If you do not have a wire rack, you can arrange the skewers directly on a suitable baking tray, turning them during cooking.
Step 2: Arrange the Chicken
Place the skewers on the rack with space between them.
Do not crowd the tray. If the skewers are packed together, moisture can collect around the chicken and prevent the edges from becoming nicely browned.
Slide the tray into the preheated oven.
Step 3: Cook the First Side
Cook for approximately 10–12 minutes, depending on the size of the pieces and your oven.
The marinade should begin to set, and the chicken may develop small brown spots around the edges.
Avoid opening the oven repeatedly because doing so releases heat and can lengthen the cooking time.
Step 4: Turn the Skewers
Carefully turn the skewers using heat-resistant tongs.
Cook for another 8–12 minutes, checking the thickest pieces for doneness.
If you want a more intensely grilled appearance, use the oven’s broiler or grill setting for the final 2–4 minutes. Watch continuously during this stage because the yogurt, spices, and natural sugars can darken quickly.
The dark spots should look like delicious charred edges rather than completely burned surfaces.
Step 5: Brush with Butter
During the final few minutes, lightly brush the chicken with melted butter or ghee.
This creates a glossy finish and adds a rich, savory aroma.
Do not add excessive butter, as too much fat can drip onto the tray and create smoke.
Step 6: Check for Safe Doneness
The chicken must reach an internal temperature of 74°C, or 165°F, measured with a food thermometer in the thickest piece.
Do not rely solely on the exterior color because red spices can make cooked chicken look different from unseasoned chicken.
Once the chicken reaches the safe temperature, remove it from the oven and allow it to rest for approximately 3–5 minutes before serving.
Cooking Method 2: Barbecue-Grilled Chicken Tikka
A barbecue grill gives chicken tikka an especially appealing smoky flavor and makes it ideal for outdoor meals, family gatherings, and special occasions.
Step 1: Prepare the Grill
Preheat the grill to medium-high heat.
If you are using a charcoal barbecue, allow the charcoal to become hot and develop a layer of ash before cooking. Position the chicken where it can cook over steady heat without being exposed to excessive flames.
Clean and lightly oil the grill grates to reduce sticking.
Step 2: Place the Skewers on the Grill
Arrange the chicken skewers over the grill.
Leave enough space between them for heat circulation. The marinade should begin to sizzle as it contacts the hot cooking surface.
Avoid placing the chicken directly over large flames because the oil and marinade can drip and cause flare-ups.
Step 3: Turn Regularly
Cook for approximately 15–25 minutes, turning the skewers every few minutes.
The exact cooking time depends on the size of the chicken pieces, the heat of the grill, and whether the grill lid is open or closed.
As the chicken cooks, the exterior will begin to develop reddish-brown patches and darker grilled edges.
If the surface becomes too dark before the center is cooked, move the skewers to a cooler area of the grill and continue cooking until they reach the safe internal temperature.
Step 4: Add the Final Flavor
Brush the chicken lightly with butter or ghee during the final minutes.
For a fresh finish, sprinkle a little chaat masala over the cooked chicken and squeeze fresh lemon juice on top.
The result should be smoky, juicy chicken with a flavorful coating and attractive charred edges.
Cooking Method 3: Air Fryer Chicken Tikka
An air fryer is a convenient choice when you want to prepare a smaller batch without using a large oven.
Step 1: Preheat the Air Fryer
Preheat the air fryer to 200°C, or approximately 400°F, if your model recommends preheating.
Lightly grease the basket or use an air-fryer-safe accessory suitable for your appliance.
Step 2: Arrange the Chicken
Place the chicken pieces in a single layer.
If your air fryer basket is small, cook the chicken in batches. Overcrowding the basket prevents hot air from circulating properly and can result in uneven browning.
You can use skewers only if they fit safely inside your appliance and are approved for that model. Otherwise, cook the chicken pieces directly in the basket.
Step 3: Cook Until Browned
Cook for approximately 12–18 minutes, turning the pieces halfway through.
Large chunks may need additional time, while smaller pieces can cook more quickly.
Check the chicken’s internal temperature with a food thermometer and ensure it reaches 74°C, or 165°F.
Step 4: Finish with Butter
Brush lightly with melted butter during the last 1–2 minutes if desired.
Allow the chicken to rest briefly before serving.
Air-fried chicken tikka may not have exactly the same smoky flavor as charcoal-grilled chicken, but it can still develop a delicious, browned exterior and tender center.
Cooking Method 4: Stovetop Grill Pan Chicken Tikka
If you do not have an oven, barbecue, or air fryer, a stovetop grill pan is an excellent alternative.
Step 1: Heat the Pan
Place a heavy grill pan over medium-high heat.
Allow it to heat thoroughly before adding the chicken. A properly heated pan helps the surface brown instead of releasing too much moisture.
Lightly brush the pan with cooking oil.
Step 2: Add the Chicken
Remove excess marinade from the outside of each piece, leaving enough coating to preserve the flavor.
Place the chicken in the pan without overcrowding it.
You may need to cook in several batches to achieve the best results.
Step 3: Turn the Pieces
Cook each side for several minutes, turning as needed so the chicken develops color on multiple surfaces.
If the outside is browning too quickly, lower the heat slightly and continue cooking.
For larger pieces, you can cover the pan briefly to help the center cook, then uncover it toward the end to encourage browning.
Step 4: Finish and Rest
Brush lightly with butter or ghee and check that the thickest pieces reach 74°C, or 165°F.
Remove the chicken from the pan and allow it to rest for 3–5 minutes before serving.
How to Achieve the Bright Red Restaurant Color
One of the most noticeable features of the chicken in the picture is its vibrant red coating. This color can be achieved naturally through a combination of Kashmiri chili powder and paprika.
Kashmiri chili powder is particularly useful because it provides strong color without necessarily making the food extremely spicy.
Paprika adds another layer of red color and a gentle pepper flavor.
The yogurt helps the spices cling to the chicken, while oil supports browning during grilling.
As the chicken cooks, the marinade gradually darkens and develops reddish-brown areas. The combination of red seasoning and dark grilled patches creates the characteristic restaurant-style appearance.
Food coloring is optional in some commercial preparations, but it is not necessary for a flavorful homemade version. If you choose to use any food coloring, use only an approved food-grade product and follow its label directions.
Remember that the color of the finished chicken does not determine whether it is fully cooked. Always check the internal temperature.
Preparing the Rice Shown in the Picture
The chicken tikka in the photograph is served with a mound of white rice. Fragrant basmati rice is a particularly good accompaniment because its light texture balances the rich, spicy chicken.
Ingredients for Basmati Rice
You will need 2 cups of basmati rice, 3 cups of water depending on the rice and cooking method, 1 teaspoon of salt, and 1 teaspoon of butter or oil if desired.
You can also add one small cinnamon stick, two green cardamom pods, or one bay leaf for a fragrant variation.
Step 1: Wash the Rice
Place the rice in a bowl and rinse it several times with fresh water until the water becomes clearer.
This removes excess surface starch and helps the grains remain separate after cooking.
Step 2: Soak the Rice
Soak the rice for approximately 20–30 minutes if the package directions recommend soaking.
Drain thoroughly before cooking.
Step 3: Boil the Water
Bring the measured water to a boil in a saucepan.
Add the salt and optional butter or oil.
If you want fragrant rice, add the whole spices at this stage.
Step 4: Add the Rice
Add the drained rice and stir gently once.
Reduce the heat, cover the pan, and cook according to the rice package directions. Depending on the rice, water ratio, and cooking method, this may take approximately 10–15 minutes.
Avoid repeatedly lifting the lid because escaping steam can affect the cooking process.
Step 5: Rest the Rice
When the water has been absorbed and the rice is tender, remove the pan from the heat.
Let it stand, covered, for approximately 5–10 minutes.
Fluff gently with a fork before serving.
The finished rice should be soft, fragrant, and reasonably separate rather than sticky or watery.
Creamy Orange Curry to Serve Alongside the Chicken
The photograph also shows a creamy orange-colored curry or sauce behind the chicken. A mild tomato-based curry is a suitable accompaniment because its smooth texture balances the charred chicken.
This sauce is optional, and chicken tikka can also be served with mint chutney, yogurt sauce, or a simple lemon dressing.
Ingredients for the Creamy Tomato Sauce
You will need 2 tablespoons of butter, 1 tablespoon of cooking oil, 1 small finely chopped onion, 2 teaspoons of ginger-garlic paste, 2 cups of crushed tomatoes or tomato purée, ½ teaspoon of ground cumin, ½ teaspoon of ground coriander, ½ teaspoon of paprika, ½ teaspoon of garam masala, salt to taste, and ¼–½ cup of cream.
You will also need approximately ½ cup of water or stock, depending on the consistency you prefer.
Step 1: Cook the Onion
Heat the butter and oil in a saucepan over medium heat.
Add the chopped onion and cook for approximately 5–7 minutes, stirring regularly, until softened.
The onion does not need to become very dark. A soft, lightly golden onion provides a pleasant background flavor.
Step 2: Add the Ginger and Garlic
Add the ginger-garlic paste.
Cook for another 30–60 seconds, stirring continuously so it does not stick or burn.
The mixture should become fragrant.
Step 3: Add the Tomatoes and Spices
Stir in the crushed tomatoes, cumin, coriander, paprika, garam masala, and salt.
Add the water or stock and bring the mixture to a gentle simmer.
Cook for approximately 12–15 minutes, stirring occasionally, until the tomatoes lose their raw taste and the sauce begins to thicken.
Step 4: Blend the Sauce
For a smooth, restaurant-style consistency, carefully blend the sauce using an immersion blender.
If using a countertop blender, allow the sauce to cool slightly and follow the blender manufacturer’s instructions for hot liquids.
Return the sauce to the pan.
Step 5: Add the Cream
Reduce the heat to low and stir in the cream.
Warm gently without allowing the sauce to boil vigorously.
Taste and adjust the seasoning.
The finished sauce should be smooth, creamy, and orange-red. If it is too thick, add a little water or stock. If it is too thin, simmer gently until it reaches your preferred consistency.
Serve it in a separate dish beside the chicken and rice, just as you might in a restaurant-style meal.
Fresh Mint and Yogurt Chutney
Mint chutney adds freshness and a cooling contrast to the spices in chicken tikka.
Ingredients
Use 1 cup of fresh mint leaves, ½ cup of fresh coriander leaves, ½ cup of plain yogurt, 1–2 tablespoons of lemon juice, ½ teaspoon of roasted cumin powder, a small green chili if desired, and salt to taste.
Preparation
Wash the mint and coriander thoroughly and drain them well.
Place the herbs in a blender with the yogurt, lemon juice, cumin powder, optional green chili, and salt.
Blend until smooth.
If the chutney is too thick, add a teaspoon of water at a time until it reaches the desired consistency.
Taste and adjust the lemon juice and salt.
Refrigerate until serving.
The finished chutney should be bright green, creamy, and refreshing. Serve it in a small bowl alongside the chicken tikka.
Fresh Onion and Lemon Garnish
A simple onion garnish makes the meal look more attractive and adds a crisp texture.
Thinly slice one red onion and separate the rings.
Place the onion in a bowl and add a small squeeze of lemon juice, a pinch of salt, and a little chopped coriander.
Mix gently and allow the onions to rest for 5–10 minutes.
Arrange the onion slices on the serving platter or place them in a separate dish.
Cut a lemon into wedges and serve them beside the chicken.
If you enjoy extra spice, you can add thinly sliced green chilies to the garnish, but this is entirely optional.
How to Arrange the Chicken Tikka Like a Restaurant
Choose a large white serving plate to make the bright red chicken stand out.
Place the cooked skewers across the center of the plate, allowing some of the wooden or metal handles to extend beyond the edge where safe and practical.
Arrange the skewers so that the grilled chicken pieces overlap slightly, creating height and a generous presentation.
Place a neat mound of basmati rice on one side of the plate.
Garnish the chicken with freshly chopped coriander leaves and a light sprinkle of chaat masala.
Arrange lemon wedges near the chicken so that everyone can squeeze fresh lemon juice over their portion.
Serve the creamy tomato sauce in a separate shallow bowl. If you prefer, you can add a small drizzle of the sauce to the rice rather than pouring it over all the chicken.
Place the mint chutney and onion salad nearby.
For a complete restaurant-style meal, serve warm naan or roti alongside the chicken and rice.
The key to an attractive presentation is to keep the plate organized. Avoid pouring too much sauce over the grilled chicken because doing so can hide its beautiful charred exterior.
Important Tips for Juicy Chicken Tikka
Choose the Right Cut of Chicken
Boneless chicken thighs are particularly forgiving because they retain moisture well during grilling.
Chicken breast works too, but it benefits from evenly sized pieces, sufficient marination, and careful temperature monitoring.
Use Thick Yogurt
Thin yogurt can make the marinade watery and prevent the chicken from browning effectively.
Strained yogurt creates a thicker coating that stays on the chicken during cooking.
Avoid Excessive Acid
Lemon juice adds a pleasant tang, but too much acid or excessively long marination can affect the chicken’s surface texture.
Use the suggested quantity and keep the chicken refrigerated.
Do Not Overcrowd the Skewers
Leave a little space between pieces.
This allows the hot air to circulate and helps the chicken develop a better exterior.
Preheat the Cooking Equipment
A properly preheated oven, grill, air fryer, or grill pan helps the chicken begin browning promptly.
Starting with equipment that is too cool may result in a pale, watery coating.
Control the Heat
High heat encourages browning, but excessively intense heat can burn the outside before the center is fully cooked.
If the marinade darkens too quickly, reduce the heat or move the chicken to a cooler area of the grill.
Use Butter at the Right Time
Brushing with butter or ghee near the end of cooking adds flavor and shine.
Applying too much at the beginning may cause excessive dripping or smoking.
Let the Chicken Rest
A brief resting period after cooking helps the juices settle.
Do not leave the chicken sitting out for a long time. Serve it while warm and handle leftovers promptly.
Common Mistakes and How to Avoid Them
One common mistake is using watery yogurt. The marinade may slide off the chicken, leaving the pieces unevenly coated. Strain the yogurt before mixing it with the spices.
Another mistake is cutting the chicken into pieces of very different sizes. Small pieces may dry out before large pieces finish cooking. Try to keep the chunks reasonably uniform.
Using too little seasoning can make the chicken taste bland, while adding too much chili powder may overpower the other flavors. Measure the spices carefully and adjust the heat to suit your preferences.
Overcrowding the baking tray or air fryer basket is another frequent problem. Chicken releases moisture as it cooks, and crowded pieces may steam instead of developing a browned exterior. Cook in batches when necessary.
Leaving the chicken on the heat for too long can make it tough and dry. Use a food thermometer to determine when it reaches 74°C, or 165°F.
Finally, do not judge doneness only by the red marinade. Spices may remain vividly colored even after the chicken is cooked. Temperature is the most reliable check.
Variations You Can Try
Extra-Spicy Chicken Tikka
For a hotter version, increase the hot red chili powder slightly and add a small amount of crushed green chili to the marinade.
Keep the Kashmiri chili powder for color, and balance the heat with yogurt and lemon juice.
Mild Family-Style Chicken Tikka
For a milder version, omit the hot chili powder and reduce the amount of black pepper.
Use Kashmiri chili powder or paprika for color without adding too much heat.
Garlic Butter Chicken Tikka
Mix softened butter with finely minced garlic and a little chopped coriander.
Brush a small amount over the chicken during the final minutes of cooking.
This variation produces a richer garlic aroma and works especially well with naan or rice.
Creamy Chicken Tikka
Add 1 tablespoon of cream to the marinade and serve the cooked chicken with a small bowl of creamy tomato sauce.
This version is suitable for anyone who enjoys a smoother, richer flavor.
Lemon and Herb Chicken Tikka
Increase the fresh coriander and add a little lemon zest to the marinade.
Keep the spice mixture balanced so the herbs and citrus remain noticeable.
Boneless Chicken Tikka Bites
Instead of using skewers, cut the chicken into slightly smaller cubes and cook them in an oven, air fryer, or grill pan.
Turn the pieces during cooking and check that they reach the required internal temperature.
These bite-sized pieces are convenient for wraps, rice bowls, and lunch boxes.
Chicken Tikka Wraps
Place the cooked chicken inside warm naan or flatbread.
Add shredded lettuce, sliced onions, cucumber, and mint-yogurt chutney.
Roll tightly and serve immediately.
Chicken Tikka Rice Bowl
Place basmati rice in a bowl and top it with chicken tikka, cucumber, tomato, fresh coriander, and a spoonful of yogurt sauce.
Add lemon juice just before eating.
Chicken Tikka Salad
Allow the cooked chicken to cool slightly, then serve it over lettuce, cucumber, tomatoes, and red onions.
Use a yogurt-and-lemon dressing to complement the spices.
Chicken Tikka with Naan
Serve the chicken with warm naan, mint chutney, and onion salad.
The bread can be used to scoop up the chicken and sauce, creating a satisfying restaurant-style meal.
Storage and Food Safety
If you have leftover chicken tikka, place it in a clean, shallow, airtight container and refrigerate it within 2 hours of cooking, or within 1 hour if the surrounding temperature is above 32°C, or 90°F.
Refrigerated cooked chicken is generally best used within 3–4 days.
For longer storage, freeze the cooked chicken in a suitable airtight container. For the best quality, use it within approximately 2–3 months.
Thaw frozen chicken in the refrigerator rather than leaving it on the counter.
When reheating, heat the chicken thoroughly to 74°C, or 165°F. You can use an oven, stovetop pan, or air fryer. Add a small amount of water or sauce if necessary to help prevent the chicken from drying out.
Do not store cooked chicken in the same uncovered container used for raw chicken.
Discard chicken that has been left at unsafe temperatures for too long. Smell and appearance alone cannot reliably establish whether food is safe.
Frequently Asked Questions
Can I make chicken tikka without yogurt?
Yes. You can use a suitable unsweetened dairy-free yogurt alternative or create a spice marinade using oil, lemon juice, ginger, garlic, and seasonings. The texture and flavor will differ slightly, but the chicken can still be delicious.
Can I prepare the marinade the night before?
Yes. You can mix the yogurt, spices, ginger, and garlic in advance and refrigerate the marinade in a sealed container. For the best results, add the chicken and marinate it in the refrigerator for approximately 8–12 hours.
Why does my chicken tikka release water?
This can happen when the chicken is very wet, the yogurt is thin, or the cooking tray is overcrowded. Pat the chicken dry before marinating, use strained yogurt, and leave sufficient space between the pieces.
Why is my chicken tikka not red enough?
The color depends on the type and amount of chili powder or paprika used. Kashmiri chili powder is particularly helpful for a naturally vibrant red appearance. Cooking can darken the coating, so do not add excessive spice simply to achieve a particular color.
Can I use chicken with bones?
Yes. Bone-in chicken can be marinated with the same general seasoning mixture, but the cooking time will be longer and depends on the size and cut. Check the thickest part without touching the bone to ensure the chicken reaches a safe internal temperature.
Can I cook the chicken without skewers?
Absolutely. Arrange the marinated chicken pieces on a lightly greased baking tray or in an air fryer basket. Turn them during cooking to brown the surfaces evenly.
Is charcoal necessary?
No. Charcoal adds a distinctive smoky aroma, but an oven, air fryer, or stovetop grill pan can produce excellent results. If you want a smoky flavor, use a barbecue grill when available.
Can I make chicken tikka ahead of time?
You can marinate the raw chicken in advance and keep it refrigerated for the planned cooking period. You can also cook the chicken ahead of time and refrigerate it promptly, then reheat it thoroughly before serving. For the best texture, freshly grilled chicken is ideal.
What should I serve with chicken tikka?
Basmati rice, naan, roti, mint chutney, yogurt sauce, sliced onions, lemon wedges, cucumber salad, and a mild tomato curry all complement the dish.
How do I keep chicken breast juicy?
Cut it into evenly sized pieces, use a yogurt-based marinade, avoid excessive cooking, and check the internal temperature with a food thermometer. Remove it from the heat once it reaches 74°C, or 165°F.
Final Serving Suggestion
For the most appealing meal inspired by the picture, prepare a generous platter of red tandoori chicken tikka with lightly charred edges, a mound of fluffy basmati rice, a bowl of creamy orange tomato sauce, and a side of fresh mint chutney.
Finish the chicken with chopped coriander, a light dusting of chaat masala, and freshly squeezed lemon juice. Add warm naan or roti if you want a more substantial restaurant-style dinner.
The most important parts of this recipe are a thick, well-seasoned yogurt marinade, sufficient refrigerated marination time, evenly sized chicken pieces, properly controlled cooking heat, and careful temperature checking. Follow these steps, and you can make flavorful, tender chicken tikka at home with a beautiful red coating and delicious grilled edges.
Enjoy your homemade restaurant-style Tandoori Chicken Tikka with rice, chutney, and your favorite sides.