 admin1
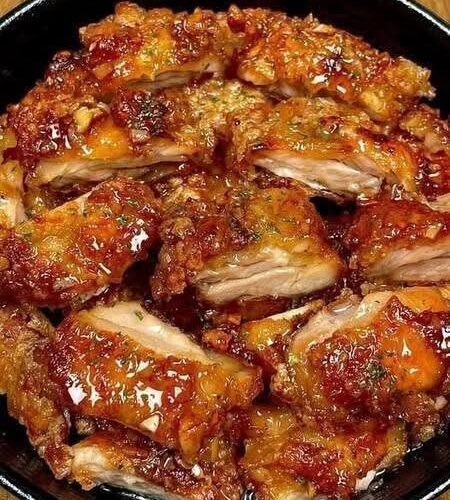
Sticky Honey Garlic Glazed Chicken Wings: The Ultimate Crispy, Juicy, and Flavorful Recipe
Sticky honey garlic chicken wings are a delicious combination of crispy chicken skin, tender and juicy meat, fresh garlic, sweet honey, savory soy sauce, and a rich, glossy glaze that coats every piece beautifully. Inspired by the chicken wings shown in the picture, this recipe creates golden-brown chicken wings covered in a thick, flavorful sauce with a perfect balance of sweetness, garlic, and gentle savory notes.
These homemade chicken wings are ideal for family dinners, weekend gatherings, parties, game-day snacks, and special occasions. They look impressive when served in a bowl, yet they are surprisingly simple to prepare at home. The secret is to cook the wings until the skin becomes golden and crisp, then coat them in a freshly prepared honey garlic sauce that clings to the surface without making the chicken soggy.
Unlike ordinary chicken wings that rely on a simple seasoning blend, this recipe builds flavor in layers. The chicken is first seasoned with aromatic spices, then cooked until tender, and finally tossed in a homemade sauce made with honey, garlic, soy sauce, butter, and a touch of vinegar. The result is a sticky, shiny coating that brings sweetness, richness, and savory depth to every bite.
Recipe Overview
Preparation time: 20 minutes
Marinating time: 30 minutes to 2 hours, optional
Cooking time: 40–50 minutes
Sauce preparation time: 10 minutes
Total time: Approximately 1 hour and 20 minutes
Servings: 4–6 people
Cuisine: Asian-inspired homemade comfort food
Cooking method: Oven-baked, with air fryer and stovetop options
Main ingredients: Chicken wings, honey, garlic, soy sauce, butter, and seasonings
Difficulty level: Easy to intermediate
Why You Will Love This Honey Garlic Chicken Wings Recipe
The first thing you will notice about these wings is their beautiful appearance. The sauce creates a deep amber glaze that shines under the light, while the garlic and seasonings add texture and color. Each wing looks richly coated, making the dish especially appealing when served as the centerpiece of a meal.
The flavor is equally satisfying. Honey provides natural sweetness, garlic gives the sauce its unmistakable aroma, soy sauce contributes saltiness and umami, and butter creates a smooth, rounded finish. A small amount of vinegar or lemon juice balances the sweetness and keeps the glaze from tasting too heavy.
Another advantage is versatility. You can make the wings mildly sweet, slightly spicy, extra garlicky, or more savory according to your preference. You can also prepare them in the oven or air fryer without deep-frying them in large amounts of oil.
Most importantly, this recipe uses everyday ingredients that are easy to find in many supermarkets. You do not need a complicated marinade, special equipment, or restaurant-style cooking experience to create delicious honey garlic chicken wings at home.
Ingredients for the Chicken Wings
Main Chicken Ingredients
2 pounds (900 grams) chicken wings
1 tablespoon olive oil or neutral cooking oil
1 teaspoon salt, adjusted to taste
1 teaspoon freshly ground black pepper
1 teaspoon garlic powder
1 teaspoon onion powder
1 teaspoon paprika
½ teaspoon smoked paprika, optional
½ teaspoon ground ginger
1 tablespoon cornstarch, optional, for a crispier coating
½ teaspoon baking powder, optional, for extra-crispy oven-baked skin
Use baking powder rather than baking soda if you want to improve the crispiness of the skin. Baking soda is more alkaline and can produce an unpleasant flavor when substituted in the same amount.
Ingredients for the Honey Garlic Sauce
⅓ cup honey
4–5 cloves fresh garlic, finely minced
¼ cup low-sodium soy sauce
2 tablespoons unsalted butter
2 tablespoons water
1 tablespoon rice vinegar or apple cider vinegar
1 tablespoon ketchup, optional, for a richer and slightly tangy sauce
1 teaspoon freshly grated ginger, optional
½ teaspoon chili flakes, optional
¼ teaspoon black pepper
1 teaspoon cornstarch mixed with 1 tablespoon cold water, optional, for thickening
1 teaspoon sesame oil, optional
Ingredients for Garnishing
1 tablespoon finely chopped fresh parsley or spring onion
1 teaspoon sesame seeds, optional
A small pinch of chili flakes, optional
Fresh lemon wedges, optional
The garnish is not essential, but a little fresh green color contrasts beautifully with the dark, glossy sauce. Sesame seeds also provide a subtle nutty flavor that complements the honey and garlic.
Choosing the Best Chicken Wings
The quality of the chicken makes a noticeable difference in the final result. Fresh chicken wings generally have a clean smell, a moist surface, and a natural pink color. Avoid chicken that has an unpleasant odor or feels unusually sticky.
You can purchase whole chicken wings and separate them into drumettes and flats, or buy wings that have already been divided. Drumettes resemble small drumsticks, while flats have two narrow bones and a flatter shape. Both work well in this recipe.
If you use frozen wings, thaw them completely in the refrigerator before cooking. Pat the thawed wings dry with paper towels, because excess moisture prevents the skin from becoming properly crisp.
For the best texture, choose wings that are similar in size. This helps them cook evenly, so smaller pieces do not dry out while larger pieces remain undercooked.
Step 1: Prepare the Chicken Wings
Begin by placing the chicken wings on a clean cutting board. If the wings are whole, separate them at the joints using a sharp kitchen knife. Remove the wing tips if desired, saving them for homemade chicken stock.
Transfer the prepared wings to a large bowl. Use paper towels to dry the surface thoroughly, paying particular attention to the folds around the joints.
Drying is one of the most important steps in this recipe. Moisture on the surface creates steam during cooking, which makes it harder for the skin to develop a crisp, golden exterior. Removing excess moisture allows the seasonings to adhere better and helps the wings brown more evenly.
Once the wings are dry, inspect them for any remaining feather shafts and remove them if necessary.
If you have enough time, place the uncovered wings on a tray in the refrigerator for 30 minutes to several hours. This helps the surface dry further and can improve crispiness. Keep raw chicken separate from ready-to-eat foods and clean any surfaces that come into contact with it.
Step 2: Season the Chicken
In a small bowl, combine the salt, black pepper, garlic powder, onion powder, paprika, smoked paprika, and ground ginger.
Sprinkle the seasoning mixture over the chicken wings. Add the olive oil and toss everything together until each piece is evenly coated.
The oil helps the seasonings distribute across the skin and encourages browning during cooking. Garlic powder and onion powder provide a savory foundation, while paprika gives the chicken a warm color and a mild peppery flavor.
If you want a crispier surface, combine the cornstarch and baking powder, then sprinkle the mixture evenly over the dry wings before tossing. Use aluminum-free baking powder if you prefer to avoid a possible metallic aftertaste.
Do not add the honey garlic sauce at this stage. Honey contains sugars that brown quickly and can burn during the longer cooking time required to cook chicken wings thoroughly.
For a deeper flavor, cover the seasoned chicken and refrigerate it for 30 minutes to 2 hours. You can also cook it immediately if you are short on time.
If the chicken has been refrigerated, place it directly on the prepared cooking tray when you are ready to cook. Do not leave raw chicken sitting at room temperature for an extended period.
Step 3: Prepare the Oven
Preheat your oven to 425°F (220°C).
Line a large baking tray with foil for easier cleaning, then place an oven-safe wire rack over the tray if you have one. Lightly grease the rack to help prevent sticking.
Arrange the chicken wings in a single layer, leaving a little space between each piece. Avoid stacking the wings or crowding them together, because the trapped moisture can prevent the skin from crisping.
A wire rack is especially helpful because it allows hot air to circulate around the chicken. The fat can drip onto the tray while the surface of the wings becomes more evenly browned.
If you do not have a wire rack, you can place the wings directly on a lightly greased baking tray. Turn them during cooking to encourage even browning.
Step 4: Bake the Chicken Wings
Place the tray in the preheated oven and bake the wings for approximately 40–50 minutes, depending on their size and your oven.
After the first 20–25 minutes, turn each wing using clean kitchen tongs. Return the tray to the oven and continue baking until the skin is golden brown and the chicken is cooked through.
The wings should look lightly crisp and browned before the sauce is added. If necessary, cook them for a few additional minutes, keeping a close eye on the surface to prevent excessive browning.
The most reliable way to check doneness is to use a food thermometer. Insert it into the thickest part of the meat without touching the bone. Chicken must reach an internal temperature of 165°F (74°C).
Although chicken wings can be tender at higher internal temperatures, they should always reach at least this safe minimum temperature.
Once cooked, remove the tray from the oven and let the wings rest briefly while you prepare the sauce. Keep the oven on if you plan to return the glazed wings to it for a final finish.
Step 5: Prepare the Honey Garlic Sauce
While the chicken cooks, prepare the sauce in a small saucepan.
Place the butter in the saucepan over medium-low heat. Allow it to melt gently, then add the minced garlic.
Cook the garlic for approximately 30–60 seconds, stirring frequently. It should become fragrant without turning dark brown. Burnt garlic can introduce bitterness, which may overpower the sweetness of the honey.
Add the grated ginger if using it, and stir briefly to release its aroma.
Pour in the soy sauce, honey, water, vinegar, black pepper, and optional ketchup. Stir slowly until the ingredients are thoroughly combined.
Allow the mixture to reach a gentle simmer. Reduce the heat and cook for approximately 3–5 minutes, stirring occasionally.
As the sauce heats, the honey dissolves into the liquid, the garlic infuses the mixture, and the soy sauce develops a richer flavor. The butter helps create a smooth, glossy finish.
Taste a small amount of the sauce using a clean spoon. If it is too sweet, add a little more vinegar. If it tastes too salty, add a small splash of water and a little additional honey if needed. For stronger garlic flavor, add a small amount of freshly minced garlic near the end of cooking.
For a spicy version, add chili flakes or a small amount of chili sauce.
Step 6: Thicken the Sauce
A good honey garlic glaze should cling to the chicken rather than run off immediately. The sauce may thicken naturally as it simmers, especially because honey becomes more viscous as the mixture cools.
If you prefer a thicker coating, mix 1 teaspoon of cornstarch with 1 tablespoon of cold water in a separate bowl.
Stir the mixture until no dry lumps remain. Slowly pour it into the gently simmering sauce while stirring continuously.
Cook for another 30–60 seconds, or until the sauce reaches your preferred consistency. Add a little water if it becomes too thick.
Avoid adding dry cornstarch directly to the hot saucepan, because it can form lumps that are difficult to remove.
Remember that the sauce will continue to thicken slightly as it cools. For this reason, remove it from the heat when it is thick enough to coat the back of a spoon but still easy to pour.
Step 7: Coat the Chicken Wings
Transfer the cooked chicken wings to a large, heat-safe mixing bowl.
Pour approximately two-thirds of the honey garlic sauce over the wings. Use tongs or a large spoon to toss them gently until each piece is covered.
The sauce should spread across the golden skin, collecting around the edges and settling into the natural folds of the chicken.
Add more sauce gradually until the wings are coated to your liking. You may not need every drop, depending on the number of wings and how thick you made the glaze.
Reserve a small portion of the sauce before it touches the cooked chicken if you want extra sauce for serving. Never reuse sauce that has been in contact with raw chicken unless it is thoroughly cooked.
For a more dramatic finish similar to the photograph, return the coated wings to the baking tray and brush a little extra glaze over their upper surfaces.
Step 8: Create the Sticky, Glossy Finish
Return the glazed wings to the oven for another 5–8 minutes.
This short final cooking period allows the glaze to adhere to the chicken and develop a beautiful shiny finish. Watch the wings carefully because honey contains sugar and can burn if exposed to excessive heat for too long.
You are looking for a deep golden-brown color with glossy highlights, not a blackened or bitter coating.
If you want additional caramelization, use the broiler for approximately 1–2 minutes at the end, but watch continuously and remove the wings as soon as the surface looks lightly caramelized.
Do not leave the wings unattended under the broiler. The sugar in the glaze can burn quickly.
Remove the tray from the oven and allow the wings to rest for a few minutes. The sauce will settle onto the surface and become slightly stickier as it cools.
Step 9: Garnish and Serve
Arrange the finished wings in a wide serving bowl or on a large platter.
Spoon any thick glaze remaining in the mixing bowl over the chicken. Sprinkle with chopped parsley or spring onion, and add sesame seeds or chili flakes if desired.
Serve the wings while warm for the best combination of tender meat, crisp edges, and sticky sauce.
For an attractive presentation, arrange some wings with their golden skin facing upward and place a few pieces at an angle to show the juicy meat inside. Keep extra sauce in a small serving bowl for anyone who prefers a stronger honey garlic flavor.
These wings can be served as an appetizer, a party snack, or a complete meal with rice and vegetables.
Air Fryer Honey Garlic Chicken Wings
The air fryer is an excellent option if you want crisp chicken wings with less oil and a shorter cooking time.
Preheat the air fryer to 400°F (200°C) for approximately 3–5 minutes, following your appliance’s instructions.
Prepare the chicken as described above, including drying the wings thoroughly and coating them with the seasonings. Arrange the pieces in a single layer in the air fryer basket. Cook in batches if necessary rather than overcrowding the basket.
Air-fry for approximately 20–25 minutes, turning the wings halfway through. Cooking time varies with wing size and the air fryer model, so check the internal temperature and ensure the chicken reaches 165°F (74°C).
While the chicken cooks, prepare the honey garlic sauce on the stovetop.
When the wings are fully cooked, transfer them to a bowl and toss with the sauce. Return the glazed wings to the air fryer for approximately 2–3 minutes at 375°F (190°C), checking frequently to prevent the honey from burning.
If your air fryer heats aggressively, skip this final step and serve the sauced wings immediately. They will still be flavorful and glossy.
For the crispiest results, avoid pouring sauce into the air fryer basket while the chicken is still cooking for an extended period. Sugary sauce can burn, and excess liquid may interfere with browning.
Stovetop Honey Garlic Chicken Wings
You can also prepare these wings on the stovetop if you do not have an oven or air fryer.
Season the chicken and heat a thin layer of cooking oil in a large, heavy-bottomed skillet over medium heat. Add the wings in a single layer, working in batches if needed.
Cook them on several sides until they are evenly browned. Reduce the heat, cover the skillet, and continue cooking as needed, turning the pieces periodically to prevent burning.
Because wing sizes and skillet temperatures vary, use a food thermometer to confirm that the thickest parts reach 165°F (74°C). If the skin browns too quickly before the meat is cooked through, reduce the heat and continue cooking gently.
Once the chicken is cooked, transfer it to a clean plate. Carefully drain excess fat from the pan, leaving only a small amount if desired.
Prepare the honey garlic sauce separately or in the cleaned skillet. Return the cooked wings to the pan and toss them in the glaze over low heat for 1–2 minutes.
Stir gently until the sauce coats the chicken evenly. Remove the pan from the heat as soon as the glaze becomes glossy and sticky.
This method creates flavorful wings with browned surfaces, although the skin may be less evenly crisp than oven-baked or air-fried wings.
Tips for Perfect Honey Garlic Chicken Wings
Dry the Chicken Thoroughly
Moisture is one of the main reasons chicken skin remains soft. Use paper towels to dry the wings before seasoning, and allow extra time for surface drying if possible.
Do Not Crowd the Tray
When wings are packed too closely together, they release moisture into the surrounding space. Leave gaps between pieces so hot air can circulate.
If you are preparing a large batch, use two trays or cook in batches rather than stacking the wings.
Add the Sauce Near the End
Honey and other sweet ingredients can burn before the chicken finishes cooking. Cook the wings first, then add the sauce during the final stage.
Use Fresh Garlic
Fresh garlic creates a stronger aroma and more complex flavor than garlic powder alone. Garlic powder is excellent in the chicken seasoning, but freshly minced garlic is especially important in the sauce.
Balance Sweetness and Saltiness
Honey can make the sauce sweet, while soy sauce contributes saltiness. Vinegar helps balance both flavors.
Taste the sauce before coating the wings and adjust it gradually. Small changes often make a noticeable difference.
Avoid Overcooking
Chicken wings contain connective tissue that becomes tender during cooking, but the meat can still dry out if cooked excessively. Use a thermometer and monitor the wings closely near the end of the cooking time.
Brush on Extra Glaze
For the glossy appearance shown in the photograph, brush a small amount of additional sauce over the wings immediately before serving.
Serve Fresh for the Best Texture
The wings are usually crispiest immediately after cooking. Over time, moisture from the glaze softens the skin. If crispness is important, serve the wings shortly after the final glaze is applied.
Flavor Variations
Spicy Honey Garlic Chicken Wings
For a spicy version, add 1–2 teaspoons of sriracha or another chili sauce to the honey garlic mixture. You can also include chili flakes, cayenne pepper, or a small amount of hot sauce.
The honey softens the heat while the garlic keeps the flavor savory. Begin with a small quantity of chili and increase it gradually until the sauce reaches your preferred level of spiciness.
Lemon Honey Garlic Chicken Wings
For a fresher flavor, add 1–2 teaspoons of lemon juice to the sauce after removing it from the heat.
A little finely grated lemon zest can also brighten the glaze. Avoid adding too much lemon juice, because excess liquid may make the sauce thinner and overpower the honey and garlic.
Extra Garlic Chicken Wings
If you love garlic, use six to eight cloves instead of four or five. Cook the garlic gently in butter to release its aroma without burning it.
For a stronger fresh-garlic flavor, stir a small amount of minced garlic into the sauce during the final minute of cooking.
Honey Garlic Butter Wings
For a richer, buttery finish, increase the butter to three tablespoons. The extra butter gives the sauce a smooth texture and a fuller flavor.
Keep the heat low when incorporating the butter, as excessive heat can cause the sauce to separate.
Sesame Honey Garlic Wings
Add a small amount of sesame oil to the finished sauce and garnish the wings with toasted sesame seeds.
Sesame oil has a strong flavor, so a little goes a long way. This variation pairs particularly well with steamed rice and sautéed vegetables.
Sticky Brown Sugar Honey Wings
For a deeper caramel-like flavor, replace one tablespoon of honey with one tablespoon of brown sugar.
The brown sugar adds a molasses-like note and can make the glaze richer. Because it also increases the risk of burning, apply the sauce near the end of cooking and watch the wings closely.
Ginger Honey Garlic Wings
Add one to two teaspoons of freshly grated ginger to the sauce. Ginger provides a warm, slightly peppery flavor that complements garlic and honey.
This variation works especially well when served with rice, noodles, or lightly seasoned vegetables.
Mild Honey Garlic Wings for Children
For a milder version, omit the chili flakes and hot sauce. Use a little extra honey if needed, while retaining the soy sauce and vinegar to maintain balance.
Allow the wings to cool to a comfortable serving temperature before serving, and remove any small loose bones or sharp fragments.
What to Serve with Honey Garlic Chicken Wings
These wings have a rich, sweet-savory glaze, so they pair well with simple side dishes that balance the flavor.
Steamed White Rice
Plain steamed rice is an excellent accompaniment because it absorbs the honey garlic sauce without competing with the chicken. Jasmine rice is particularly fragrant, while long-grain rice gives a lighter texture.
Serve the wings over rice or arrange them beside a generous spoonful of rice. Add a little spring onion for freshness.
Fried Rice
Vegetable fried rice turns the wings into a satisfying meal. Use cooked rice, carrots, peas, spring onions, and a modest amount of soy sauce.
Since the chicken glaze is already flavorful, keep the fried rice seasoning relatively light.
Roasted Potatoes
Crispy roasted potatoes provide a savory contrast to the sticky glaze. Toss potato wedges with olive oil, black pepper, paprika, and a little garlic powder, then roast until golden.
You can cook the potatoes separately while the wings bake, depending on your oven space and timing.
Steamed Broccoli
Broccoli adds freshness and a pleasant texture to the plate. Steam it until tender but still bright green, then finish with a little lemon juice or black pepper.
Its mild flavor balances the richness of the sauce.
Fresh Cucumber Salad
A cucumber salad offers a cool, refreshing contrast. Combine sliced cucumber with a little rice vinegar, chopped spring onion, and sesame seeds.
Keep the dressing light so that it complements rather than overwhelms the honey garlic glaze.
Coleslaw
Creamy or vinegar-based coleslaw provides crunch and a refreshing side for parties and casual dinners. A vinegar-based dressing is particularly useful when you want to balance the sweetness of the chicken.
Garlic Noodles
For a more filling meal, serve the wings with noodles tossed in a small amount of butter, garlic, and spring onion. Avoid using too much soy sauce or sugar in the noodles because the chicken already contains a rich glaze.
Corn on the Cob
Grilled, steamed, or roasted corn adds natural sweetness and a pleasant texture. A small amount of butter and black pepper is usually enough to season it.
How to Store Leftover Chicken Wings
If you have leftovers, allow the wings to stop steaming heavily and refrigerate them promptly in a clean, airtight container. Do not leave cooked chicken at room temperature for more than two hours, or one hour when the surrounding temperature is above 90°F (32°C).
Refrigerated cooked chicken wings should generally be eaten within 3–4 days.
If possible, store the wings with only enough sauce to coat them and keep any separately reserved sauce in another clean container. This can make reheating easier and help the skin retain more texture.
Label the container with the date so you can keep track of how long the leftovers have been stored.
How to Reheat Honey Garlic Chicken Wings
Reheating in the Oven
Preheat the oven to 350°F (175°C). Place the wings in a single layer on a baking tray and heat until the centers reach 165°F (74°C).
This usually takes approximately 10–15 minutes, depending on the size and quantity of the wings.
If the glaze looks dry, brush a little reserved sauce over the chicken during the final few minutes. Watch carefully because honey can burn.
Reheating in the Air Fryer
Preheat the air fryer to 350°F (175°C). Place the wings in the basket without overcrowding and heat for approximately 5–8 minutes, turning once if necessary.
Check that the chicken reaches 165°F (74°C) throughout. The air fryer can help restore some crispness to the skin, although the sticky glaze may remain slightly softer than it was when freshly prepared.
Reheating in a Skillet
Place the wings in a skillet over low to medium-low heat with one or two teaspoons of water. Cover briefly to warm the meat, turning the wings occasionally.
Remove the lid toward the end and allow excess liquid to evaporate. If you want a fresh glossy finish, add a small amount of separately stored sauce and toss gently until warmed through.
Avoid repeatedly reheating the same batch. Reheat only the portion you intend to eat.
Can You Freeze Honey Garlic Chicken Wings?
Yes. Cooked chicken wings can be frozen, although the skin may lose some crispness after thawing.
Allow the cooked wings to cool, then place them in a freezer-safe airtight container or bag. For the best quality, use them within approximately 2–3 months.
If possible, freeze the wings in a single layer first, then transfer them to a container. This makes it easier to separate individual portions later.
Thaw frozen wings in the refrigerator rather than on the kitchen counter. Reheat them in an oven or air fryer until they reach 165°F (74°C) throughout.
For an especially fresh finish, prepare a small new batch of honey garlic sauce and brush it over the reheated wings before serving.
Make-Ahead Instructions
You can prepare several parts of this recipe in advance, making it easier to serve a large group.
The chicken can be seasoned and refrigerated for up to 24 hours before cooking, provided it remains properly refrigerated and is handled safely. Keep it covered and separate from ready-to-eat foods.
The honey garlic sauce can also be prepared ahead of time. Allow it to cool, transfer it to a clean airtight container, and refrigerate it. Reheat it gently in a saucepan, stirring frequently and adding a small amount of water if it has become too thick.
For the best texture, cook the wings close to serving time. If you must prepare them ahead, refrigerate them promptly and reheat thoroughly before tossing them with freshly warmed sauce.
If you are serving guests, you can have the sauce ready and the chicken seasoned before they arrive. Then bake the wings, coat them, and finish them shortly before serving.
Common Mistakes to Avoid
Adding Honey Too Early
Honey can burn when exposed to high heat for an extended period. This is why the sauce is added after the wings are cooked, followed by only a short finishing period.
Using Wet Chicken
Wet chicken often steams instead of browning. Dry the wings carefully before applying oil and seasonings.
Making the Sauce Too Thin
A thin sauce may run off the wings and collect at the bottom of the serving bowl. Simmer it gently to reduce excess liquid, or use a small amount of cornstarch slurry if necessary.
Making the Sauce Too Thick
A glaze that is too thick can become sticky before it coats all the wings evenly. Add water a teaspoon at a time until the consistency is smooth and pourable.
Burning the Garlic
Garlic cooks quickly. Add it to gently melted butter and stir constantly. If it turns very dark or smells bitter, it is better to start the sauce again.
Overcrowding the Air Fryer
Air fryers work best when hot air can move around the food. Cook in batches if the basket is small.
Skipping the Temperature Check
Color alone cannot confirm that chicken is safe to eat. Always check the internal temperature of the thickest pieces with a food thermometer.
Adding Too Much Salt
Soy sauce is already salty, and the chicken seasoning also contains salt. Using low-sodium soy sauce gives you greater control over the final flavor.
Frequently Asked Questions
Are honey garlic chicken wings sweet?
Yes, they have a noticeable sweetness from the honey, but the garlic, soy sauce, and vinegar balance that sweetness. You can reduce the honey slightly if you prefer a more savory sauce.
Can I make these wings without soy sauce?
Yes. You can use a suitable reduced-sodium alternative or coconut aminos, adjusting the quantity to taste. Keep in mind that different substitutes have different levels of saltiness and sweetness.
Can I use bottled minced garlic?
Yes. Bottled minced garlic can save preparation time. Fresh garlic generally provides a brighter aroma, but bottled garlic can still produce a flavorful sauce.
Can I make the wings without butter?
Yes. Replace the butter with a small amount of olive oil or another neutral cooking oil. The sauce may taste slightly less rich, but the honey, garlic, and soy sauce will still provide plenty of flavor.
Why are my wings not crispy?
Common reasons include excess moisture, overcrowding, low oven temperature, and insufficient cooking time. Dry the wings thoroughly, arrange them in a single layer, and allow enough time for the skin to brown before adding the glaze.
Can I make this recipe gluten-free?
Yes, provided you use gluten-free soy sauce or a certified gluten-free alternative and check the labels of all other packaged ingredients. Standard soy sauce often contains wheat.
Can I use chicken drumsticks instead of wings?
Yes. Drumsticks work well with the same sauce, but they require a longer cooking time because they are larger. Check their internal temperature and cook until the thickest part reaches at least 165°F (74°C).
How do I make the sauce less sweet?
Reduce the honey and add a little extra vinegar or lemon juice. You can also increase the garlic slightly to give the sauce a stronger savory character.
How do I make the sauce thicker without cornstarch?
Simmer the sauce gently for a few extra minutes to reduce the water content. Stir frequently and keep the heat moderate to prevent the honey from burning.
Can I double the recipe?
Yes. Double the chicken and sauce ingredients, but cook the wings in batches or on multiple trays to maintain good airflow. If you are using a large saucepan, the sauce may need a little more time to reach the desired consistency.
Can I prepare the wings for a party?
Yes. Season the chicken in advance and prepare the sauce separately. Cook the wings shortly before serving when possible, then coat and glaze them in batches.
Keep cooked chicken hot until serving, and do not leave it at room temperature for extended periods. For a buffet, serve manageable portions and replenish them with freshly heated wings.
Approximate Nutritional Information
The following estimates are for one serving when the recipe makes six servings. Actual nutrition varies depending on the size of the wings, how much skin and fat remain, the quantity of sauce used, and whether the wings are cooked with additional oil.
Calories: Approximately 400–550
Protein: Approximately 25–35 grams
Carbohydrates: Approximately 15–25 grams
Fat: Approximately 25–38 grams
Sugar: Approximately 12–20 grams
Sodium: Approximately 600–1,000 milligrams
These figures are estimates rather than laboratory-tested nutritional values. Using less honey, choosing low-sodium soy sauce, and serving a smaller amount of glaze can change the nutritional profile.
Final Thoughts
These sticky honey garlic chicken wings bring together everything that makes homemade chicken wings so enjoyable: golden-brown skin, juicy meat, fragrant garlic, sweet honey, and a rich sauce that coats every piece.
The key to achieving the appearance and flavor shown in the photograph is to cook the chicken until it is thoroughly done and nicely browned before adding the glaze. Prepare the sauce separately, balance the sweetness with soy sauce and vinegar, and give the coated wings a brief final finish so the glaze becomes shiny and sticky.
Serve them with steamed rice, crispy potatoes, fresh vegetables, or a refreshing cucumber salad for a satisfying meal. You can also prepare them as a party appetizer, offering extra sauce on the side for anyone who loves an especially generous coating.
Once you master this basic recipe, it is easy to adjust the flavor with ginger, chili, lemon, sesame oil, or additional garlic. Whether baked in the oven, cooked in an air fryer, or finished in a skillet, these homemade honey garlic chicken wings are a delicious choice for anyone who enjoys tender chicken covered in a beautifully glossy, flavorful glaze.


