admin1
Chocolate and Vanilla Swirl Protein Fluff: A Rich, Creamy, Homemade Frozen Dessert
Introduction
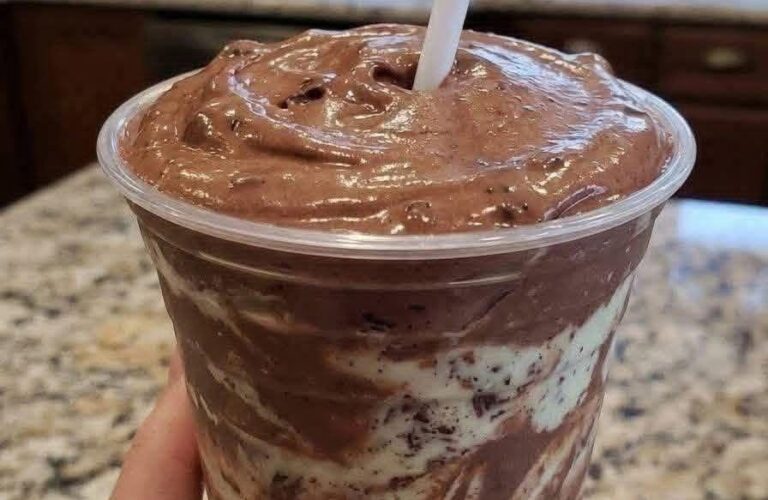
Chocolate and vanilla swirl protein fluff is a delicious, creamy, chocolate-filled dessert inspired by the popular soft-serve ice cream and chocolate mousse combinations found in ice cream shops. This homemade treat features a thick chocolate mixture swirled with a smooth vanilla cream, creating beautiful layers of chocolate and white cream throughout the cup. The top is rich, glossy, and chocolatey, while the inside contains contrasting ribbons of vanilla that make every spoonful taste slightly different.
The dessert in the picture has a thick, fluffy chocolate topping with creamy white swirls running through the sides. It looks like a cross between a chocolate Frosty, a soft-serve sundae, a frozen mousse, and a layered chocolate milkshake. The best part is that you can recreate a similar dessert in your own kitchen with simple ingredients, a blender or electric mixer, and a little patience.
This recipe is designed to create a thick, spoonable dessert rather than a thin drink. The chocolate mixture is made with cocoa powder, milk, yogurt, and optional protein powder, while the vanilla layer is prepared with whipped cream cheese, Greek yogurt, vanilla extract, or whipped topping. When combined gently, these two mixtures create a beautiful marbled appearance that looks impressive without requiring any complicated decorating techniques.
You can enjoy this chocolate and vanilla dessert as an afternoon treat, an after-dinner dessert, a frozen summer snack, or a homemade alternative to expensive ice cream shop creations. It can also be customized with chocolate chips, cookie crumbs, peanut butter, or other favorite toppings.
Recipe Overview
Preparation time: 20 minutes
Freezing time: 30–60 minutes, depending on the desired consistency
Total time: Approximately 50–80 minutes
Servings: 2 large dessert cups or 3–4 smaller servings
Difficulty level: Easy
Texture: Thick, creamy, fluffy, and mousse-like
Flavor: Rich chocolate with sweet vanilla cream
Equipment needed: Blender or food processor, mixing bowls, electric hand mixer or whisk, spatula, measuring cups, measuring spoons, and serving cups
Ingredients for the Chocolate Mixture
Main chocolate ingredients
1 cup cold milk, preferably whole milk or 2% milk
1 cup thick plain Greek yogurt
2 tablespoons unsweetened cocoa powder
2–3 tablespoons powdered sugar or another preferred sweetener, adjusted to taste
1 teaspoon vanilla extract
1 tablespoon chocolate syrup, optional
1 scoop chocolate or unflavored protein powder, optional
1–2 tablespoons milk powder, optional, for a thicker and creamier consistency
A small pinch of salt
Ingredients for extra thickness
1 frozen banana, sliced before freezing, optional
½ cup ice cubes, optional if using a powerful blender
2 tablespoons whipped topping, optional
1–2 tablespoons softened cream cheese, optional for a richer dessert texture
The frozen banana is useful if you want a naturally thick, frozen dessert. However, it will add a mild banana flavor. If you prefer a more traditional chocolate ice cream taste, leave it out and use thick yogurt, milk powder, and a small amount of whipped topping instead.
Protein powder is also optional. It can add flavor and help make the dessert more substantial, but it is not necessary for a successful recipe. If you use protein powder, begin with a small amount of additional milk only if the mixture becomes too thick to blend.
Ingredients for the Vanilla Cream Swirl
½ cup thick Greek yogurt
¼ cup softened cream cheese
2 tablespoons powdered sugar, or to taste
1 teaspoon pure vanilla extract
2 tablespoons whipped topping or lightly whipped cream, optional
1–2 teaspoons milk, only if needed
The vanilla mixture should be smooth, sweet, and thick enough to hold its shape when spooned into the chocolate mixture. Greek yogurt provides a pleasant creamy texture, while cream cheese creates a richer flavor. Whipped topping makes the mixture lighter and more similar to the white swirls visible in the photograph.
If you prefer a lighter vanilla flavor, use only Greek yogurt, vanilla extract, and powdered sugar. For a more dessert-like filling, include the cream cheese and whipped topping.
Optional Chocolate Toppings
You can finish the dessert with any of the following ingredients:
Chocolate shavings
Mini chocolate chips
Crushed chocolate sandwich cookies
A drizzle of chocolate syrup
Dark chocolate curls
A light dusting of cocoa powder
Crushed chocolate wafer biscuits
A spoonful of chocolate hazelnut spread
Chopped roasted nuts
A small amount of whipped cream
The toppings are entirely optional because the chocolate and vanilla layers already provide plenty of flavor. If you want the finished cup to resemble the picture most closely, keep the top thick and chocolatey and avoid adding too many toppings.
Choosing the Right Ingredients
The quality of the ingredients makes a noticeable difference in the final texture. Because this dessert contains relatively few components, each ingredient contributes to the overall flavor, thickness, or creaminess.
Milk: Cold milk helps blend the chocolate mixture smoothly. Whole milk produces a richer result, while reduced-fat milk creates a lighter texture. Start with less milk than you think you need, because adding too much can turn the dessert into a drink.
Greek yogurt: Thick Greek yogurt is particularly useful because it contributes creaminess and a slight tang that balances the sweetness of the chocolate. Regular yogurt may also work, but it can be more watery. If your yogurt contains excess liquid, drain it before measuring.
Cocoa powder: Unsweetened cocoa powder provides a deep chocolate flavor without making the mixture excessively sweet. Dutch-process cocoa can give the dessert a smoother, darker chocolate taste, while natural cocoa produces a slightly sharper flavor.
Sweetener: Powdered sugar blends easily into cold mixtures and helps prevent a grainy texture. You can adjust the quantity depending on whether your yogurt, chocolate syrup, or protein powder is already sweetened.
Vanilla extract: Vanilla improves both layers. It rounds out the cocoa flavor in the chocolate mixture and gives the white cream its familiar vanilla dessert taste.
Cream cheese: Softened cream cheese adds body and a cheesecake-like richness to the vanilla swirl. Make sure it is softened before mixing so that it blends without leaving small lumps.
Whipped topping: Whipped topping or properly whipped cream adds air and lightness. Fold it into the vanilla mixture gently to maintain a soft, fluffy texture.
Protein powder: If included, choose a flavor that works well with chocolate. Some powders absorb considerable liquid, so the mixture may need a little extra milk. Add the liquid gradually instead of pouring in a large amount at once.
Step-by-Step Instructions
Step 1: Prepare the ingredients
Before starting, gather all the ingredients and make sure the milk and yogurt are cold. Cold ingredients help the dessert remain thick during blending.
If you are using cream cheese for the vanilla swirl, remove it from the refrigerator a little earlier so that it softens. Softened cream cheese is much easier to mix into a smooth cream.
Measure the cocoa powder, sweetener, vanilla extract, and other ingredients before beginning. This makes the process easier and helps prevent the chocolate mixture from becoming too warm while you search for ingredients.
If you are using a frozen banana, peel it before freezing and cut it into small pieces. Frozen banana pieces are easier to blend than one large frozen piece.
Place the serving cups in the refrigerator while preparing the mixtures. Chilled cups can help the finished dessert stay cold a little longer.
Step 2: Make the chocolate base
Add the cold milk and Greek yogurt to a blender or food processor.
Add the unsweetened cocoa powder, powdered sugar, vanilla extract, and a small pinch of salt. If you are using protein powder, add it now.
The salt should be only a small pinch. Its purpose is not to make the dessert taste salty but to enhance the chocolate flavor and balance the sweetness.
If you are using frozen banana, add the pieces to the blender along with the other ingredients.
Blend on a low setting at first to combine the ingredients. Once the cocoa powder has been incorporated, increase the speed and blend until the mixture is smooth.
Stop the blender occasionally and scrape down the sides with a spatula if cocoa powder or yogurt sticks to the container.
Continue blending until the chocolate mixture has a uniform color with no visible dry cocoa powder or large lumps.
Step 3: Adjust the chocolate flavor
Taste a small spoonful of the chocolate mixture.
If you prefer a sweeter dessert, add another teaspoon of powdered sugar and blend briefly. If you want a darker chocolate flavor, add a little more cocoa powder.
If the mixture tastes too bitter, a little additional sweetener or vanilla extract can help balance it.
For a stronger chocolate flavor, add a small amount of chocolate syrup. You can also add a teaspoon of melted chocolate, provided it has cooled before being mixed in. Warm melted chocolate can change the texture of a cold mixture, so add it gradually.
Remember that cocoa powder becomes more noticeable when used in large amounts. It is better to add it gradually than to make the mixture too bitter.
Step 4: Make the chocolate mixture thick
The ideal chocolate base should be thick enough to coat a spoon. It should not pour like ordinary chocolate milk.
If the mixture is too thin, add one or two tablespoons of Greek yogurt or a little milk powder and blend again.
If you are using a frozen banana, allow the blender to process it completely before adding more ingredients.
If the mixture is too thick to blend, add milk one tablespoon at a time. Pause between additions and check the consistency before adding more.
For an extra-frozen texture, add a small quantity of ice cubes and blend until smooth. However, too much ice can dilute the chocolate flavor and create an icy texture.
Once the mixture reaches the desired consistency, transfer it to a chilled bowl and place it in the freezer for approximately 15–20 minutes if needed.
Do not leave it in the freezer unattended for too long. The goal is to chill and thicken the mixture, not to freeze it into a solid block.
Step 5: Prepare the vanilla cream cheese
Place the softened cream cheese in a clean mixing bowl.
Beat it with an electric mixer or whisk until smooth and creamy. If the cream cheese is still cold and firm, it may form lumps, so give it a little more time to soften.
Add the Greek yogurt, powdered sugar, and vanilla extract.
Mix until the ingredients are completely combined and the mixture has a uniform pale color.
Taste the vanilla cream and adjust the sweetness as needed.
If you want a stronger vanilla flavor, add a few additional drops of vanilla extract. Avoid adding too much liquid, as a thin vanilla cream will disappear into the chocolate mixture instead of forming distinct white swirls.
Step 6: Make the vanilla layer lighter
If you are using whipped topping or whipped cream, add it after the cream cheese and yogurt have been combined.
Fold the whipped topping into the mixture with a spatula using gentle movements. Avoid vigorous stirring because excessive mixing can reduce the airy texture.
The vanilla cream should be smooth, fluffy, and thick enough to form soft mounds when lifted with a spoon.
If the mixture appears too soft, refrigerate it for 10–15 minutes before assembling the dessert.
If it is too thick to spread, add a teaspoon of milk and mix gently. Repeat only if necessary.
For a slightly tangy flavor, leave the mixture as it is. For a sweeter dessert, add a little extra powdered sugar.
Step 7: Chill both mixtures
Place the chocolate mixture and vanilla cream in the refrigerator or freezer briefly, depending on their consistency.
The chocolate mixture can be placed in the freezer for 15–20 minutes, while the vanilla cream can remain in the refrigerator.
Check both mixtures before assembling. They should be cold and thick, but still soft enough to spoon into a cup.
If the chocolate mixture has become too firm, allow it to sit at room temperature for a few minutes and stir gently.
If the vanilla mixture becomes too warm, return it to the refrigerator before proceeding.
Keeping both mixtures cold makes it easier to create distinct layers without the white cream melting into the chocolate.
Step 8: Prepare the serving cups
Choose two large transparent dessert cups or several smaller clear cups.
Transparent cups are ideal because they show the chocolate and vanilla swirls through the sides. You can use ordinary drinking cups or small dessert glasses, provided they are clean and suitable for food.
Place the cups on a flat surface.
Prepare a spoon or small spatula for layering the mixtures. If you want a more decorative result, you can transfer the vanilla cream to a piping bag or a clean food-safe plastic bag with a small corner cut off.
A piping bag is optional. A teaspoon works perfectly well and creates a more rustic, homemade appearance.
Step 9: Add the first chocolate layer
Spoon a generous amount of the chocolate mixture into the bottom of each cup.
Use the back of a spoon to spread the mixture gently across the base. Do not press too firmly, because the dessert should remain light and creamy.
The first chocolate layer creates the foundation for the remaining swirls.
If the chocolate mixture is especially thick, allow it to settle naturally rather than trying to smooth every part of the cup perfectly.
A slightly uneven surface can actually make the finished dessert look more like a homemade ice cream shop creation.
Step 10: Add the vanilla cream
Spoon a small amount of vanilla cream over the chocolate layer.
You can place it in the center, along one side, or in several small portions around the inside of the cup.
For a visible white swirl, avoid covering the entire chocolate surface with one thick layer of vanilla cream. Instead, add a few spoonfuls in different positions.
The contrast between the white vanilla cream and the dark chocolate mixture creates the attractive marbled effect seen in the photograph.
If you are using a piping bag, pipe small ribbons of vanilla cream around the inside wall of the cup.
Step 11: Create the chocolate and vanilla swirls
Add another layer of chocolate mixture over the vanilla cream.
Use the back of a spoon to spread the chocolate gently without completely covering every white section.
Next, add another small amount of vanilla cream. Repeat this process until the cup is almost full.
You can alternate the layers in any pattern you prefer. For a more natural appearance, make the layers slightly uneven rather than creating perfectly straight horizontal lines.
If you want the vanilla streaks to extend down the sides, place small spoonfuls of vanilla cream close to the inside wall of the cup before adding the next chocolate layer.
Use a thin skewer or the handle of a teaspoon to draw one or two gentle curves through the mixtures. Avoid stirring repeatedly, because too much mixing will turn the dessert into a uniform light-brown color.
The goal is to create ribbons of white cream within the chocolate mixture while keeping both flavors recognizable.
Step 12: Fill the cup generously
Continue layering until the cup is nearly full.
Leave a little space at the top if you plan to add chocolate shavings or whipped cream. If you prefer the overflowing soft-serve appearance shown in the photograph, add a generous final mound of chocolate mixture.
Use a spoon to shape the top into a rounded swirl.
Move the spoon in a circular motion, gradually building a small mound in the center. You do not need to make the surface perfectly smooth.
The natural folds and glossy ridges make the dessert look rich and inviting.
If you want to recreate the pictured appearance, keep the top mostly chocolate-colored while allowing some vanilla streaks to remain visible around the sides.
Step 13: Shape the chocolate topping
Add a final spoonful of thick chocolate mixture to the top of each cup.
Use the back of a spoon to create gentle circular ridges. Start near the outside and move toward the center, allowing the mixture to form soft curves.
If the mixture is too runny to hold its shape, chill it for another 10–15 minutes before finishing the cups.
If it is too firm, stir it gently until it becomes spoonable again.
For a glossy finish, use a spatula to smooth the very top lightly. For a more textured soft-serve look, leave visible swirls and small peaks.
Avoid adding too much liquid chocolate syrup to the top, as it can run down the sides and soften the dessert.
Step 14: Add optional toppings
If desired, sprinkle a small amount of finely chopped chocolate, mini chocolate chips, or chocolate shavings over the top.
A light dusting of cocoa powder adds an elegant finish, while crushed chocolate cookies provide a pleasant crunch.
For a richer sundae-style dessert, add a small spoonful of whipped cream and a thin drizzle of chocolate syrup.
You can also add a few chopped nuts or a small amount of peanut butter.
Keep the toppings modest if you want the chocolate and vanilla swirl to remain the main feature.
Step 15: Chill the finished dessert
Place the assembled cups in the refrigerator for 15–20 minutes if you want a soft, mousse-like texture.
For a firmer frozen dessert, place them in the freezer for approximately 20–40 minutes and check the consistency regularly.
The exact chilling time depends on the ingredients, the temperature of your freezer, and the size of the cups.
Do not freeze the dessert for too long if you want to eat it with a spoon immediately. Yogurt-based mixtures can become quite firm when frozen solid.
If the dessert becomes too hard, transfer it to the refrigerator or leave it at room temperature briefly until it softens enough to serve.
Step 16: Serve and enjoy
Remove the cups from the refrigerator or freezer when the dessert reaches your preferred consistency.
Serve with a spoon or a wide straw, depending on how thick you have made the chocolate mixture.
A spoon is generally best for the thick, layered version shown in the picture.
Each spoonful should contain a combination of rich chocolate and smooth vanilla cream. The cocoa gives the dessert a deep chocolate flavor, while the vanilla layer provides a sweet, creamy contrast.
Serve immediately for the best texture and appearance.
How to Make the Dessert Extra Thick and Fluffy
The most important feature of this recipe is its thick consistency. A watery mixture will not hold the beautiful chocolate swirls, while an excessively frozen mixture will become difficult to spoon.
The following techniques can help you achieve the right result.
Use thick yogurt. Greek yogurt generally works better than thin regular yogurt. If your yogurt is watery, drain it through a fine sieve lined with clean cheesecloth before using it.
Start with less milk. You can always add more milk, but removing excess liquid is much more difficult. Begin with a small quantity and increase it gradually until the blender can process the mixture.
Chill before serving. A short chilling period helps the dessert become firmer and makes the layers easier to maintain.
Use milk powder when needed. A small amount of milk powder can help create a fuller texture without introducing much additional liquid.
Avoid over-blending. Blend until smooth, then stop. Excessive blending can warm the mixture and make it less thick.
Fold whipped topping gently. When preparing the vanilla layer, gentle folding helps retain its airy quality.
Do not overmix the layers. The chocolate and vanilla mixtures should remain separate enough to create visible swirls.
Use cold serving cups. Chilled cups help slow the softening process, especially on warm days.
How to Make a Version Without Protein Powder
Protein powder is not required to make a delicious chocolate and vanilla dessert.
To prepare a version without it, use one cup of thick Greek yogurt, a small amount of milk, cocoa powder, powdered sugar, and vanilla extract for the chocolate mixture.
If you want a more ice-cream-like texture, add half a frozen banana or a little whipped topping.
Blend until smooth, adding only enough milk to keep the mixture moving.
For the vanilla layer, combine Greek yogurt, cream cheese, powdered sugar, and vanilla extract.
Layer the two mixtures in the serving cups and chill until thick.
This version focuses on the traditional chocolate-and-vanilla flavor rather than additional protein ingredients. The exact nutritional content will depend on the type and quantity of yogurt, milk, sugar, and toppings used.
How to Make a Dairy-Free Version
You can adapt this recipe using suitable dairy-free alternatives.
Choose a thick, unsweetened plant-based yogurt, such as coconut or soy yogurt, and use your preferred dairy-free milk.
For the chocolate mixture, blend the plant-based yogurt with cocoa powder, sweetener, vanilla extract, and a small amount of plant-based milk.
For the vanilla layer, use dairy-free cream cheese and a suitable dairy-free whipped topping.
Coconut-based ingredients tend to produce a richer flavor, while soy-based yogurt may provide a more neutral taste.
Check the consistency carefully because plant-based yogurts vary considerably. Some are thick and creamy, while others contain more water and may need additional chilling.
If using dairy-free chocolate syrup or chocolate chips, check the ingredient label to make sure they meet your dietary requirements.
How to Make a Lower-Sugar Version
If you prefer a less-sweet dessert, reduce the powdered sugar in both mixtures and choose unsweetened cocoa powder and plain yogurt.
Taste the chocolate mixture before assembling the cups. Cocoa powder has a naturally bitter flavor, so add sweetener gradually until the balance is right for you.
You can also leave out the chocolate syrup and use unsweetened vanilla extract.
Keep in mind that cream cheese, milk, yogurt, and protein powders may contain varying amounts of naturally occurring sugars or added sweeteners. The final amount will depend on the brands and ingredients used.
A lower-sugar version does not need to be completely unsweetened. A small amount of sweetener can help the chocolate and vanilla flavors taste more balanced.
Flavor Variations
Chocolate Peanut Butter Swirl
For a chocolate peanut butter version, mix one tablespoon of smooth peanut butter into the chocolate mixture.
You can also add a small spoonful of peanut butter between the chocolate and vanilla layers.
Peanut butter creates a rich, nutty flavor that works especially well with cocoa powder. If it makes the mixture too thick, add a teaspoon of milk and blend briefly.
Chocolate Strawberry Cream
Prepare the chocolate mixture as directed and add a layer of finely chopped strawberries between the chocolate and vanilla cream.
For a smoother strawberry layer, mash a few strawberries and mix them with a spoonful of yogurt.
Fresh strawberries provide a fruity contrast to the chocolate. However, because fresh fruit contains water, use only a small quantity if you want to maintain a very thick texture.
Cookies and Cream Chocolate Fluff
Crush two or three chocolate sandwich cookies into small pieces.
Fold some of the crumbs into the vanilla cream and sprinkle a little more between the layers.
For the best texture, avoid crushing all the cookies into a fine powder. Small pieces provide a more noticeable crunch.
Mocha Chocolate Fluff
Add half a teaspoon of instant coffee powder to the chocolate mixture.
Dissolve it in a teaspoon of warm water first if necessary, then allow it to cool before adding it to the cold ingredients.
Coffee enhances the flavor of chocolate without necessarily making the dessert taste strongly of coffee. Adjust the quantity according to your preference.
Chocolate Mint Swirl
Add a very small amount of peppermint extract to the vanilla cream.
Peppermint extract is strong, so start with just a drop or two and taste before adding more.
The combination of mint, chocolate, and vanilla creates a flavor similar to a chocolate mint dessert.
Chocolate Hazelnut Cream
Add a small spoonful of chocolate hazelnut spread to the chocolate mixture.
You can also use a little as a thin layer between the chocolate and vanilla cream.
This variation produces a richer, sweeter dessert. Reduce the added sugar if the spread is already sweet enough.
Chocolate Banana Swirl
Blend half a frozen banana into the chocolate mixture and layer it with the vanilla cream.
Banana naturally thickens the chocolate base and complements cocoa powder.
The banana flavor will be noticeable, especially if you use a whole banana, so this variation is best for people who enjoy the chocolate-and-banana combination.
Double Chocolate Crunch
Add finely chopped dark chocolate or mini chocolate chips between the layers.
The small chocolate pieces create a contrast with the smooth yogurt-based cream.
For a more intense chocolate flavor, use dark chocolate. For a sweeter result, use milk chocolate.
Common Mistakes and How to Avoid Them
The Chocolate Mixture Is Too Runny
A thin mixture may result from using too much milk, thin yogurt, or too many ice cubes.
To correct it, add a little more thick Greek yogurt and blend briefly. You can also chill the mixture for 15–20 minutes to help it firm up.
Avoid adding large amounts of cocoa powder to thicken it, because too much cocoa can make the dessert bitter and powdery.
The Chocolate Mixture Is Too Bitter
Unsweetened cocoa powder can produce a strong flavor, especially if too much is added.
Add a little powdered sugar or another suitable sweetener, then blend again.
A small amount of vanilla extract can also help round out the flavor.
The Vanilla Cream Contains Lumps
This usually happens when the cream cheese is too cold.
Allow it to soften before mixing and beat it until smooth before adding the yogurt.
If lumps remain, use an electric hand mixer to blend the mixture thoroughly.
The White Swirls Disappear
If the chocolate mixture is too thin or the vanilla cream is too soft, the layers may blend together.
Thicken both mixtures and chill them before assembling.
When layering, spoon the chocolate mixture gently over the vanilla cream instead of pouring it quickly into the cup.
Use only one or two gentle swirls with a skewer if you want a marbled appearance.
The Dessert Becomes Too Hard in the Freezer
Yogurt-based desserts can become firm when frozen because they do not contain the same balance of fat, sugar, and stabilizers as commercial ice cream.
Allow the dessert to soften in the refrigerator before serving.
For future batches, use a little more yogurt or whipped topping and avoid freezing the dessert for an extended period.
The Dessert Tastes Too Much Like Yogurt
Plain Greek yogurt has a naturally tangy flavor.
You can balance it with a little more vanilla, cocoa powder, or sweetener. Cream cheese and whipped topping can also make the vanilla layer taste more like a traditional dessert cream.
Choose a mild-flavored yogurt if you prefer a less tangy result.
The Mixture Looks Grainy
Graininess can occur when sweetener does not dissolve properly, cocoa powder is not blended thoroughly, or protein powder absorbs liquid unevenly.
Use powdered sugar, sift the cocoa powder before blending, and add protein powder gradually.
Blend until smooth, but avoid overheating the mixture through prolonged blending.
Storage Instructions
Because this recipe contains yogurt and other perishable ingredients, keep the dessert refrigerated or frozen rather than leaving it at room temperature.
Refrigerator: Store covered portions in the refrigerator and ideally enjoy them within 1–2 days for the best texture and flavor.
Freezer: Store the dessert in a freezer-safe, airtight container. For best quality, use it within approximately 1–2 weeks, although the texture may change during storage.
Thawing: If frozen solid, transfer the dessert to the refrigerator and allow it to soften until spoonable.
Refreezing: Avoid repeatedly thawing and refreezing the dessert, as this can cause ice crystals to form and reduce the creaminess.
Serving: Use a clean spoon each time you serve the dessert, and return unused portions to the refrigerator or freezer promptly.
If you have added fresh fruit, whipped cream, or other perishable toppings, the texture may deteriorate more quickly. Add delicate toppings shortly before serving whenever possible.
Frequently Asked Questions
Can I make this dessert without a blender?
Yes. You can use a hand mixer or whisk, provided the ingredients are soft enough to combine smoothly.
Mix the yogurt, cocoa powder, sweetener, and vanilla thoroughly in a bowl. If you are using frozen banana or ice, however, a blender is much more suitable.
Can I use ordinary yogurt instead of Greek yogurt?
Yes, but ordinary yogurt is often thinner. Drain it through a fine sieve or cheesecloth to remove some excess liquid before using it.
This will help the chocolate mixture maintain a thicker consistency.
Can I prepare the dessert the night before?
Yes. Assemble the cups, cover them, and refrigerate them overnight.
The layers may soften or blend slightly as they sit, so for the sharpest contrast, keep the chocolate mixture and vanilla cream separate until closer to serving time.
If you freeze the cups overnight, allow them to soften before serving.
Can I use chocolate milk?
You can use chocolate milk, but it will change the sweetness and chocolate intensity.
If using chocolate milk, reduce or omit the additional sweetener and adjust the cocoa powder to taste. Begin with a small amount of liquid and add more only when needed.
Can I make the dessert without cream cheese?
Yes. Replace the cream cheese with additional thick Greek yogurt or a suitable whipped topping.
The flavor will be less rich and more tangy, but the dessert can still be delicious.
How can I make the dessert look like the photograph?
Use clear cups, a thick chocolate mixture, and a contrasting white vanilla cream.
Add the mixtures in uneven layers, placing some vanilla cream close to the sides of the cup. Finish with a generous chocolate mound and shape the top into soft circular ridges with a spoon.
Keep the mixtures cold throughout assembly to help the swirls remain visible.
Can I make one large batch?
Yes. Multiply the ingredients according to the number of servings you need.
If your blender is small, prepare the chocolate mixture in batches rather than overfilling the container.
You can prepare a larger quantity of vanilla cream separately and assemble the cups when ready to serve.
Is this a frozen dessert or a milkshake?
It can be either, depending on how you prepare it.
For a thick, spoonable dessert like the one pictured, use less milk and chill the mixture until firm. For a drinkable milkshake, increase the milk gradually until the desired consistency is reached.
Can I use cocoa and melted chocolate together?
Yes. Cocoa powder provides a deep chocolate flavor, while melted chocolate can add richness.
Allow melted chocolate to cool before adding it, and blend it thoroughly into the chocolate base. If it is too warm, it may soften the cold mixture or form small chocolate pieces.
Why does my dessert melt quickly?
A homemade yogurt-based dessert generally has a different composition from commercial soft-serve ice cream. It may soften more quickly, especially in a warm room.
Keep the cups chilled until serving, use thick ingredients, and avoid leaving them on the counter for long periods.
Serving Suggestions
Serve this chocolate and vanilla swirl dessert in transparent cups to highlight the contrasting layers.
For a simple presentation, use a chilled spoon and leave the top uncovered so the chocolate ridges remain visible.
For a more elaborate dessert, place a few chocolate shavings on top and serve with fresh strawberries on the side.
You can also serve the mixture in small dessert bowls after a family meal. Smaller portions are especially suitable when the dessert is rich or contains several sweet ingredients.
For a dessert table, prepare several cups with slightly different toppings. One can have chocolate chips, another crushed cookies, and another a light dusting of cocoa powder.
If you are serving guests, assemble the cups shortly before serving so that the vanilla ribbons remain distinct and the chocolate topping retains its shape.
Final Recipe Notes
The secret to a successful chocolate and vanilla swirl dessert is the balance between thickness, creaminess, and contrast. The chocolate mixture should be rich enough to hold its shape, while the vanilla cream should be soft enough to spoon but firm enough to remain visible.
Start with cold ingredients, use thick yogurt, add milk gradually, and chill the mixtures before layering. Do not overmix the two flavors, because the contrasting white and chocolate ribbons are what make this dessert visually appealing.
Most importantly, adjust the recipe to suit your taste. You can make it sweeter, more chocolatey, more vanilla-forward, fruitier, or crunchier by changing the optional ingredients without altering the basic method.
This homemade chocolate and vanilla swirl dessert is a simple way to create an ice cream shop-inspired treat in your own kitchen. With its thick chocolate topping, creamy vanilla ribbons, smooth texture, and customizable flavors, it makes a satisfying dessert for anyone who enjoys the combination of chocolate and vanilla.